|
0 registered members (),
276
guests, and 2
spiders. |
|
Key:
Admin,
Global Mod,
Mod
|
|
|
Forums69
Topics113,822
Posts1,342,983
Members1,645
| |
Most Online731
Jan 14th, 2020
|
|
|
 Bravo 20vt Project (getting pic heavy)- On Track!
#947099
Bravo 20vt Project (getting pic heavy)- On Track!
#947099
07/12/2009 15:28
07/12/2009 15:28
|
ninja
Unregistered
|
ninja
Unregistered
|
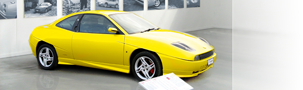
For the last 3 years ive been running my bravo HLX (on and off) as a second car for show purposes. i bought the car 5 years ago and put a lot of effect into cosmeticaly modifying the car. I was lucky enough to be in a position to be able to afford a 20vt coupe without selling my pride and joy  but i always wanted to do a 20vt conversion and ive always wanted a track orientated car. So thanks to this forum and a few of its members (your assistance and advise will continue to be required troughout the duration ) ive combined the 2 elemements and started my project. The Base: Fiat Bravo HLX 1.8 1996 ink black 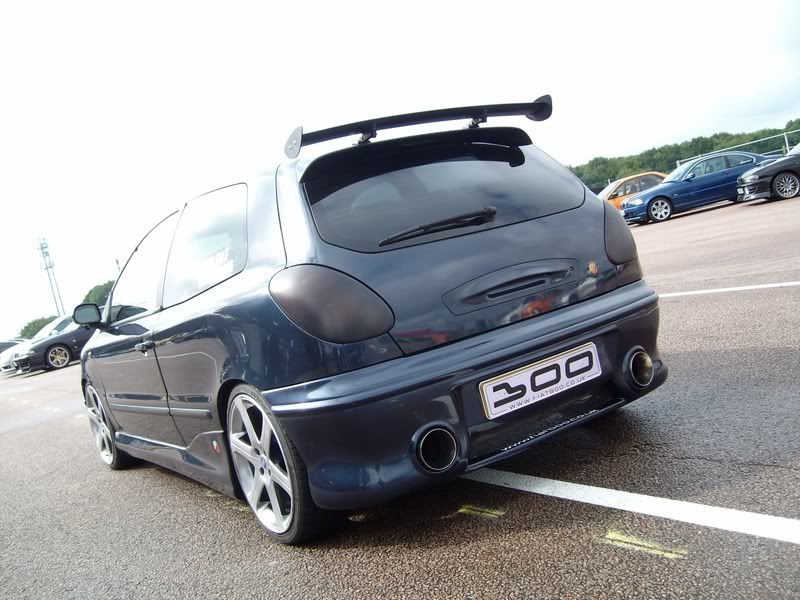 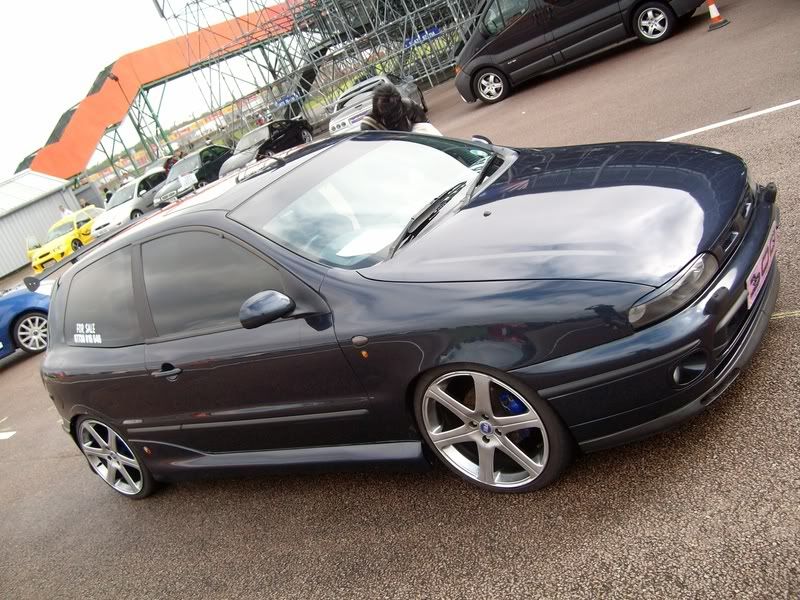 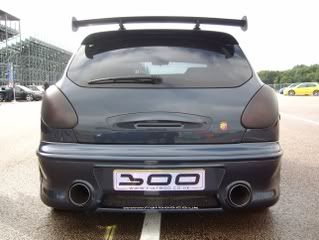 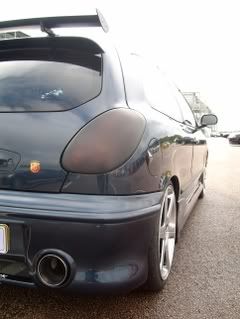 Mods: abarth front bumper/ Laguna splitter abarth skirts custom p&a rear bumper custom cat-back powerflow exhaust twin 5" tips Fiat coupe 20vt alloys -35mm pi springs etech alloy spoiler smoked side repeaters colour coded delocked merea handles merea poly headlights prof tinted windows tinted tail lights custom rear brake light (glows 'abarth') philips vision plus bulbs lightbrows full varad undercar neons k&n 57i induction kit chrome bonnet lifters corbeau carrera bucket seats corbeau sub frames footwell neons custom switches in centre column for all neons abarth car mats I aquired a 20vt as a donor vehicle earlier this year, the previous owner had already started breaking, but most the neccessary parts were still attached 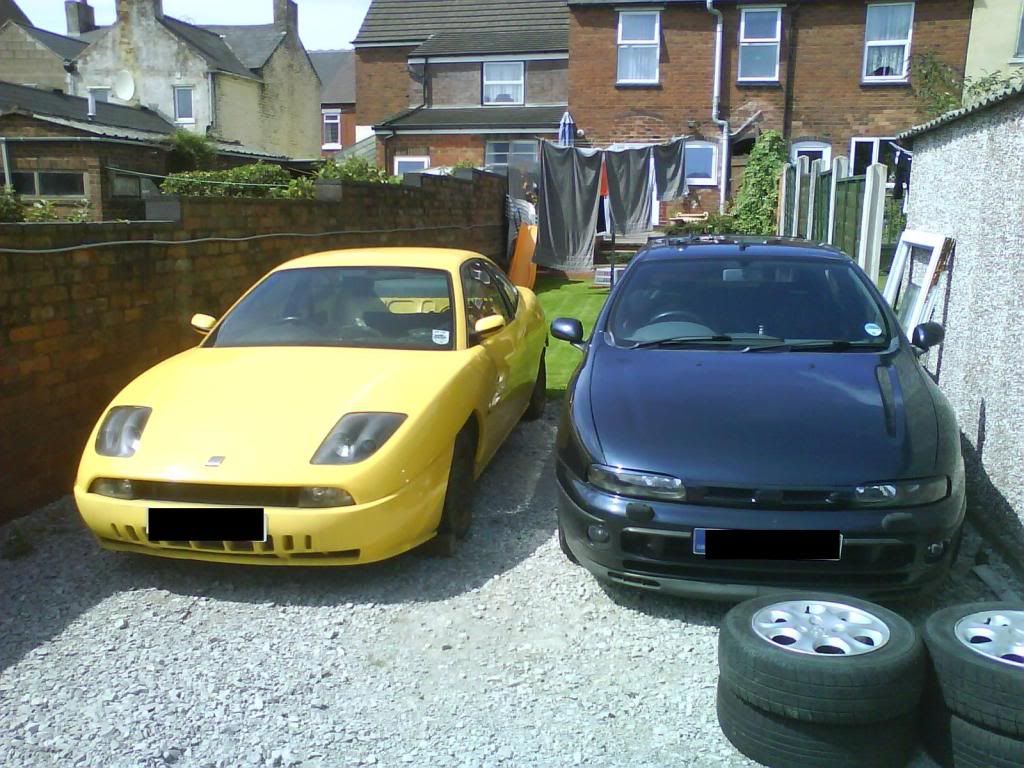 The Plan: 20vt conversion including: rear subframe including rear disc conversion front subframe, wishbones, hubs suspension, running gear (drive shafts etc), front brakes, steering rack, engine, ecu, fuel pump, As mention the car will be track orientated, so i'm looking for a good balance of handling, braking, and power. modified parts collected so far (i'll update this bit as and when) Power: ported inlet manifold 3.8 bar FPR port matched exhuast manifold GT2560 turbo FMIC Greddy EBC 3in downpipe with 5 stud v-band 2.5in decat custom midpipe NGK 7 plugs SIP Apexi filter Handling: solid rear bushes Polybushed wishbones seam welded subframe FK coilovers (20vt) with camber adj mod HEL braided brake lines Whiteline 24mm ARB Front strut brace Nigels lower brace 20vt brembos Other: VDO oil temp VDO oil pressure VDO volt meter AFR intake temp sensor still to source: DBA/3G disc EBC yellow pads adjustable fan controller Possibly a roll cage!! The project will be an ongoing one, with the suspension and brakes components first, then the engine will be re-built to spec at some point early next year before fitment. Wish me luck  Ninja
|
|
|
Re: Bravo 20vt Project
[Re: ]
#947215
07/12/2009 18:47
07/12/2009 18:47
|
ninja
Unregistered
|
ninja
Unregistered
|
i actually started the project a few weeks ago, progress so far: the coupe has been stripped, and the shell has been scrapped. bravo front subframe, wishbones, struts, hubs and calipers were removed. with the access under the car the coupe track rods have been swapped onto bravo steering rack, (cores are the same bar a gear linkage mounting so i cant swap rack just yet but the rack core and transmition tunnel will be swap with engine) 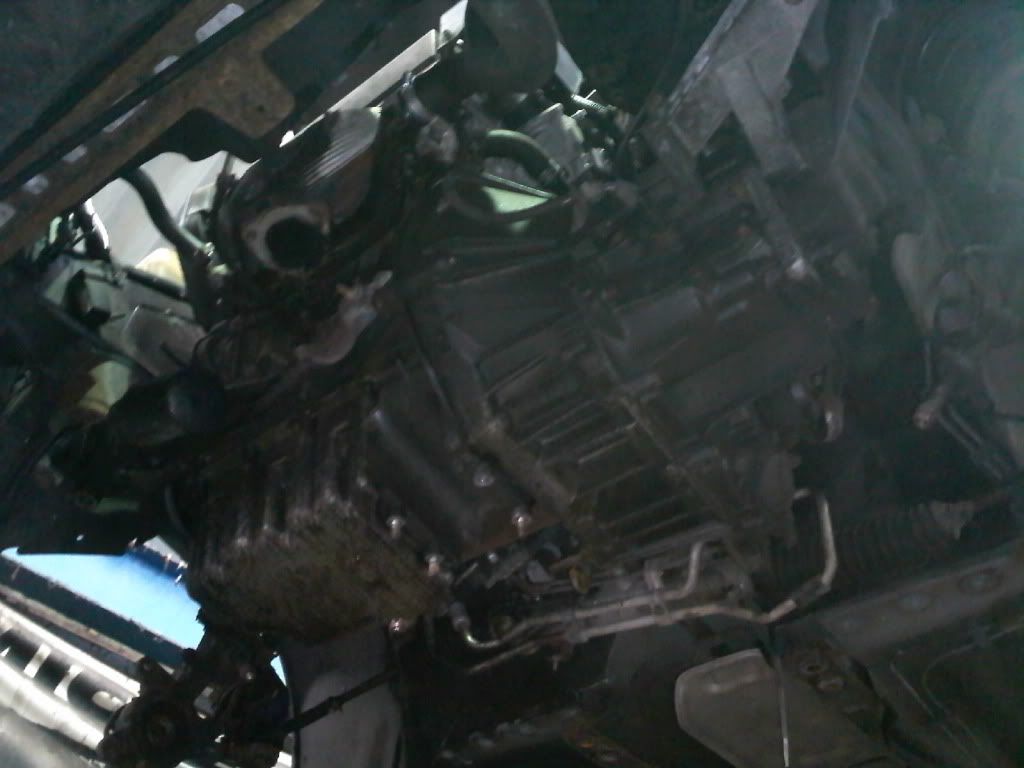 coupe subframe was stripped, welded, then fitted with polybush wishbones, then the assembly was fitted, 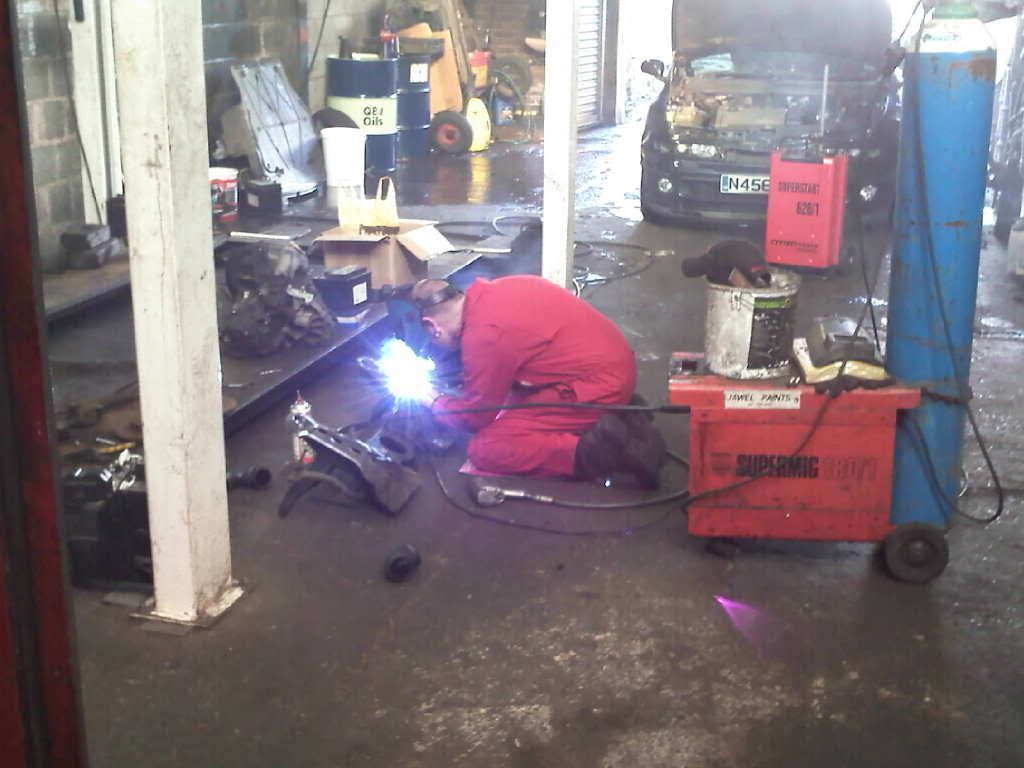 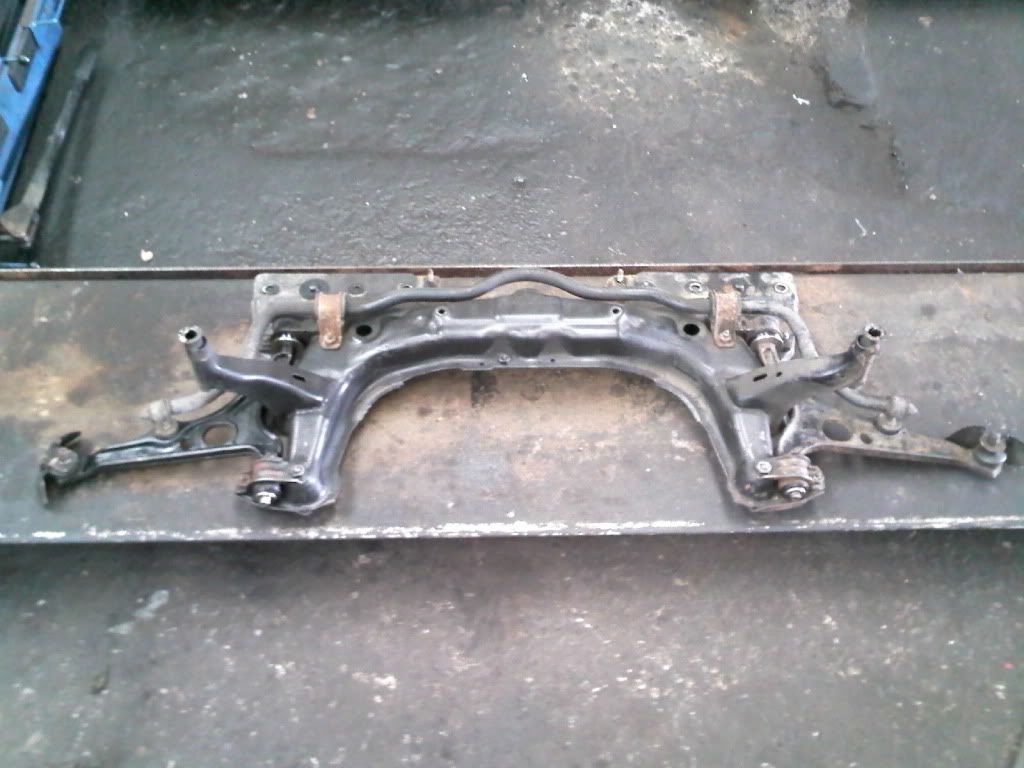 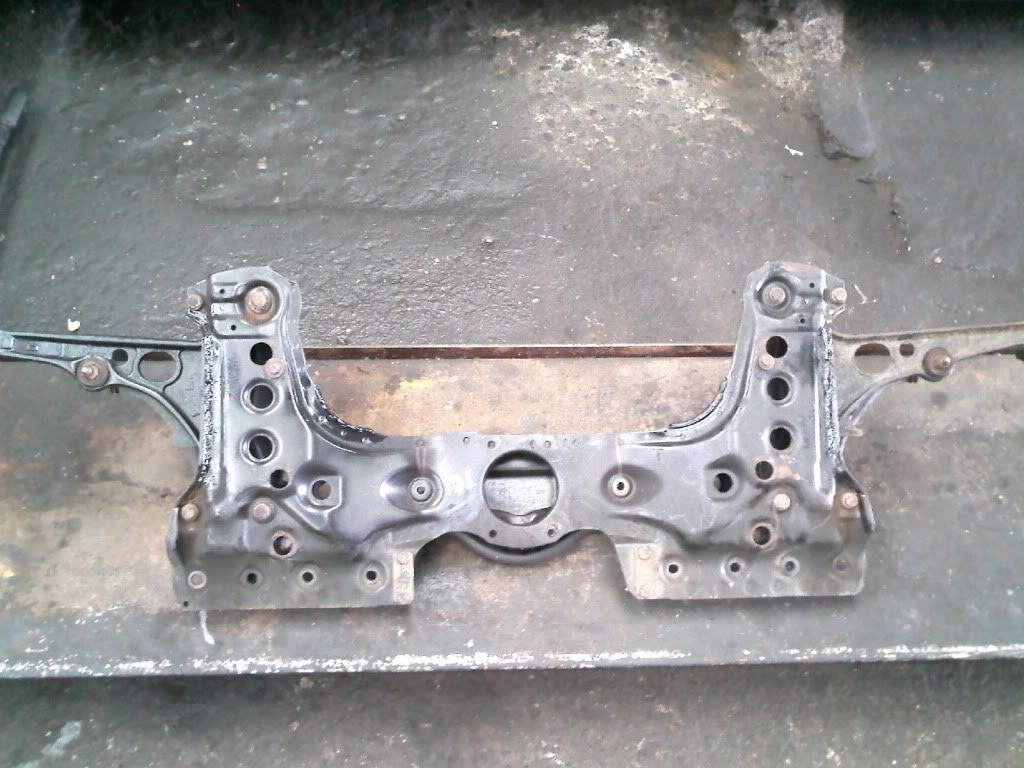 coupe hubs and standard struts fitted for now,( top mounts fitted directly and suprisingly the 1.8 drive shafts still fit despite the coupe wishbones being marginally wider ) 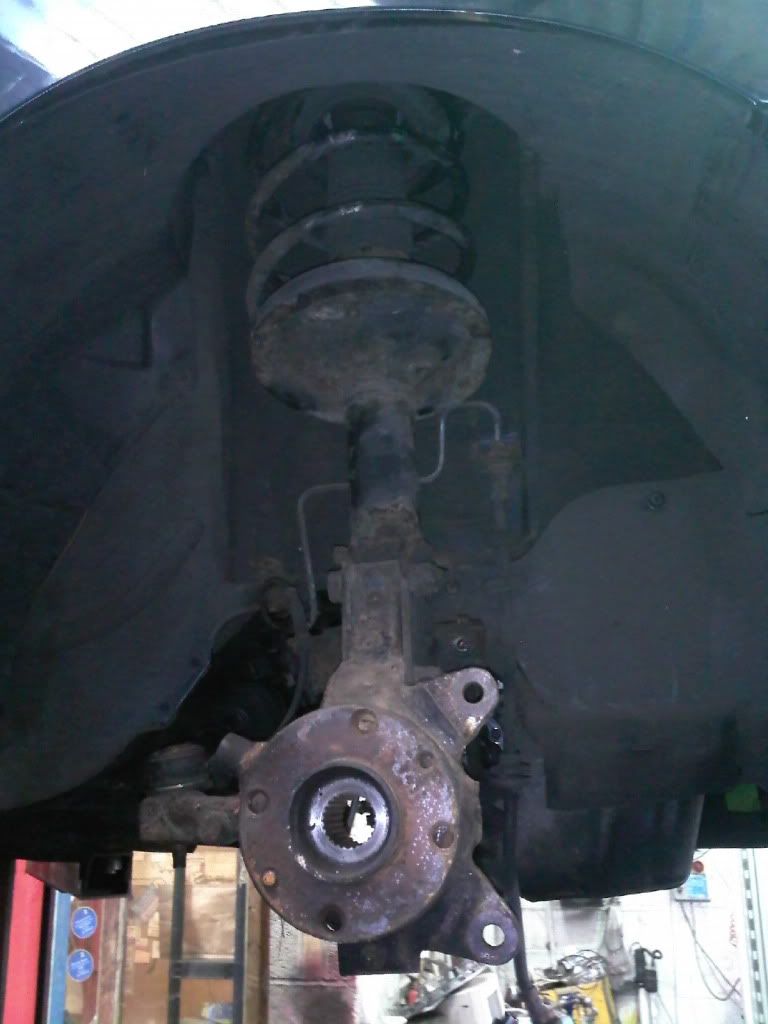 brembos painted and fitted, abs sensors plug straight in, and bravo flexipipes fit straight on (for now). 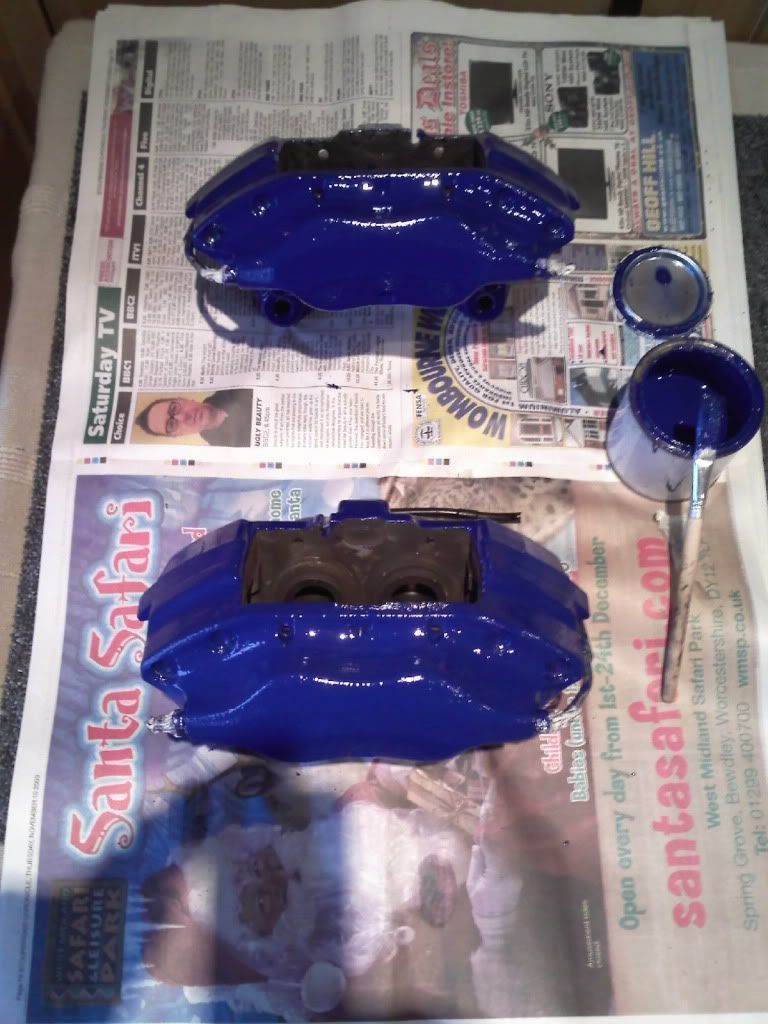 coupe 20vt wheels are required for brembo clearance, and the wider track is just about ok with the hlx wings, but i think i will fit wider arches at a later date. 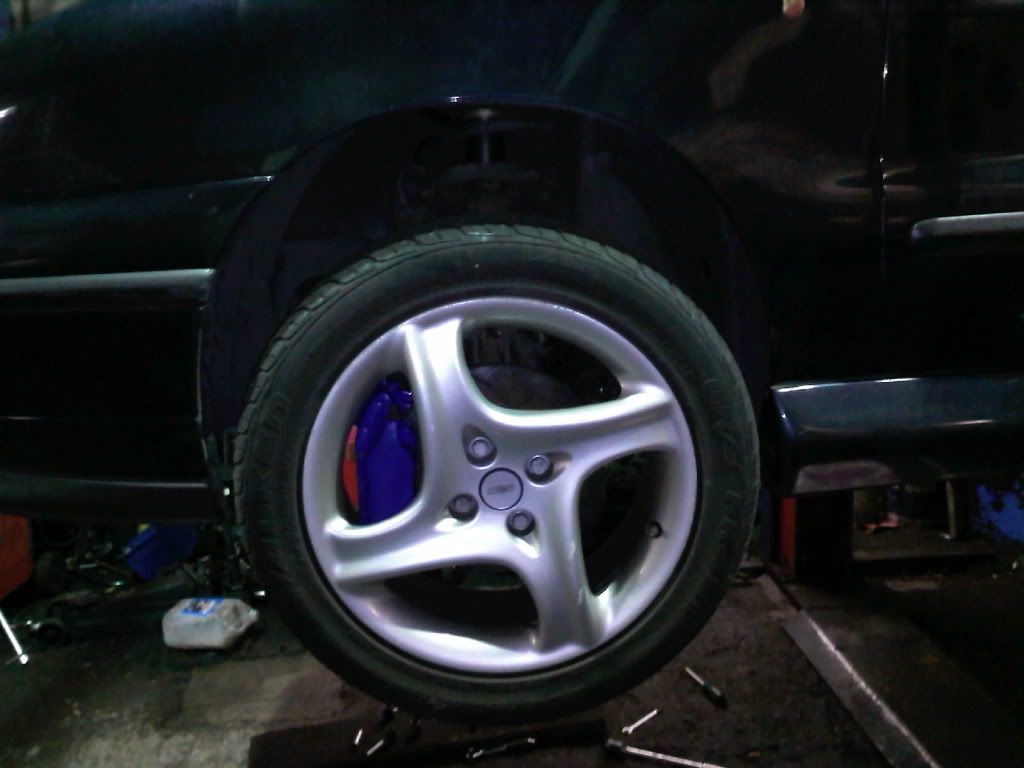 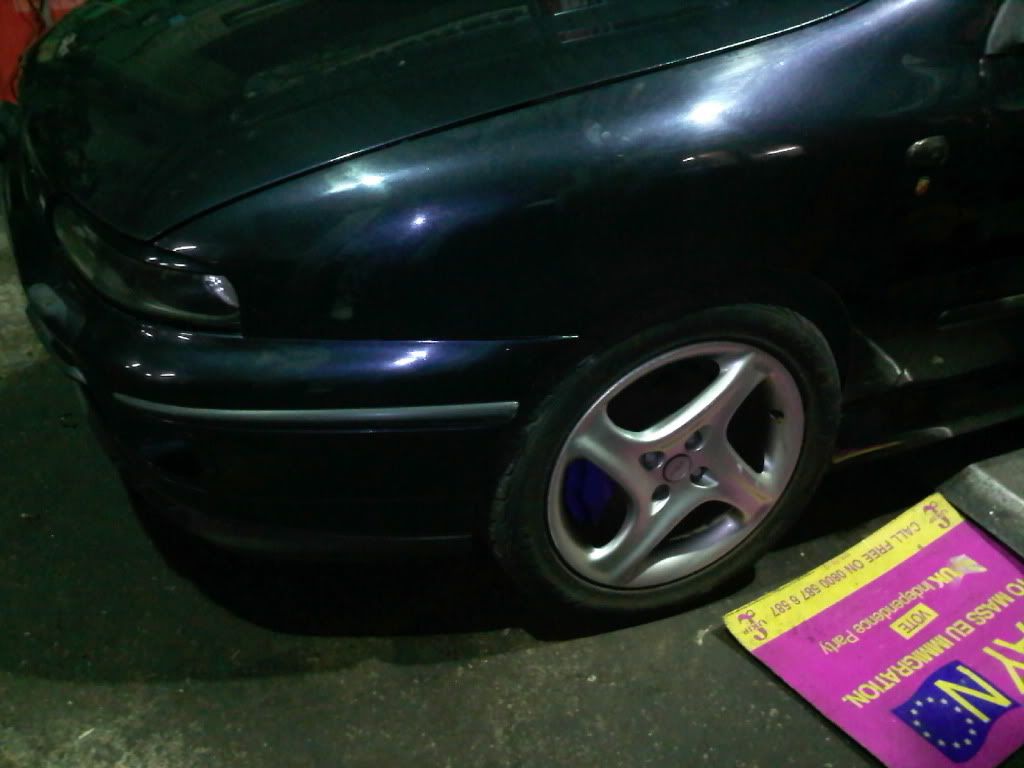 unfortunately i snapped one of the manifold studs removing the downpipe, but it went back together with just 2 (sounds a bit rough tho  ). other than that and having the clean the a few threads with a tap everything went pretty smoothly, most parts were a straight swap. the car is still actualy mobile under its own power which is good, but is declared as sorn so i wont actually be driving it. few pics added, and the garage is a mess i know  Ninja
Last edited by ninja; 07/12/2009 21:07.
|
|
|
Re: Bravo 20vt Project
[Re: ]
#952240
16/12/2009 14:16
16/12/2009 14:16
|
ninja
Unregistered
|
ninja
Unregistered
|
Update.... Few hours to spare yesterday so i decided to swap the fuel pump reservior. I was imformed the coupe pump would not fit the bravo reservior, but the whole assembly would be a straight swap, so... 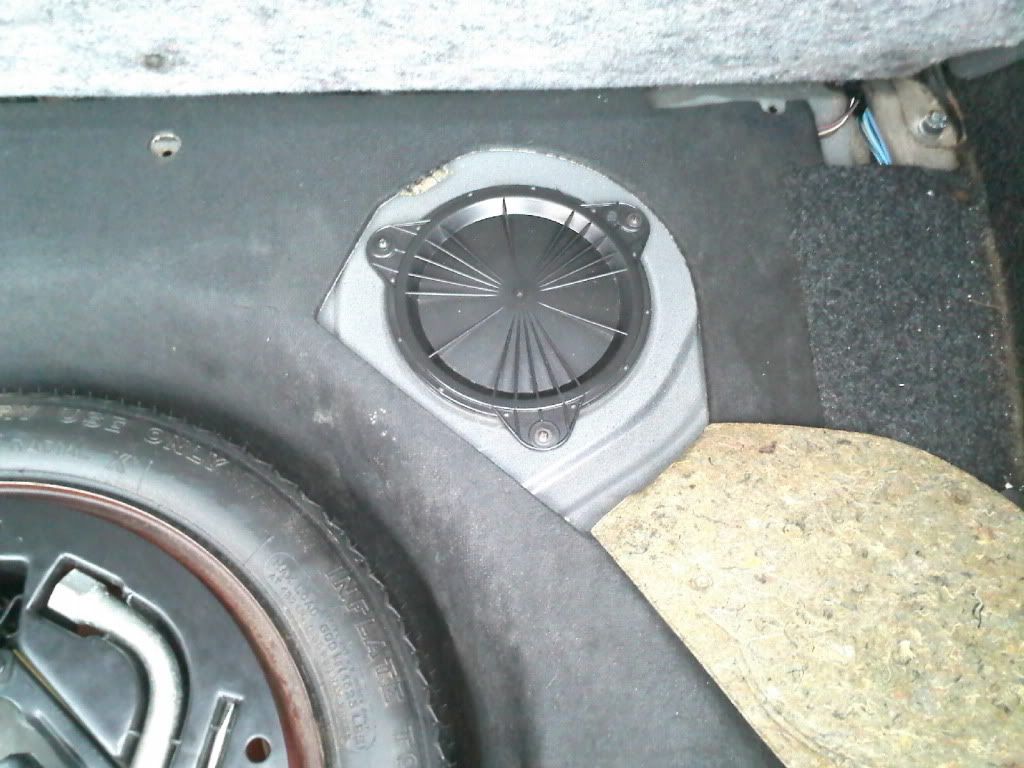 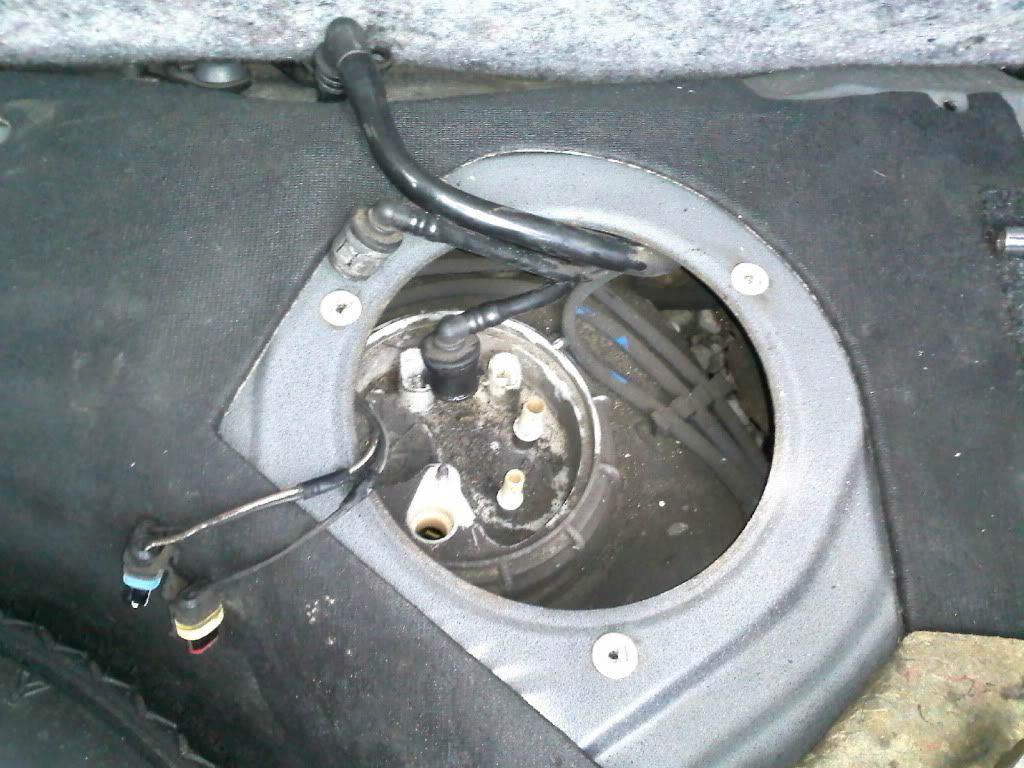 on comparison, they look indentical, all fittings are the same, plugs are the same, although the wiring in the bravo reservior (brown one) look alot more robust than the coupe wire  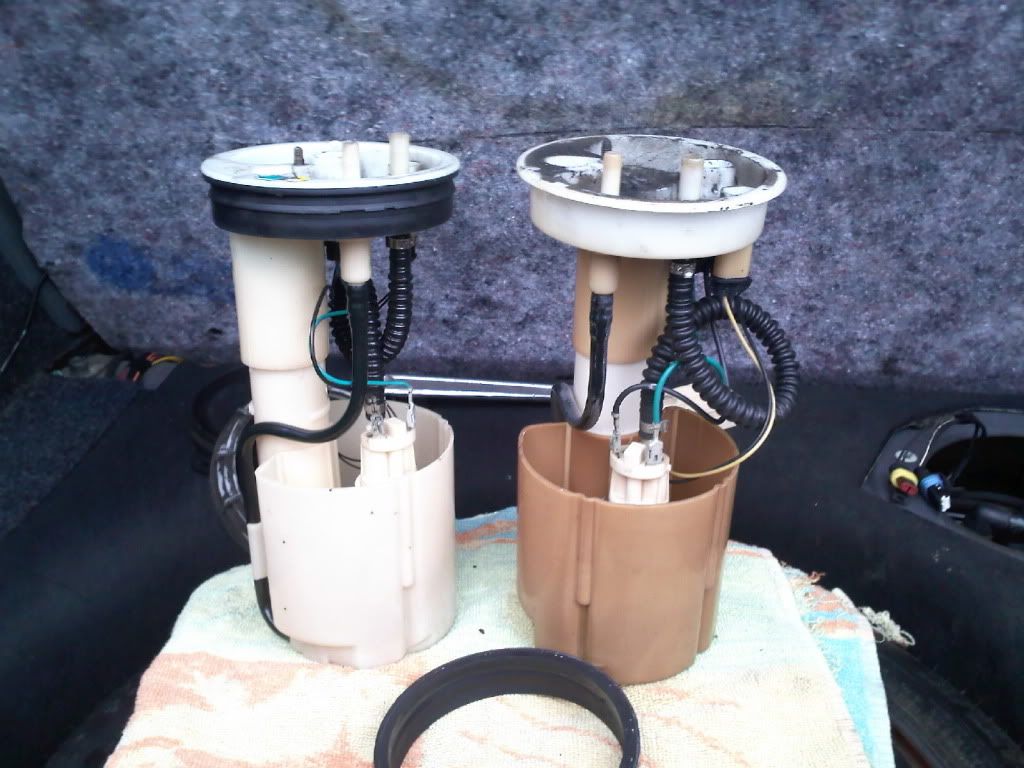 short time later later, fitted, 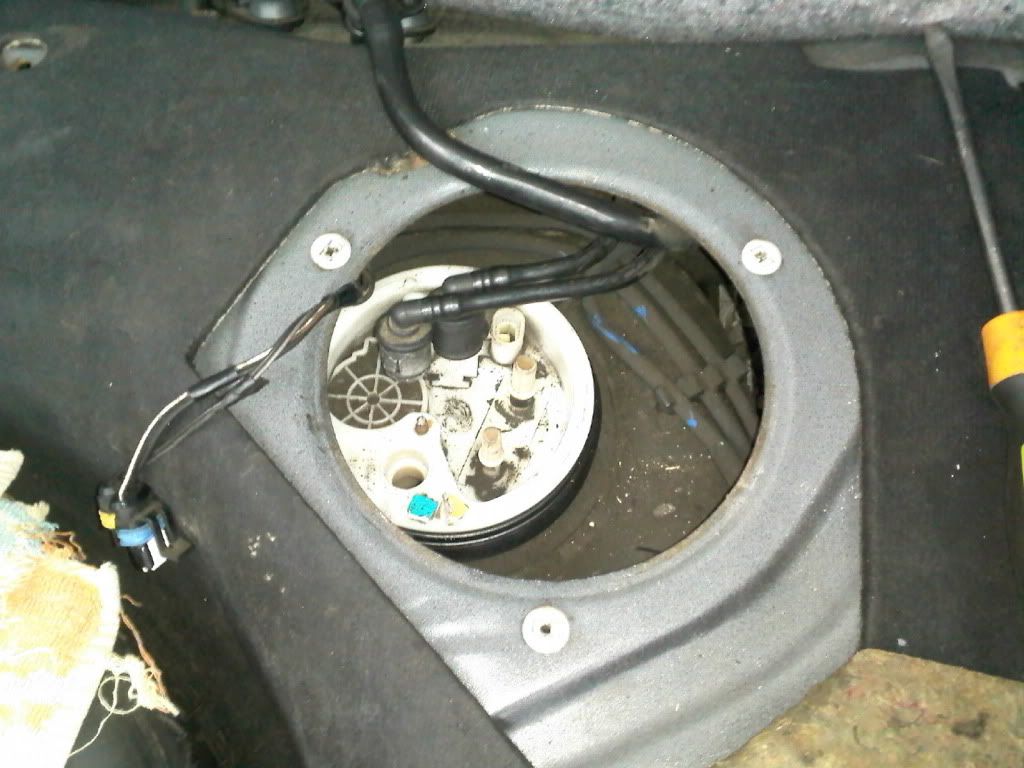 turn the key and.... the pump didnt prime  i tried unpluging the fitted pump, and plug the old pump back in and it primed fine so i know its not a wiring issue. unfortunately i ran out of time so will look at it again this weekend. Also, 24mm rear ARB has been ordered, so rear subframe will get its overhaul just after christmas Ninja
|
|
|
Re: Bravo 20vt Project
[Re: ]
#961125
05/01/2010 00:19
05/01/2010 00:19
|
ninja
Unregistered
|
ninja
Unregistered
|
well i think i know why the pump didnt prime  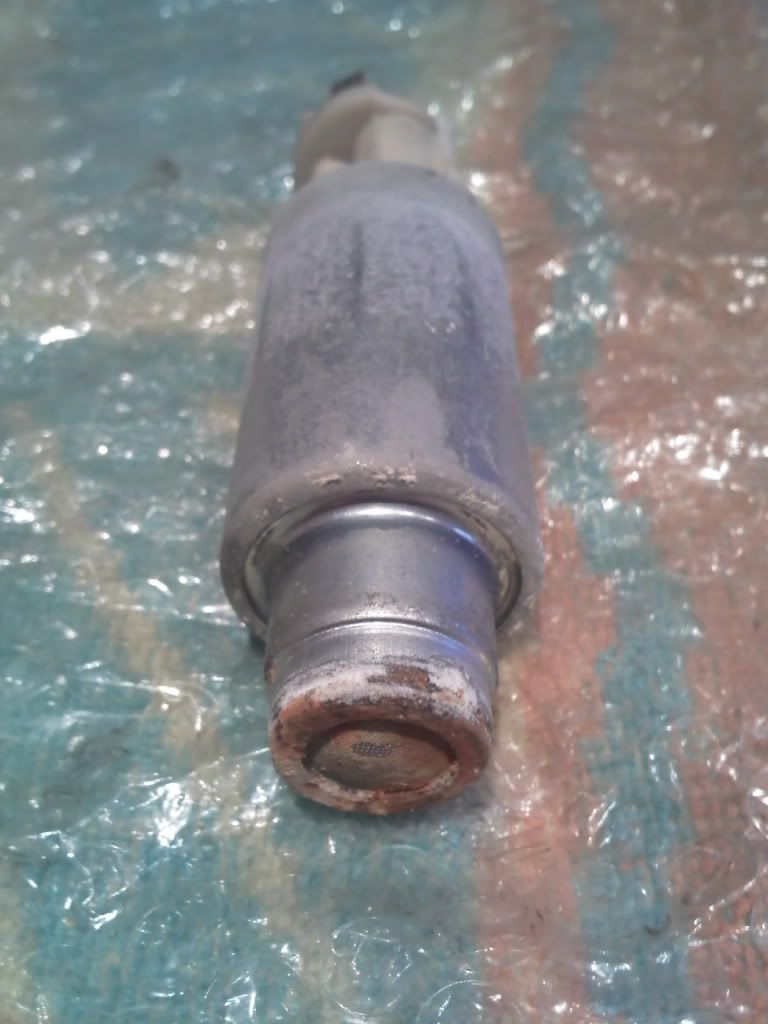 must have been sat for sometime without anything in the tank . . luckily i kept my original pump when i had my walbro fitted, so the reservior is now re-assembled with a working pump and ready to be fitted expect its too cold atm lol 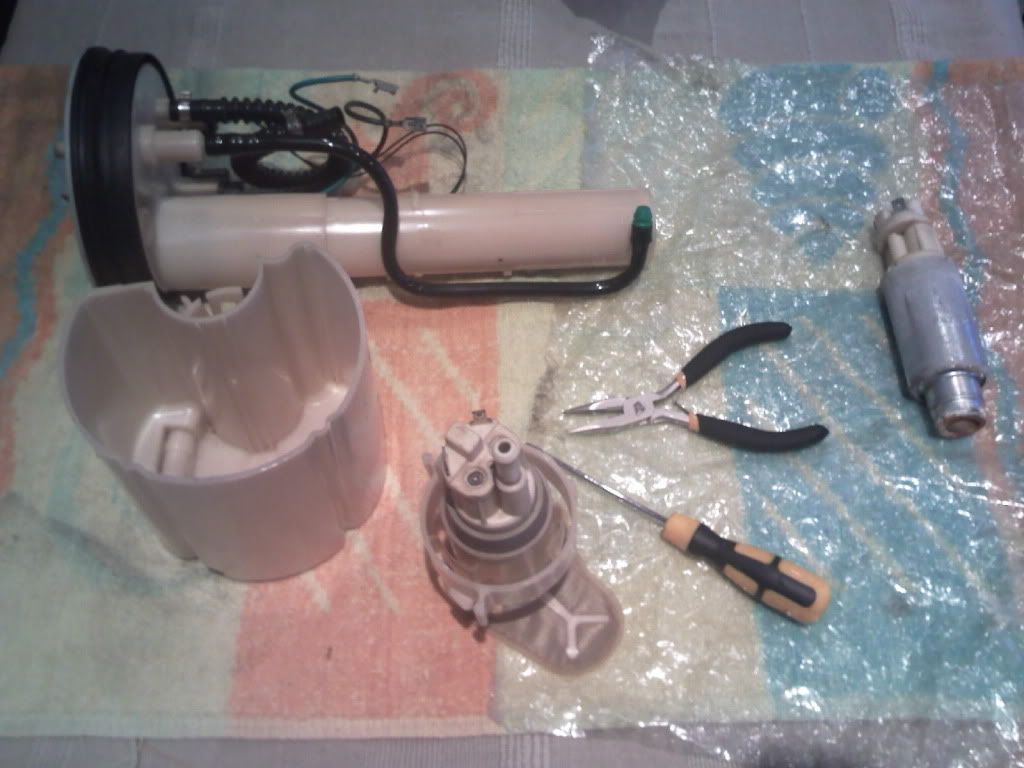 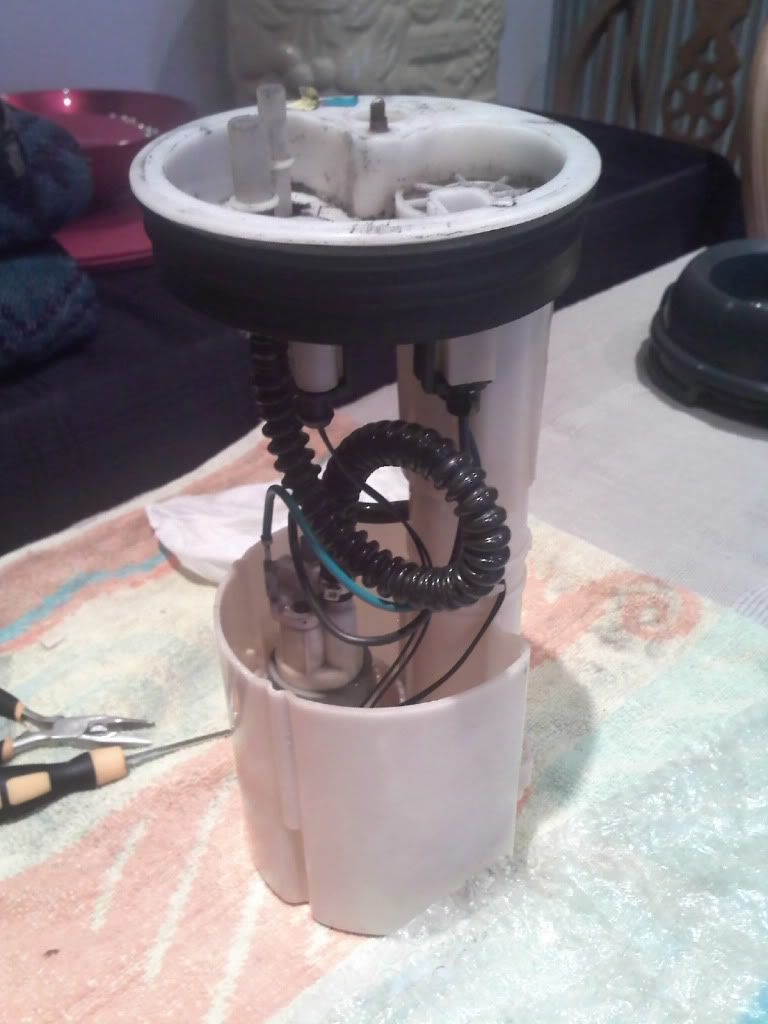 Ninja
|
|
|
Re: Bravo 20vt Project
[Re: ]
#967481
16/01/2010 16:12
16/01/2010 16:12
|
ninja
Unregistered
|
ninja
Unregistered
|
new assembly was tested and fitted this afternoon, fired up first turn off the key all i'm waiting for now is confirmation of rear solid subframe bushes and i can start rebuilding the subframe Ninja
|
|
|
Re: Bravo 20vt Project
[Re: ]
#980458
07/02/2010 23:47
07/02/2010 23:47
|
ninja
Unregistered
|
ninja
Unregistered
|
just a quick update, progress, has been a bit slow over the christmas period, a few little cosmetic enchancements have been fitted, including triple A pillar pods 20vt wheels are being prepped for a respray in black also test fitted the strut brace with the coupe struts, with succeess still waiting for the bushes to build the subframe. on a slightly different note, my 16vt has had a centre console refurb, a coolant flush, and its first actual run since october last year brakes were a little rough and it needed a jump start, but other than that it was a smooth ride. i almost forgot how comfy the standard seat actually are, there like armchairs lol Ninja
|
|
|
Re: Bravo 20vt Project
[Re: ]
#1048809
07/06/2010 09:21
07/06/2010 09:21
|
ninja
Unregistered
|
ninja
Unregistered
|
ok time for an update, and a to take a bit of a break . . . well i finally got everything i need for the rear subframe rebiuld, this includes ARB Solid bushes FK coilovers Braided lines Rear disc conversion from a HGT Radial repair kit and........ i leave the country for 3 months lol, i'm due to return in august, and will be looking forward to gettin stuck in  until then.......... Nijna
|
|
|
Re: Bravo 20vt Project
[Re: ]
#1097326
06/09/2010 19:02
06/09/2010 19:02
|
ninja
Unregistered
|
ninja
Unregistered
|
well i'm back, not had chance to get into the garage yet so ive been doing a bit of prep/spray work ive taken the apart the intake assembly, 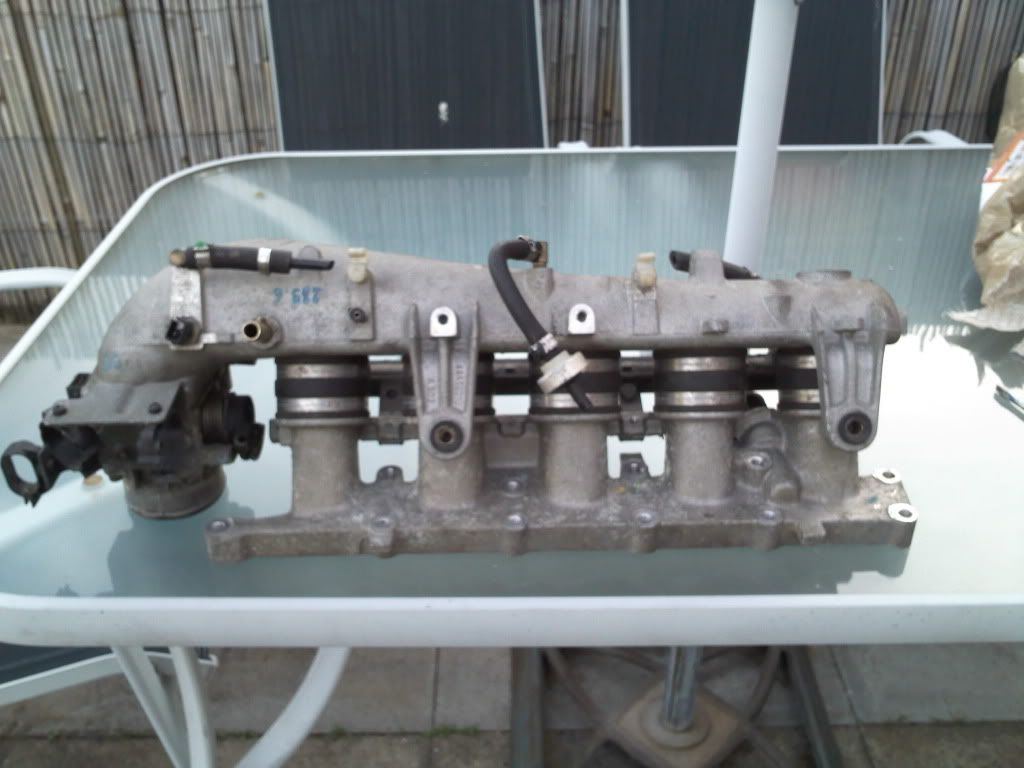 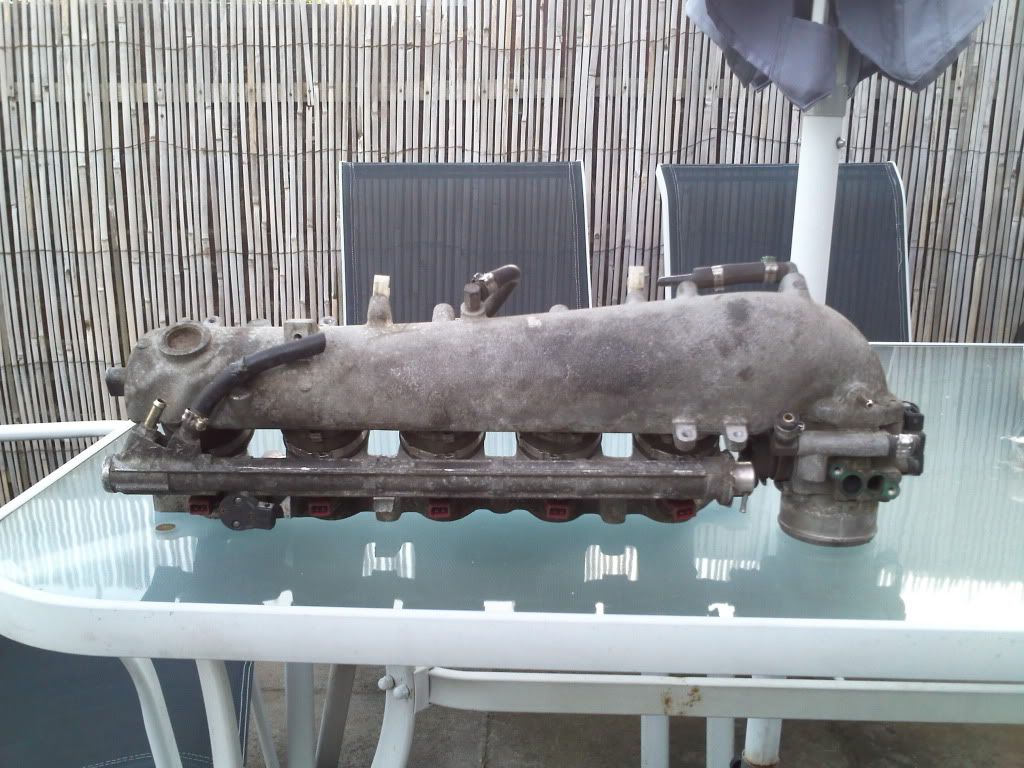  degreased and cleaned 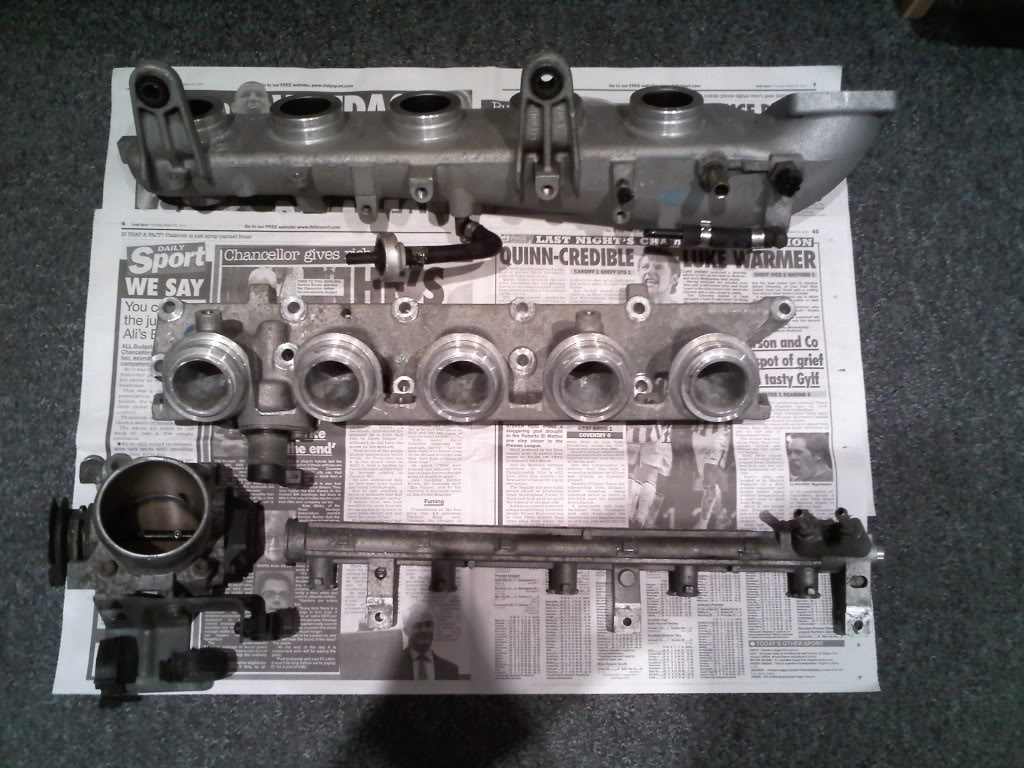 Paitned 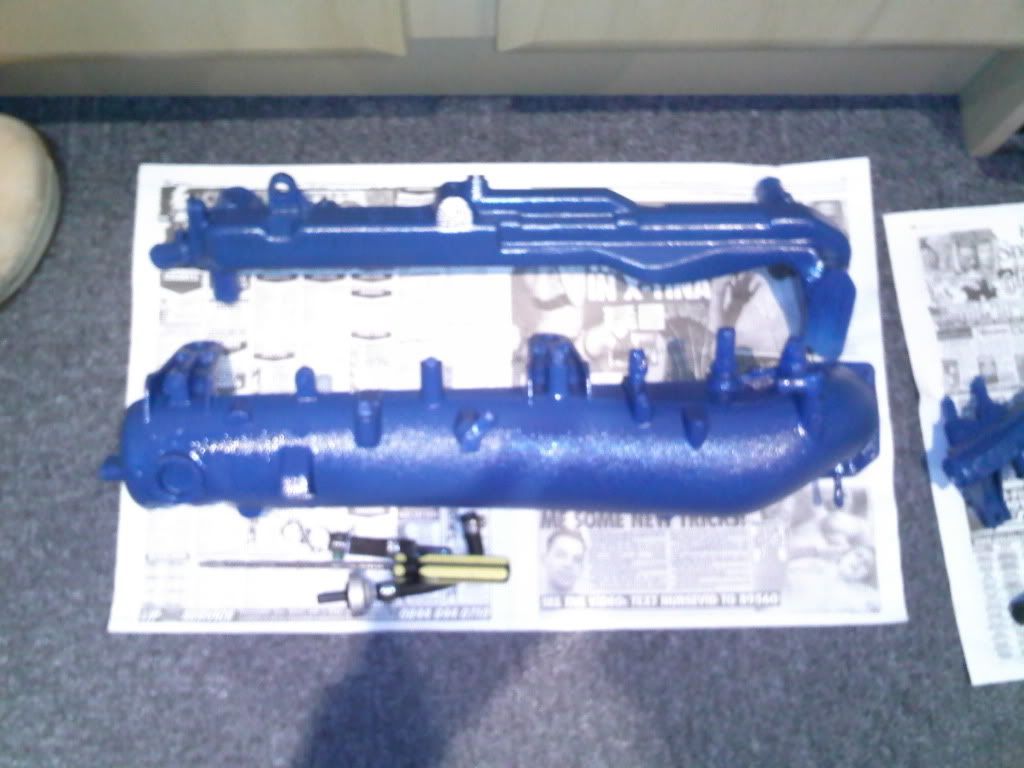 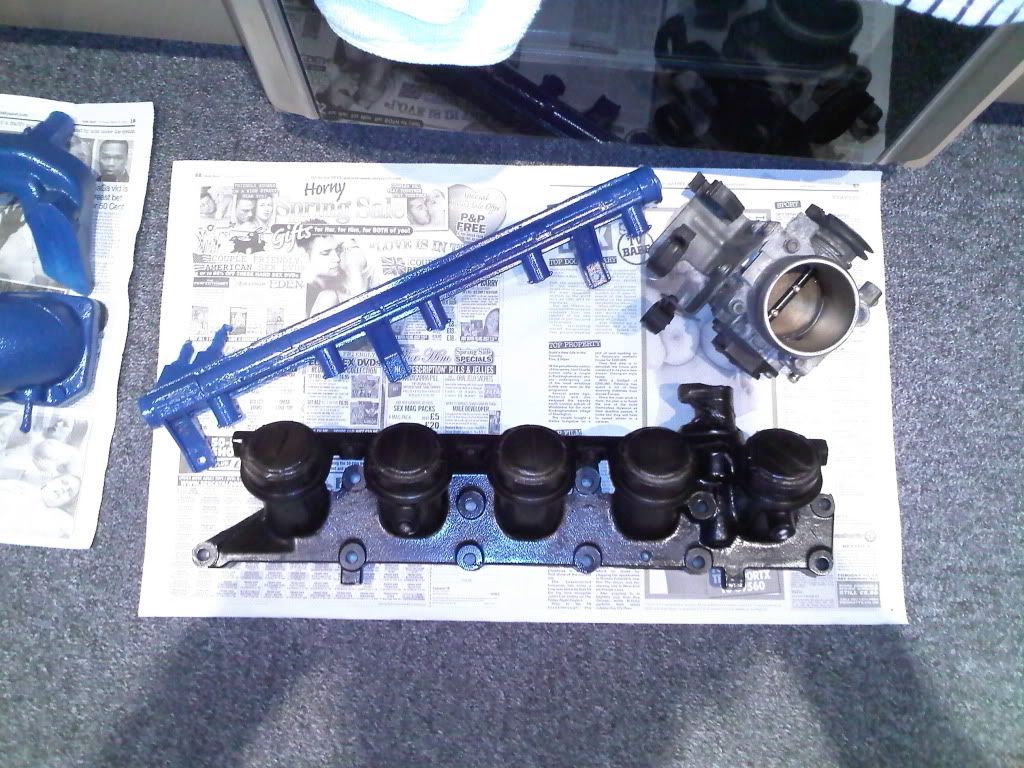 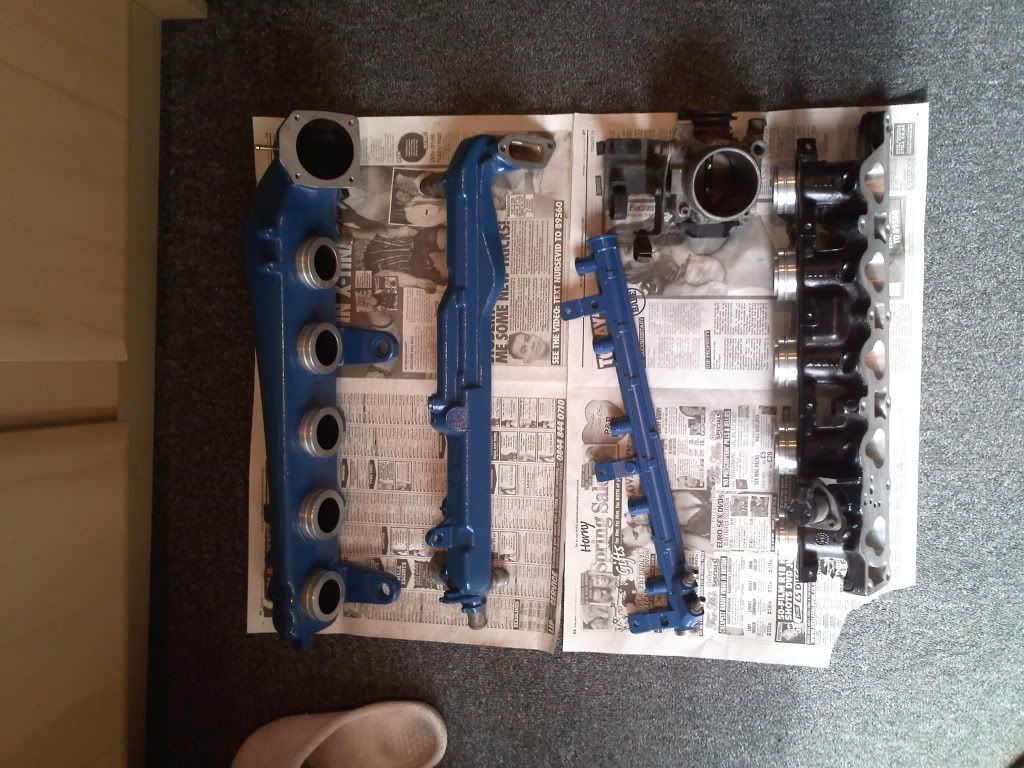 and re-assembled 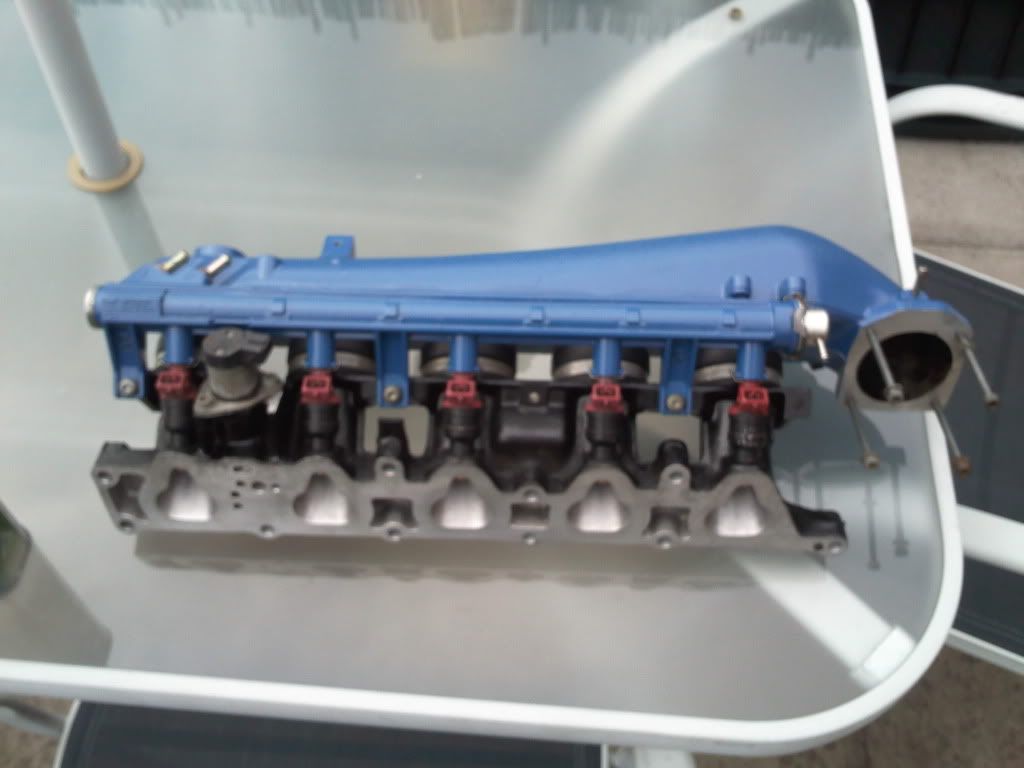 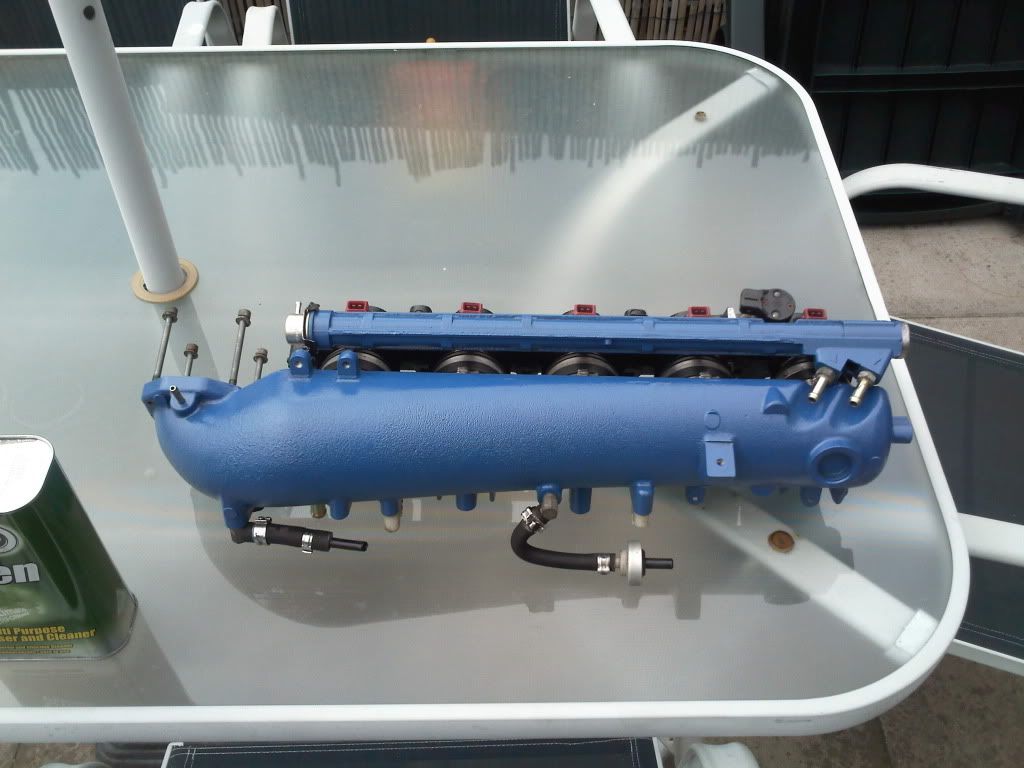 intake manifold is ported, 3.8 bar fpr. and red injectors. cam cover has been sprayed blue, exhaust manifold is black and so is the heat shield. hopefully i'll be in the garage by the end of the week. Ninja
|
|
|
Re: Bravo 20vt Project
[Re: ]
#1110320
02/10/2010 23:17
02/10/2010 23:17
|
ninja
Unregistered
|
ninja
Unregistered
|
well frame was stripped, cleaned (including some surface corrosion, which is weight saving at its strictest ) solid bushes fitted 24mm ARB fitted (with original brackets and a spacer for now) caliper brackets/dust sheilds cleaned, sprayed and fitted FK rear shocks, springs and height adjusters fitted subframe re-fitted bravo hubs and ABS sensors fitted Coupe calipers disc and pads (ive used old discs and pads cause the car will still be stood around until the engine is bilt and fitted, and i dont want the new stuff to start rusting!) Hel brakelines new brake lines from compensator new handbrake cable 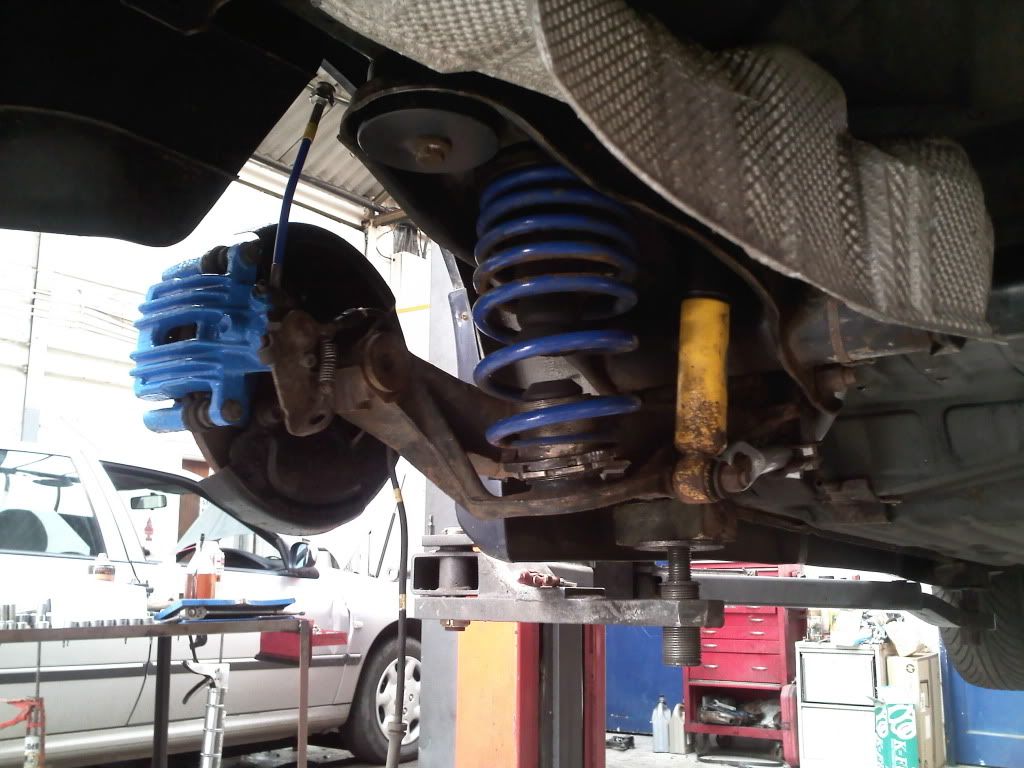 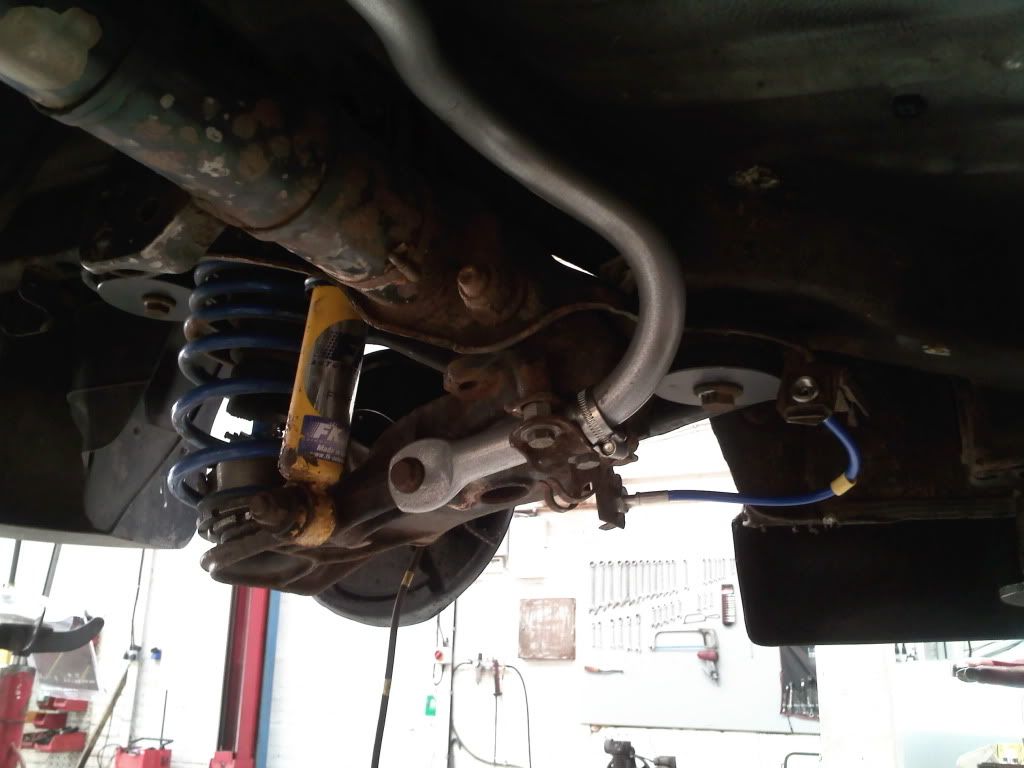 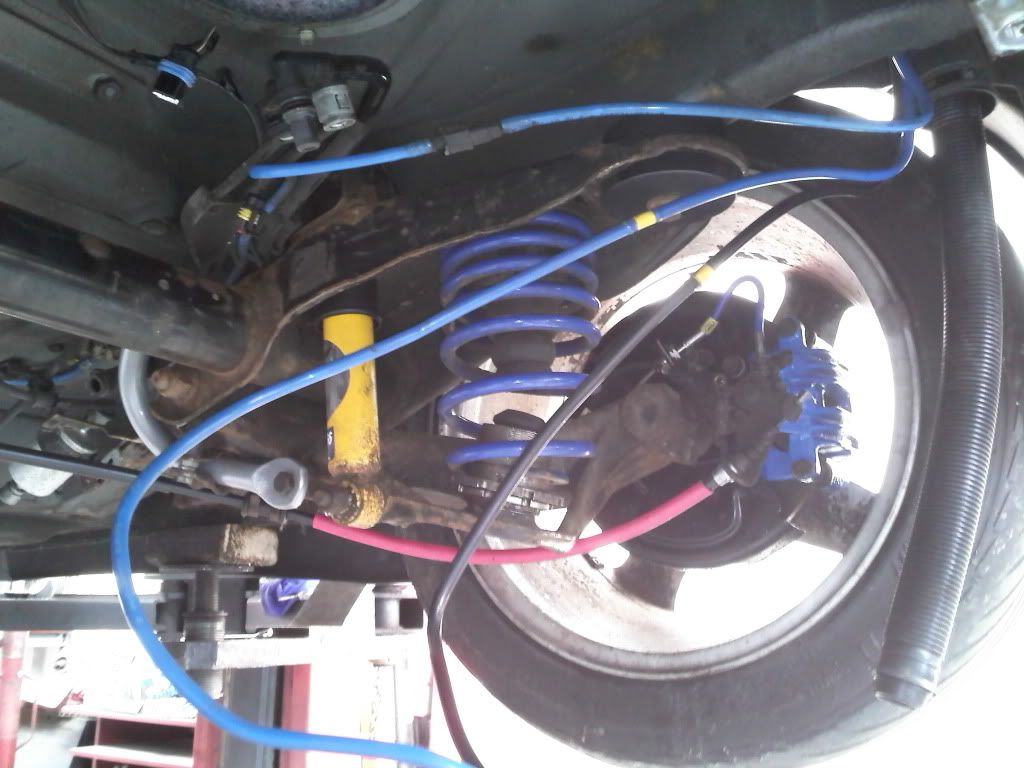 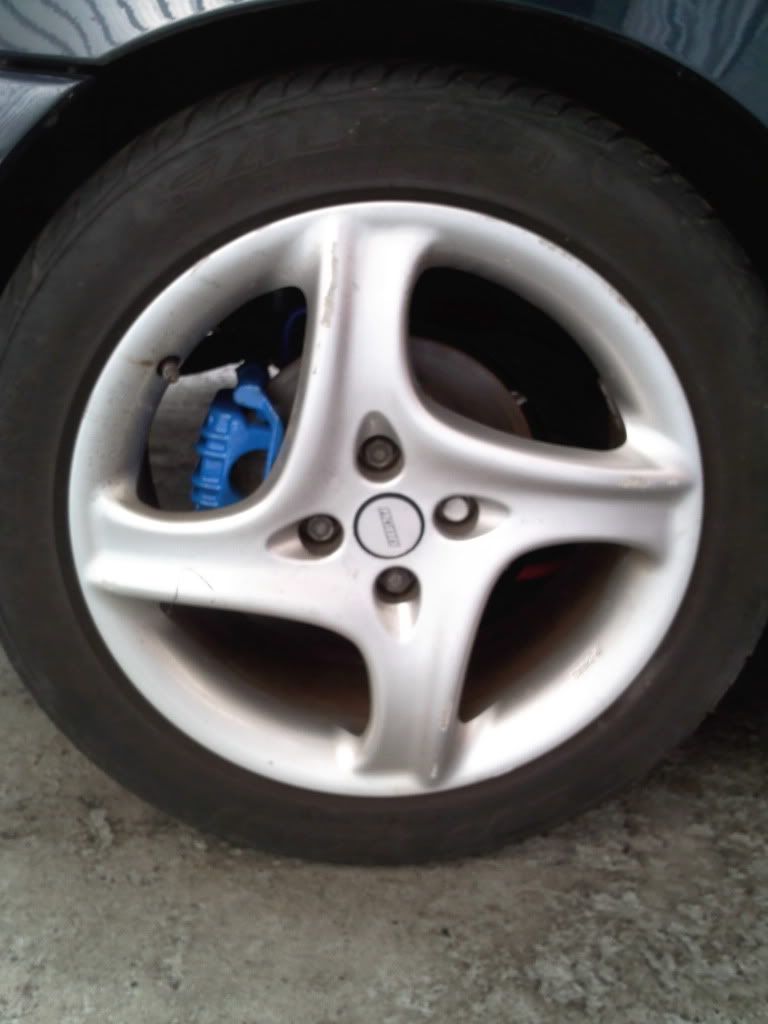 Ninja
|
|
|
Re: Bravo 20vt Project
[Re: ]
#1114808
12/10/2010 18:09
12/10/2010 18:09
|
ninja
Unregistered
|
ninja
Unregistered
|
nearly there suspension and brake wise Standard front struts removed. 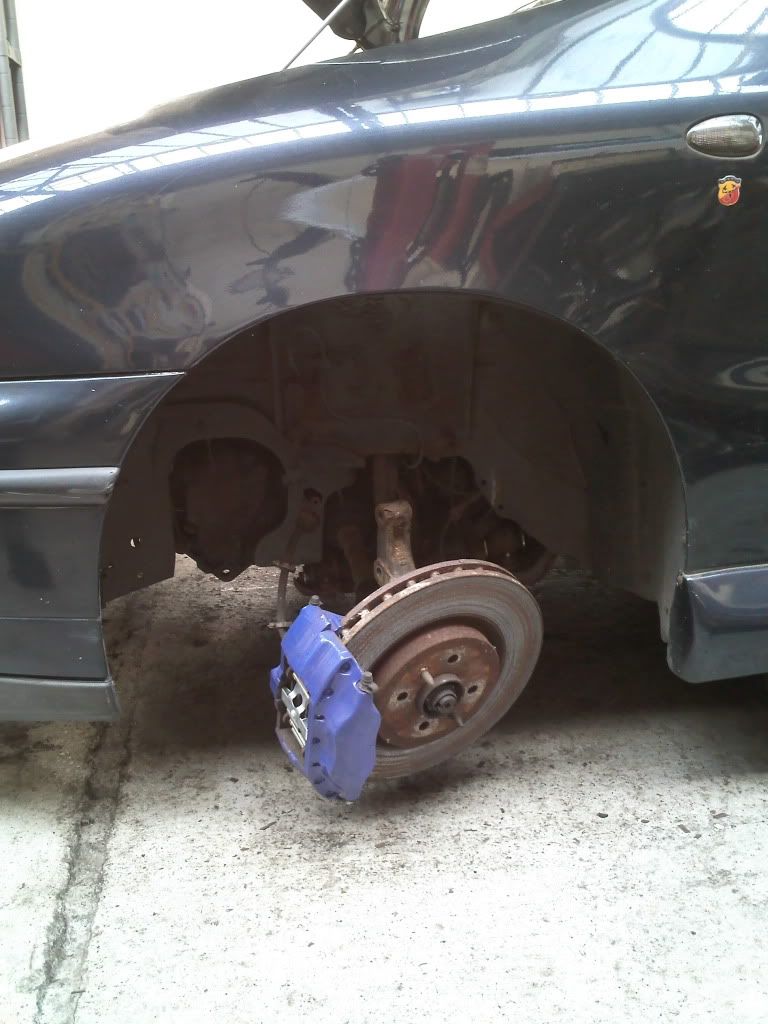 FK top bearing were cleaned and regreased, top mounts had a coat of colour 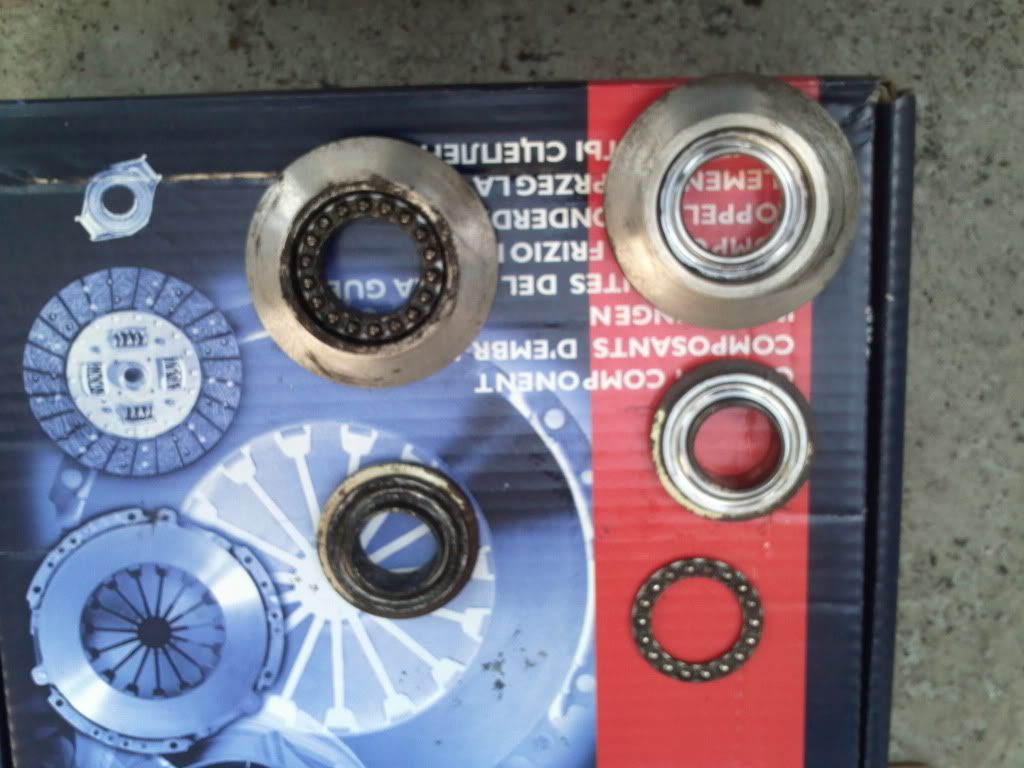  Then fitted, together with HEL braided lines and a new brembo spring kit 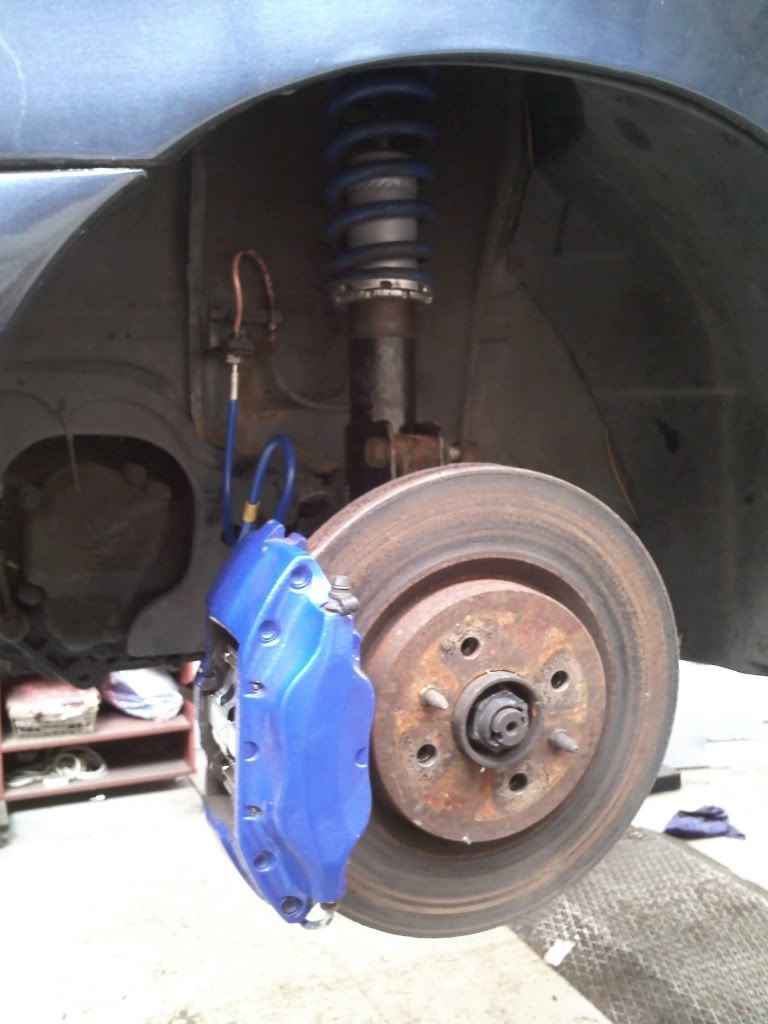 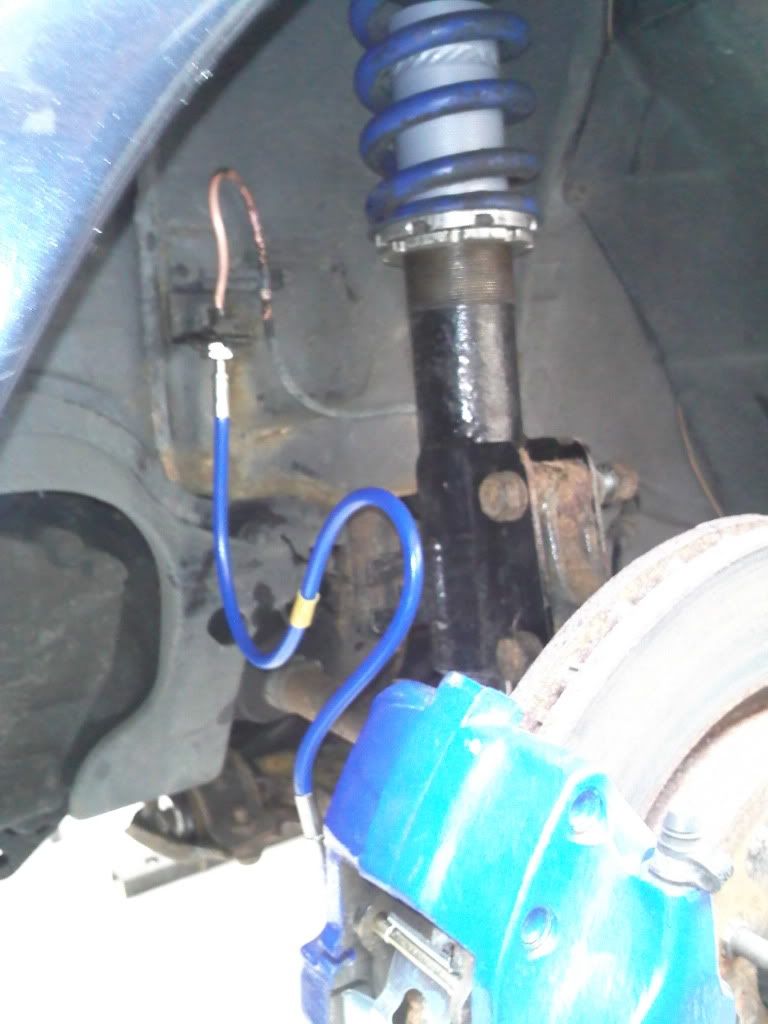 only thing is the coupe braided lines look a little too long for the bravo, the connection bracket must ne in a different place!? next is a new set of rear brake lines for the compensator, then its on with the engine Ninja
|
|
|
Re: Bravo 20vt Project
[Re: ]
#1118341
21/10/2010 13:54
21/10/2010 13:54
|
ninja
Unregistered
|
ninja
Unregistered
|
the car is back on the ground and rolling again under its own power again the blocks had its first coat of paint, and ive picked my new hybrid GT28r up too  pics to follow.... Ninja
|
|
|
Re: Bravo 20vt Project
[Re: ]
#1118517
21/10/2010 19:54
21/10/2010 19:54
|
ninja
Unregistered
|
ninja
Unregistered
|
and here she is 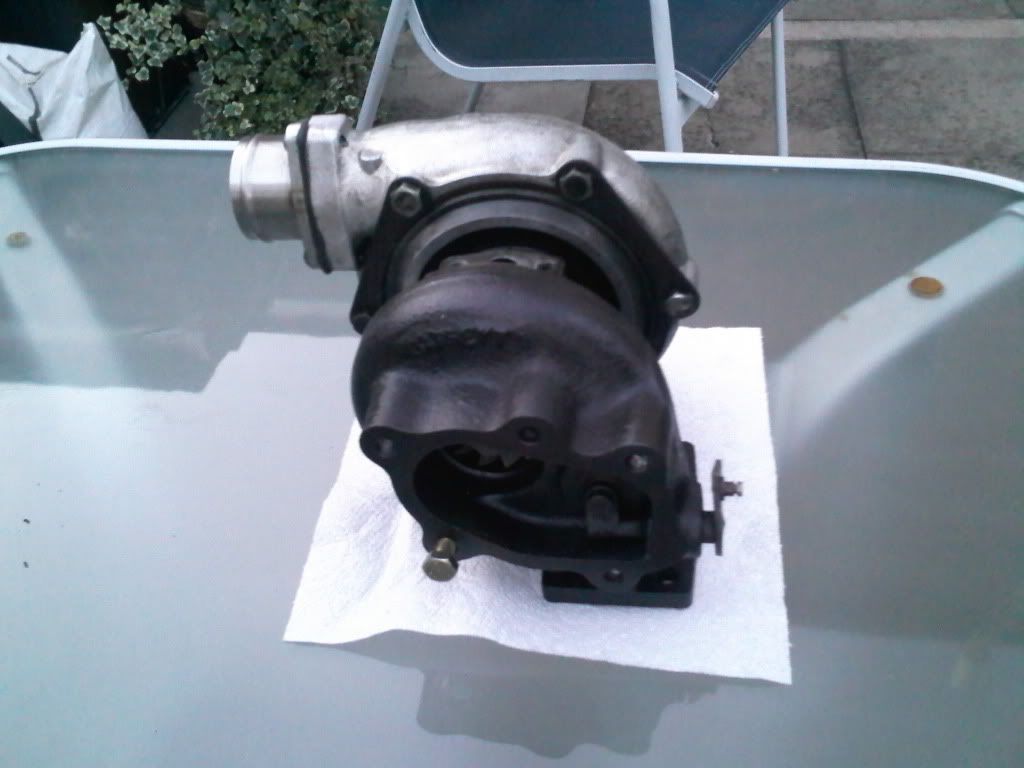 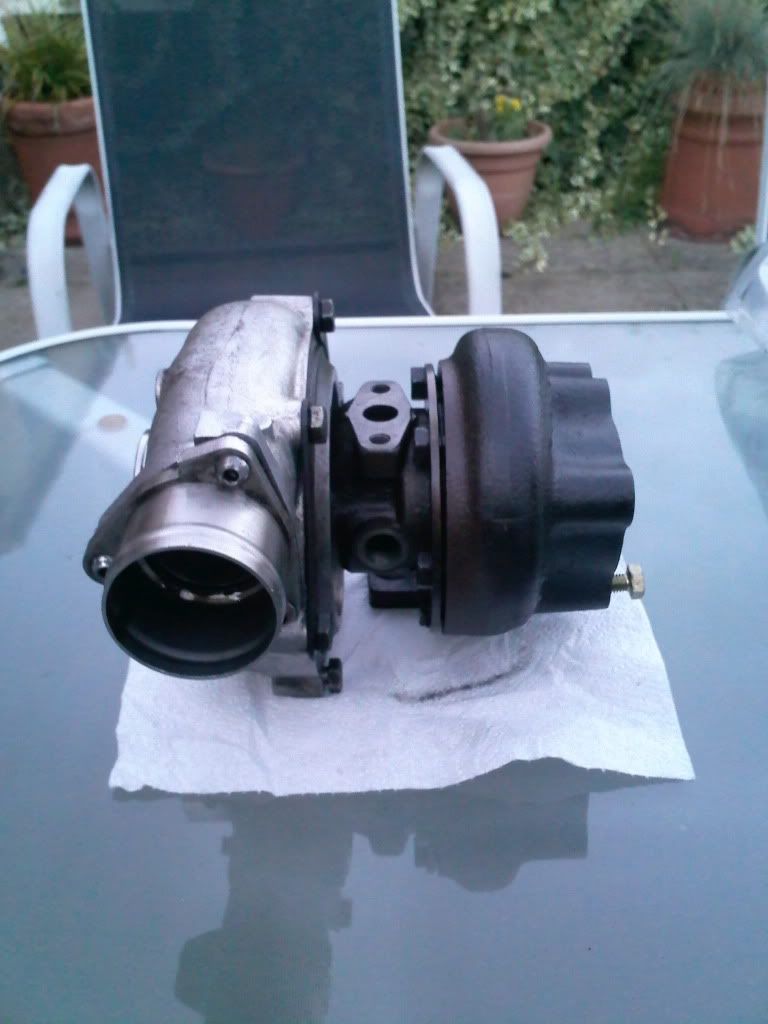 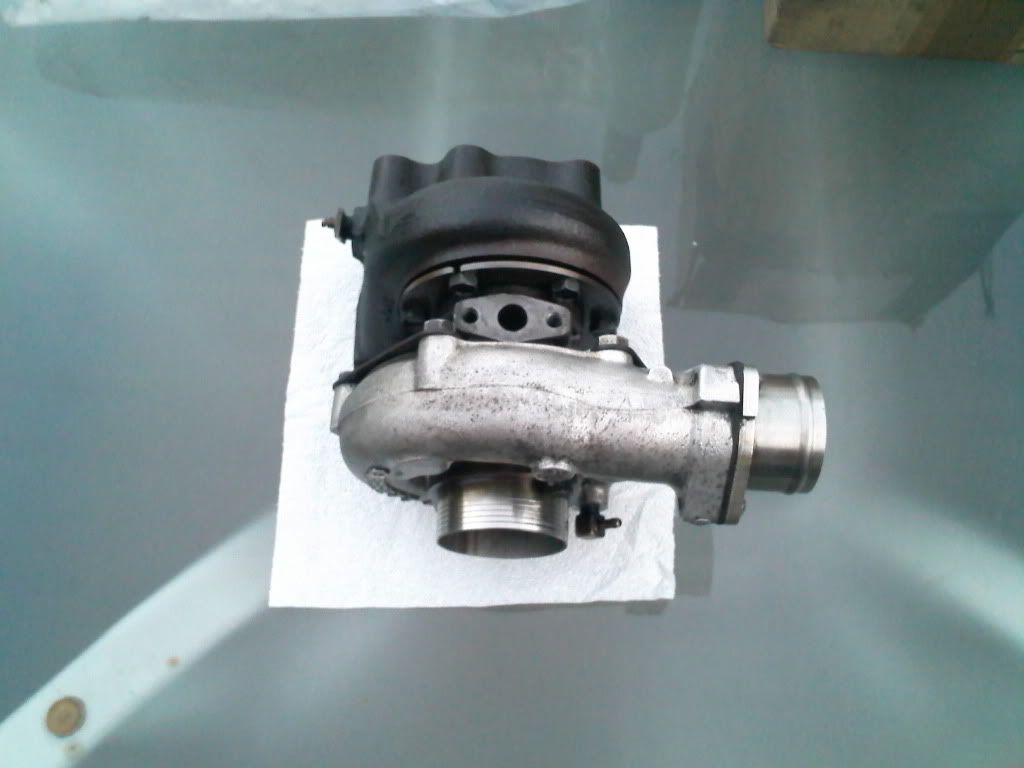 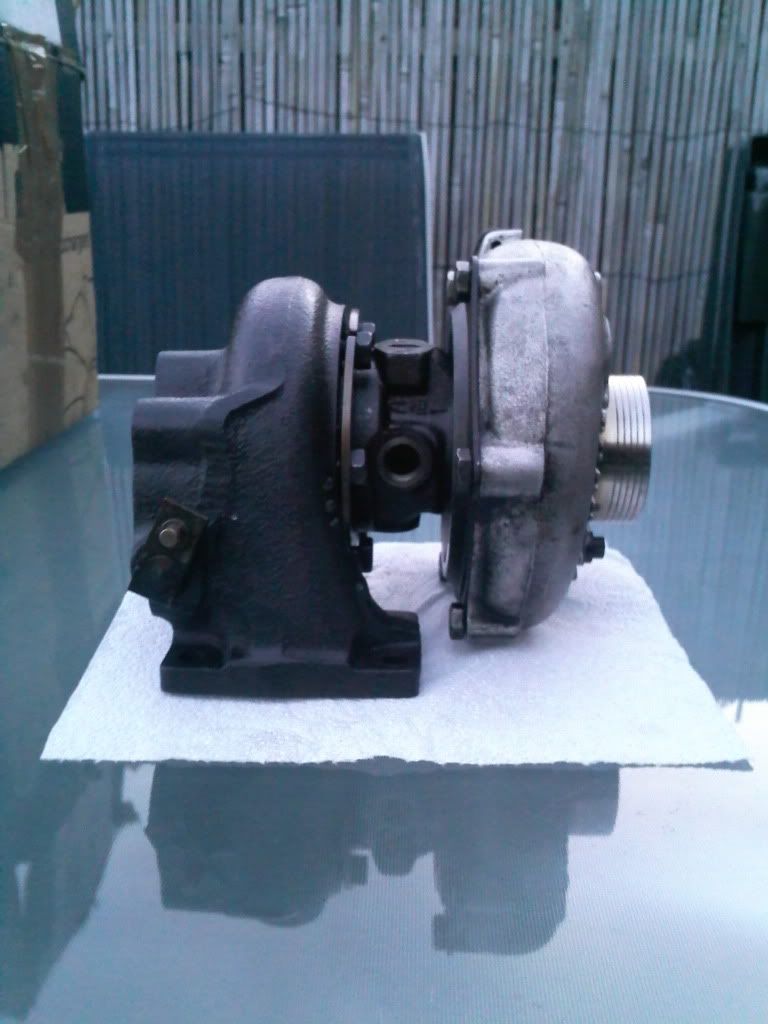 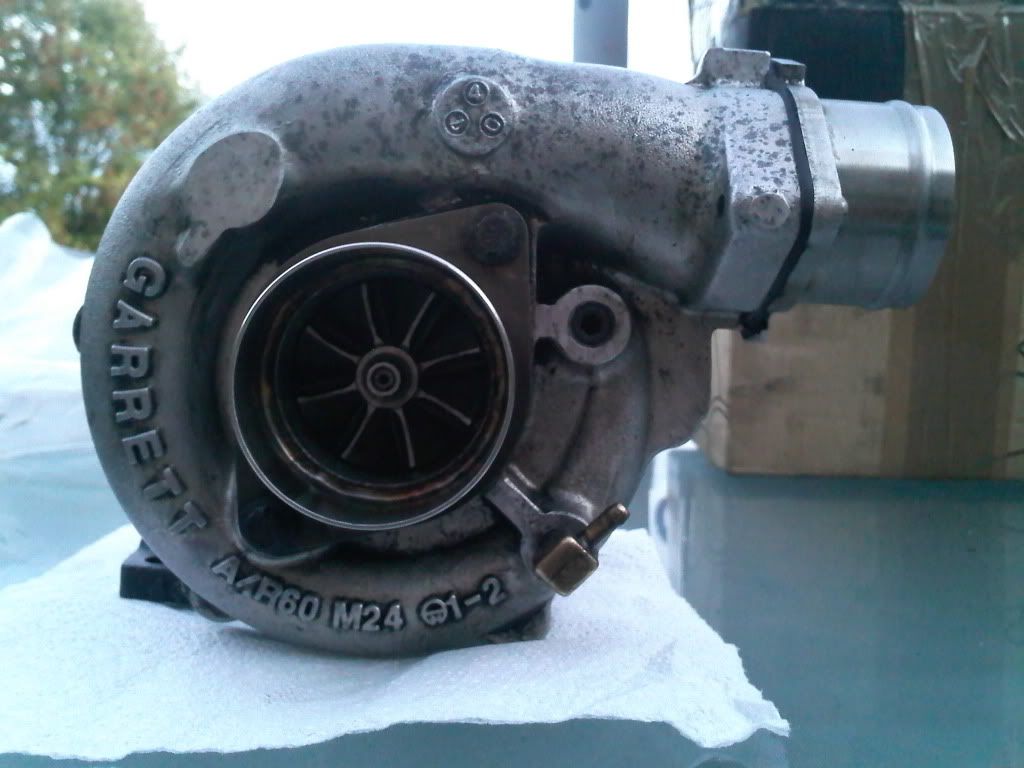 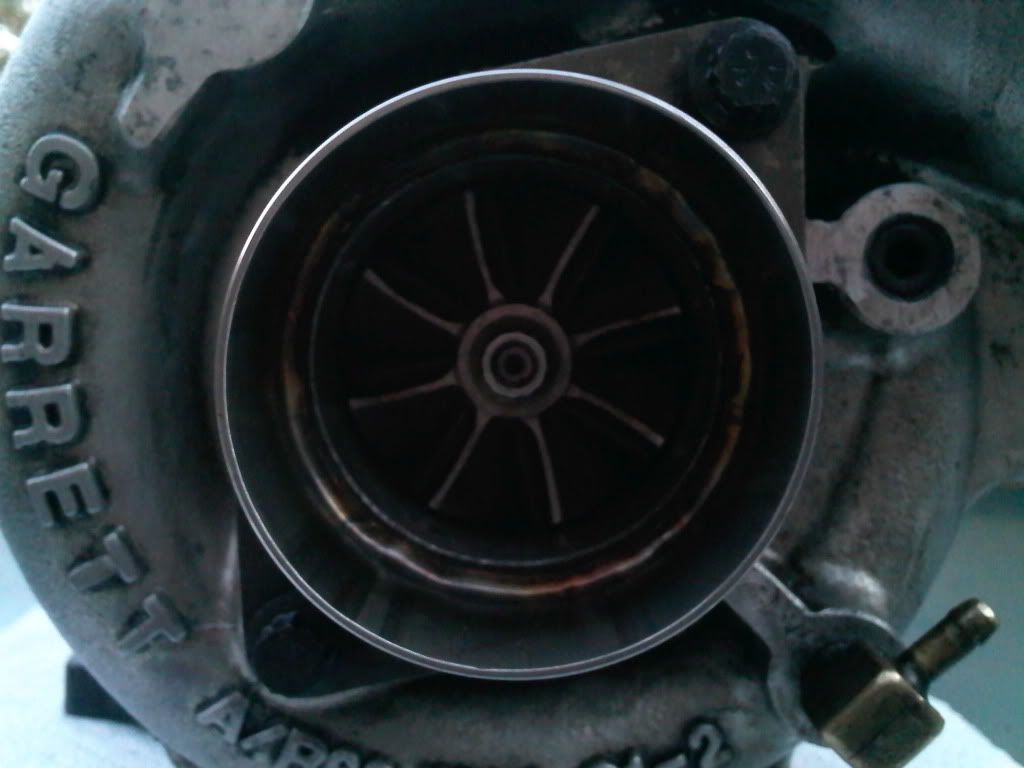 Specs GT28r w/hybird compressor wheel (8/8 blades too ) (comp)ind 48.3 exd 69.6 trim 48 A/R.60 / (turbine) whl dia 53.0 trim 62 A/R.64 i wish i had taken some before pictures, because the guy did a fantasic job, complete strip and rebuild. cant wait to test her Ninja
|
|
|
Re: Bravo 20vt Project
[Re: ]
#1136563
26/11/2010 21:40
26/11/2010 21:40
|
ninja
Unregistered
|
ninja
Unregistered
|
time for an update, and quite a big one too  managed to strip down the donor engine, wiring loom off, cylinder head came off, gearbox off, clutch + flywheel out, sump off  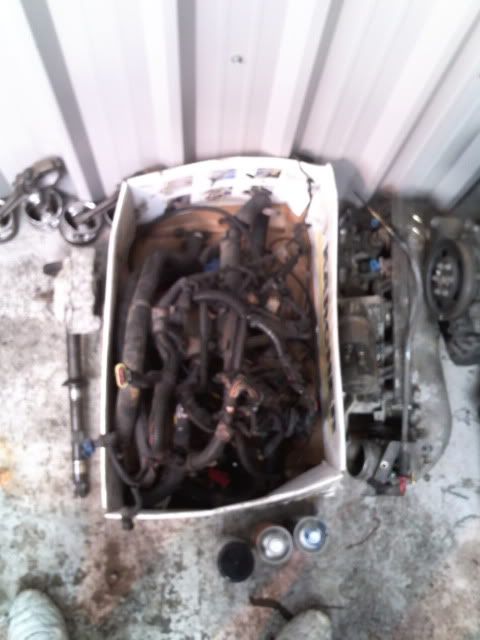 everything has had a good clean too Cylinder head has been stripped down ready to be sent off for acid dip, polishing, and skimming. 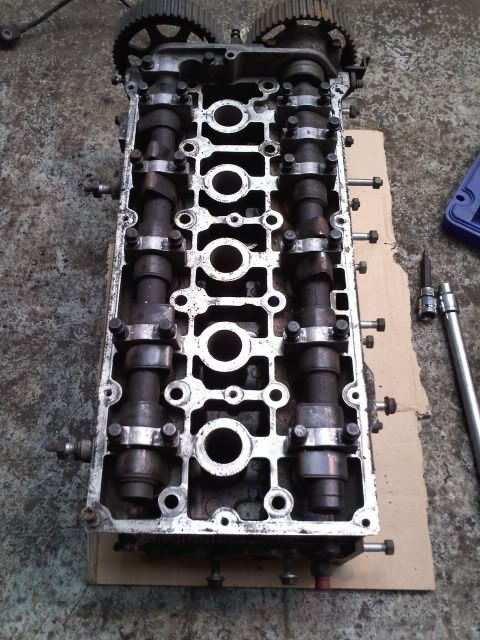 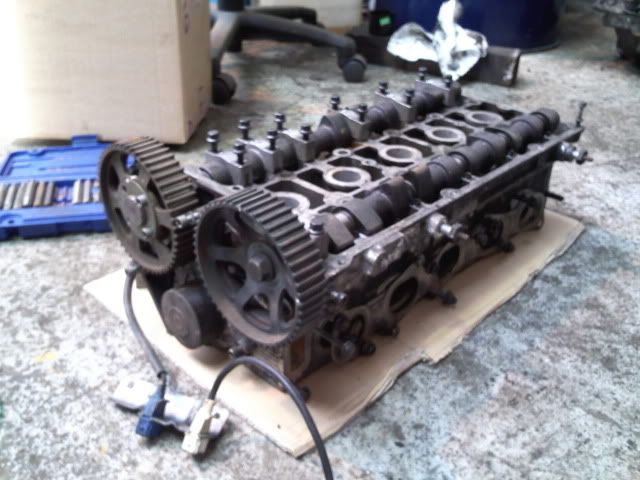 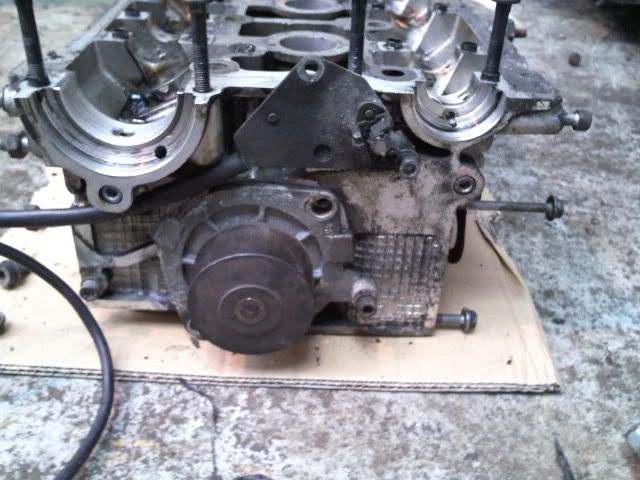 short shift fitted new block has been sprayed, along with a few other things top engine mouunt, oil breather tank, thermostat, ancilery bracket, and a few brackets/hose ends and a small amount of test assembly has been done, cant goo too far though until the pistons are fitted, which arrived today 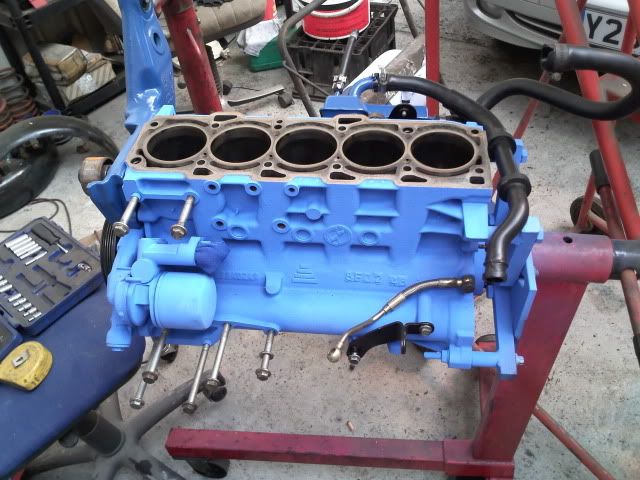 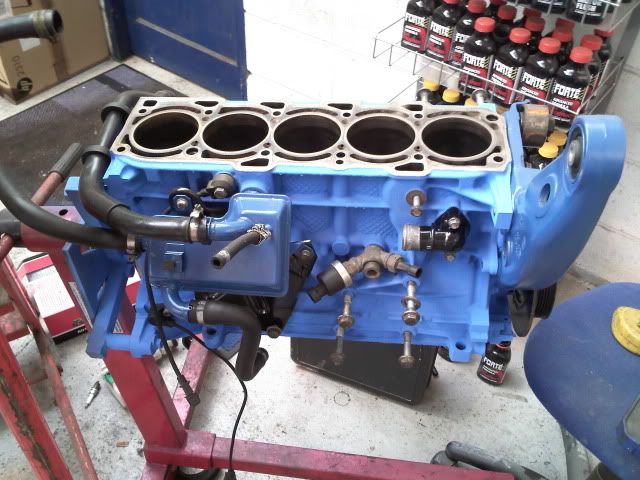 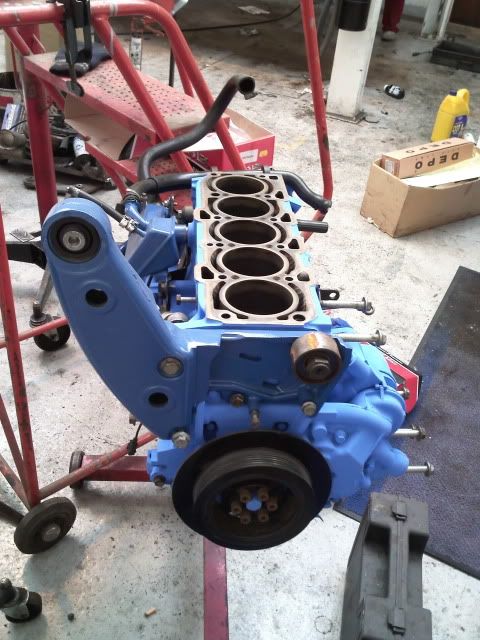 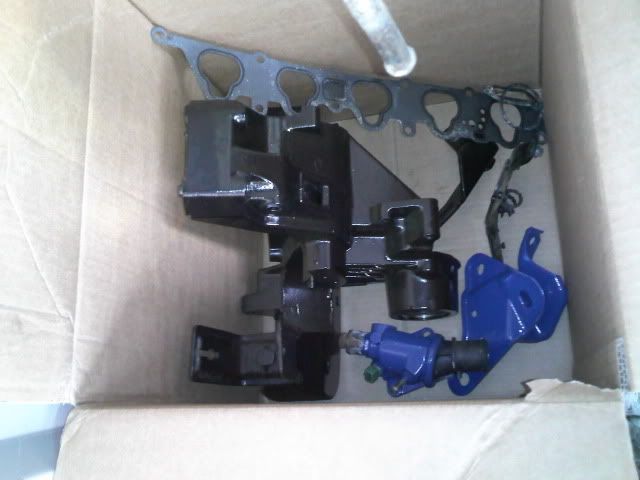 Can you see a colour theme here? hopefully my new pistons will be fitted in the block very soon, and then as haynes always says 'refit is reversal of removal' ...and these little beuties arrived too 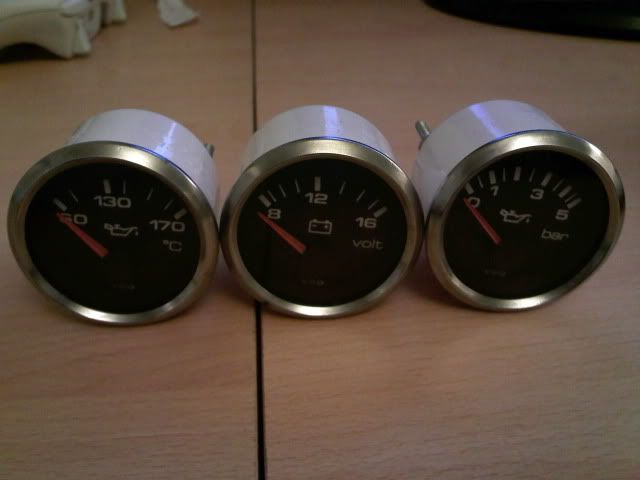 It all feels like its coming together Ninja
|
|
|
Re: Bravo 20vt Project
[Re: ]
#1142791
11/12/2010 01:09
11/12/2010 01:09
|
ninja
Unregistered
|
ninja
Unregistered
|
having some time off work ive been busy on the project Head has come back with reground valve seats + new stem seals fitted 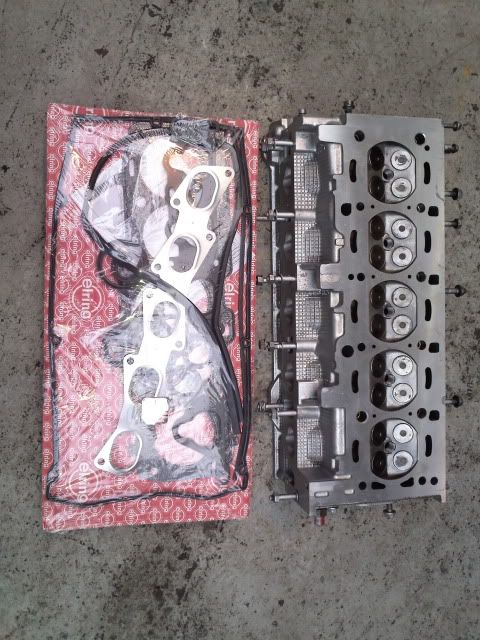 head gasket + seal set, and head bolts came with it Head has been sprayed black 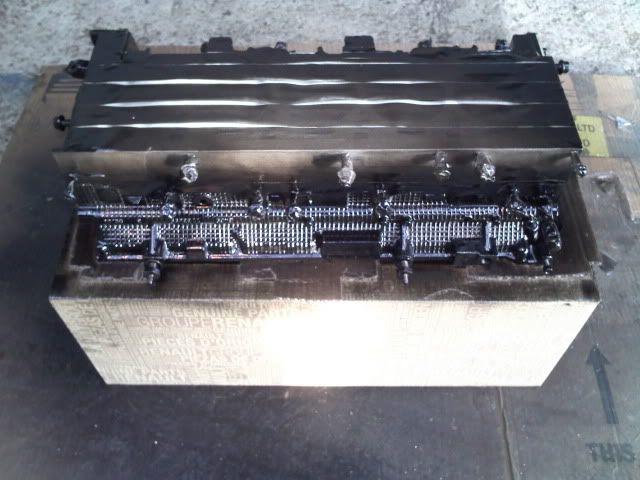 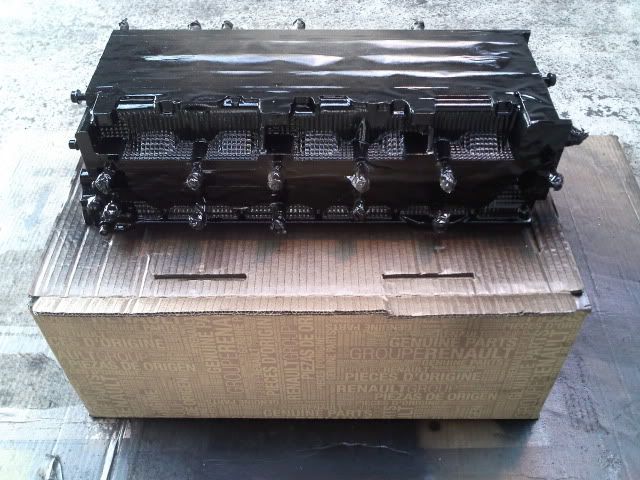 lifters has been sqeezed, cleaned and refitted 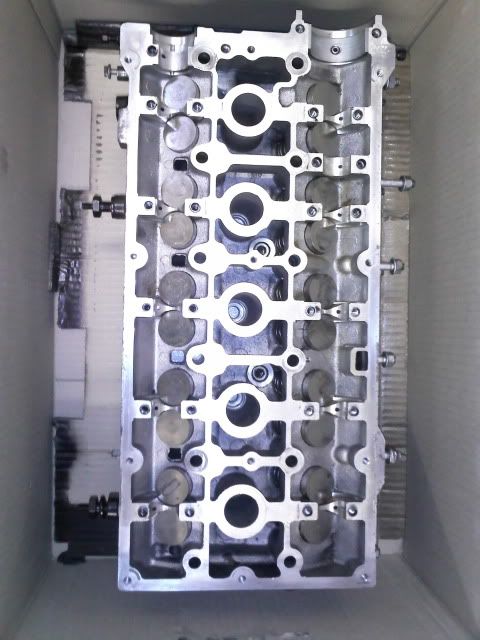 cams have been cleaned up, ready for refit sump has been cleaned and sprayed, also black 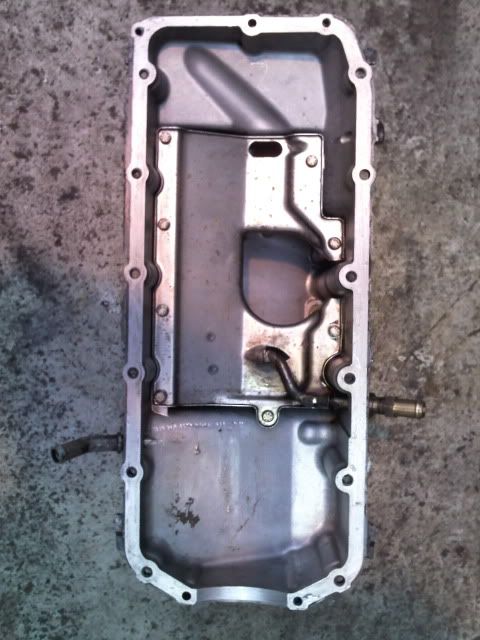  cleaned up a few other little bits and peices, brackets tried the gauges in situ  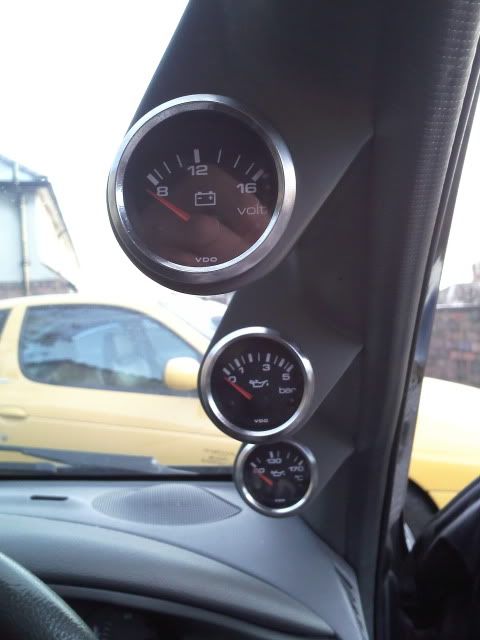 now all i'm waiting for is a nice christmas present off JBT, in the way of a freshly rebuilt and balanced bottom end, lightened flywheel and new clutch The cars been looking a little bit sorry for itself in the cold weather, but will soon have a new lease of life, or should i say 'heart'  Ninja
|
|
|
Re: Bravo 20vt Project
[Re: ]
#1150559
01/01/2011 20:50
01/01/2011 20:50
|
johnnybravoturbo
Unregistered
|
johnnybravoturbo
Unregistered
|
now all i'm waiting for is a nice christmas present off JBT, in the way of a freshly rebuilt and balanced bottom end, lightened flywheel and new clutch smile Christmas present from Jbtclause would imply its free.  Update Engine fully stripped., the following shall be done by 2nd week in Feb 6 paddle clutch Hone bores Skim block(slightly oxidised over 4 and 5 piston) Skim,lighten and balance flywheel Replace big ends Fit the best of the 100 pistons i have been given Supply and fit new rings Check oil pump Replace crank seal Replace rear main seal Replace under piston jets Balance crank pistons and rods Match big end caps to rods A few days away from measuring the wear on the crank,bores and mains.But fingers crossed. Looking forward to seeing this on the various track events towards the summer Rich. Also in that head set Rich its difficult to tell from the pictures but ENSURE that its the metal 3 piece gasket and not the fibrous type that a lot of kits nowadays are supplied with. The fibre type don't last 10 minutes whereas the stock metal one is a very substantial gasket and its near impossible to blow it.The engine will melt first.
|
|
|
Re: Bravo 20vt Project
[Re: ]
#1151874
05/01/2011 11:56
05/01/2011 11:56
|
ninja
Unregistered
|
ninja
Unregistered
|
 Also in that head set Rich its difficult to tell from the pictures but ENSURE that its the metal 3 piece gasket and not the fibrous type that a lot of kits nowadays are supplied with.
The fibre type don't last 10 minutes whereas the stock metal one is a very substantial gasket and its near impossible to blow it.The engine will melt first. I will double check but i'm 99% sure it is (at least its what i asked for following our conversation at donny) Ninja
|
|
|
Re: Bravo 20vt Project
[Re: ]
#1219540
25/05/2011 23:41
25/05/2011 23:41
|
ninja
Unregistered
|
ninja
Unregistered
|
time a looooooooong overdue update on this, and well the reason it hasnt been updated is that nothing has productively happened  Just before i sent the bottom end to be rebuilt, it was identified that one of the pistons was actually cracked, no wonder the engine was smoking, not a good start! ... then after recieving a replacement set i find out that they new pistons are out of tolerance with the old bores (too small), so not getting any better. In the mean time i aquired another bottom end with pistons fitted, only too find out that it too had a cracked piston in it so unltimatey ive got 2 engine blocks, 2 cranks, 2 sets of rods and no pistons and i'm back where i was 5 months ago. I dont really want to go mix and matching the remaining pistons, too much hassle. There is nothing wrong with the blocks, or the cranks, so I could buy larger forged items and get the bolck bored to suit. If i had the despoable cash, but i dont. In order to move forward i bit the bullet and bought a running engine, with good compression and no smoke Ive ordered i virgin ECU from our friend leighton, so i dont have to mess around with immob and keys, and barrels. So hopefully with that in light it wont be long until i have a car i can actually drive and have some fun in  The car has also had some cosmetic enhancements while all this engine malarky was going on too. (pics too follow ) Ninja
|
|
|
Re: Bravo 20vt Project
[Re: ]
#1225092
09/06/2011 01:38
09/06/2011 01:38
|
ninja
Unregistered
|
ninja
Unregistered
|
|
|
|
Re: Bravo 20vt Project
[Re: ]
#1225940
11/06/2011 14:40
11/06/2011 14:40
|
ninja
Unregistered
|
ninja
Unregistered
|
the ball is well and truely rolling again engine was stripped down to just the block and head this morning (no need to seperate these) it will get a bit of a scrub over the next week, and hopefully re-assembly with the uprated parts next weekend Ninja
|
|
|
Re: Bravo 20vt Project
[Re: ]
#1284797
30/10/2011 00:27
30/10/2011 00:27
|
ninja
Unregistered
|
ninja
Unregistered
|
Ok, time for a very big update 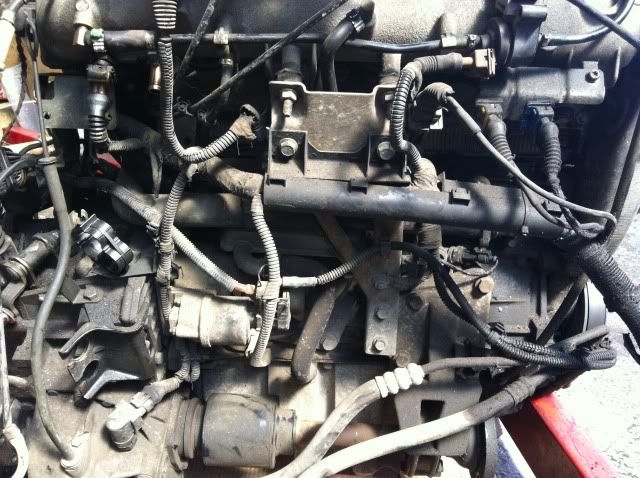 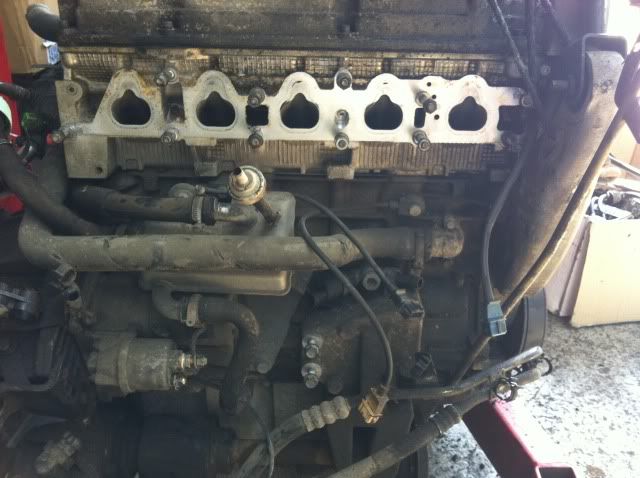 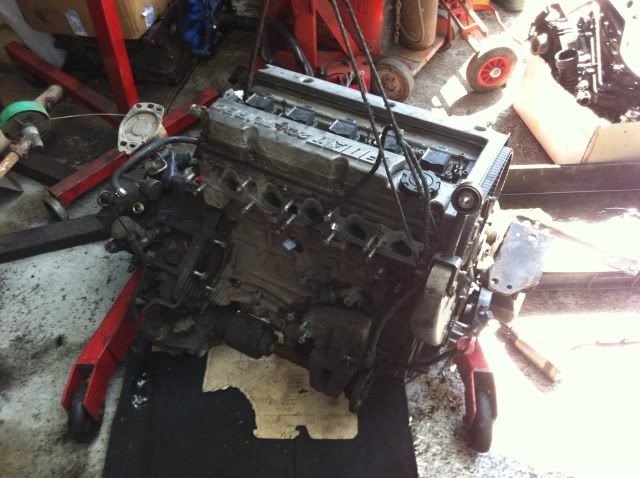 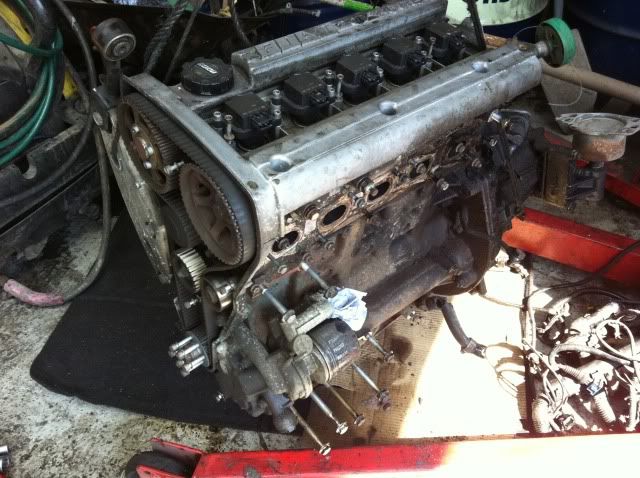 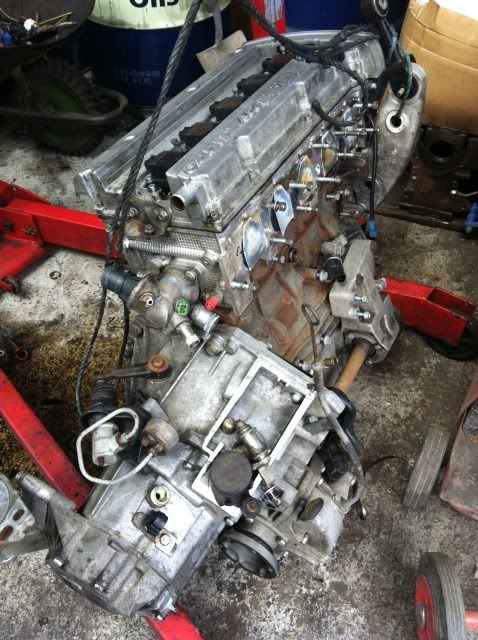  With the engine stripped i gave the block a lick of paint and cleaned up the head.    The upper mount was changed 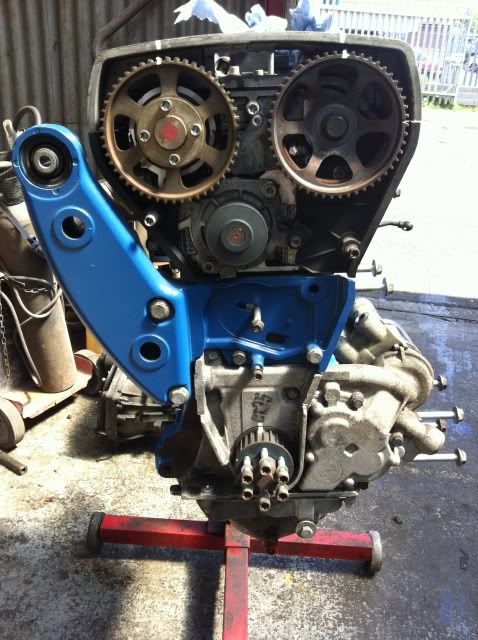 the water pump was changed  new cambelt kit was fitted including pulley and adjuster 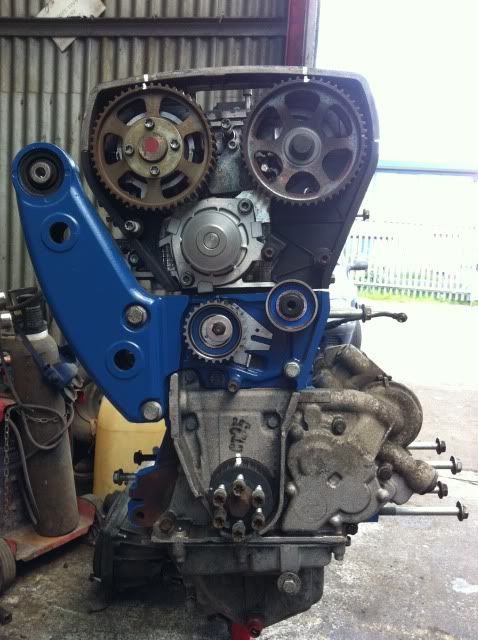 new thermostat was fitted (although i believe its one from a stilo, cause its got an extra output!? still fits though ) 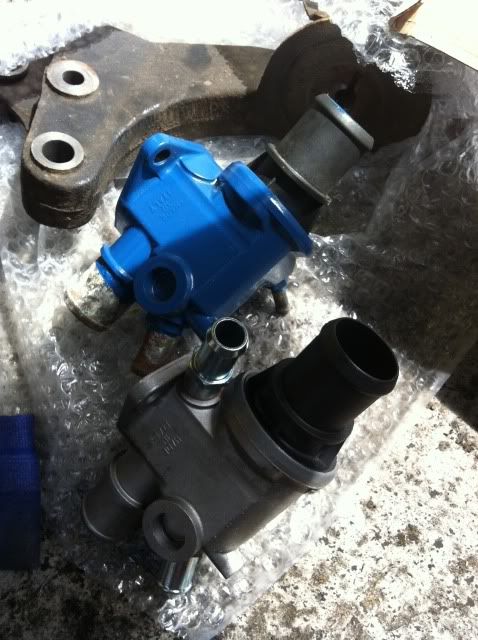 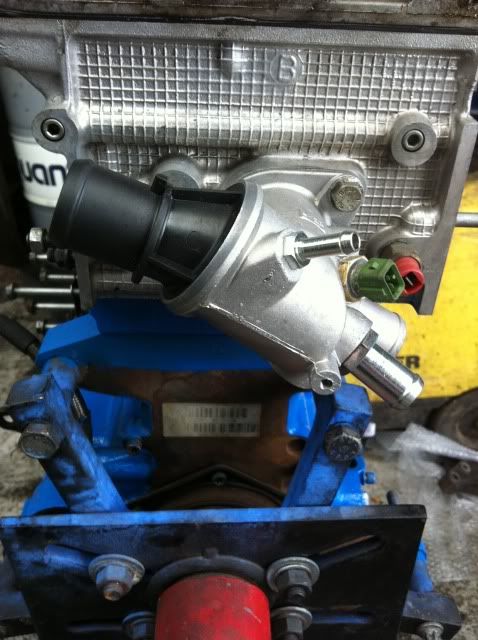 New oil filter fitted  started fitting the components and sensors on the engine 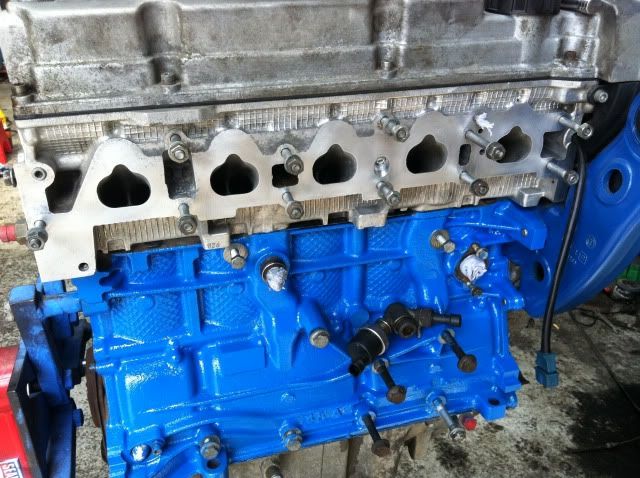 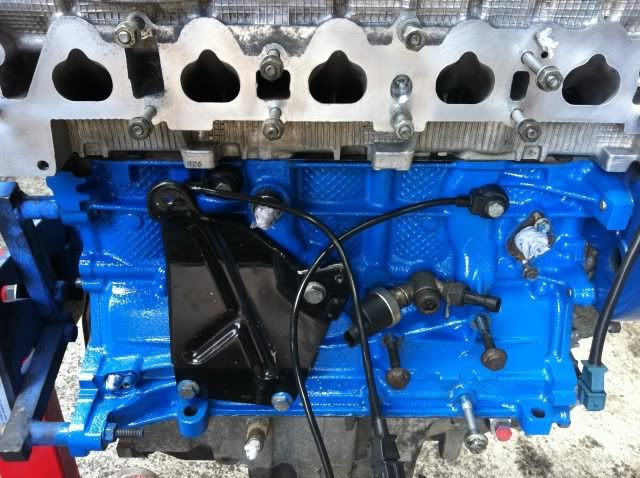 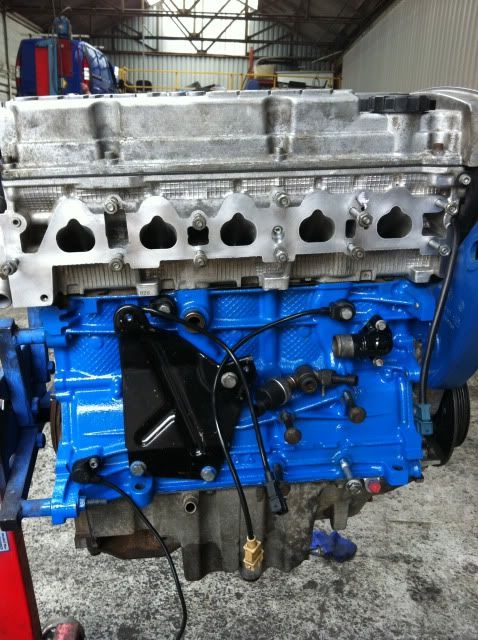 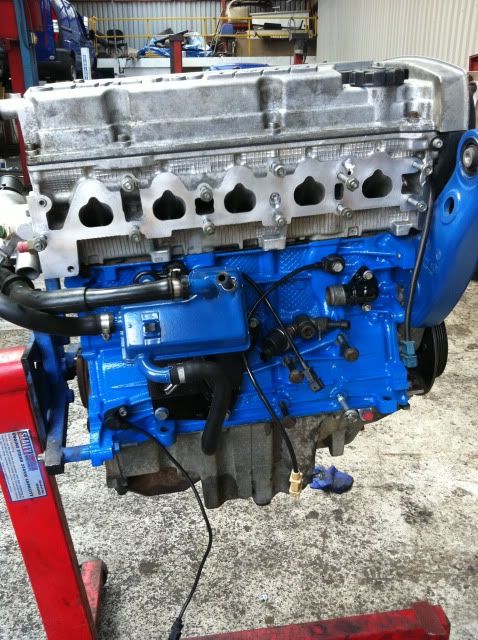 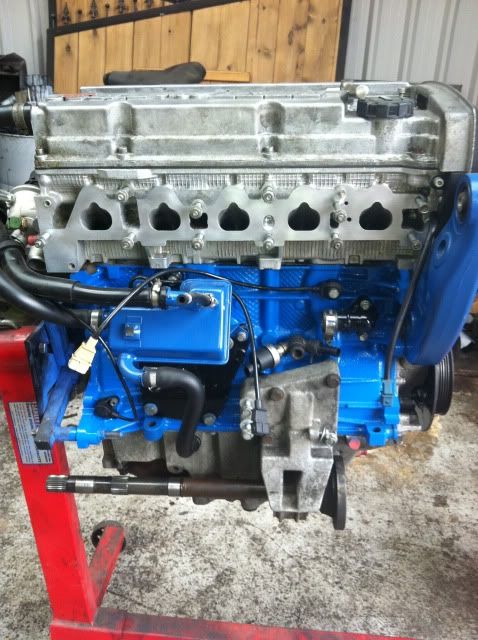 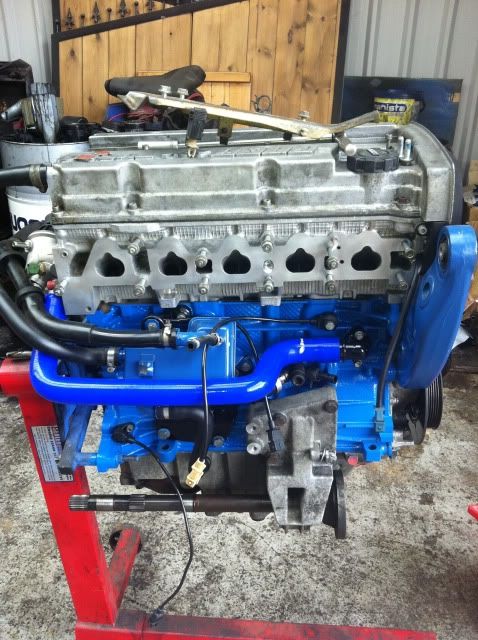 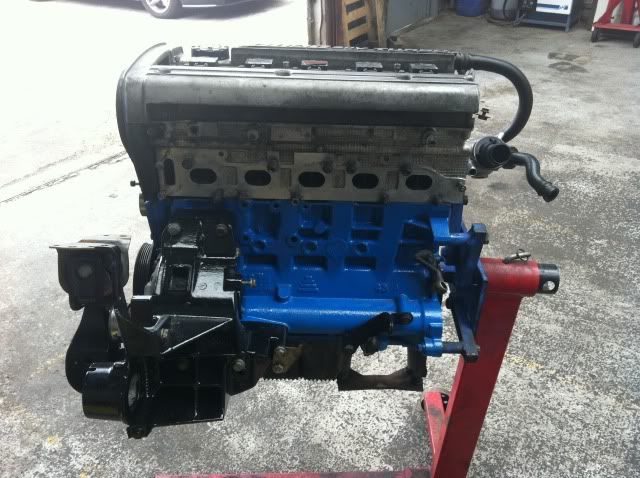 Fitted a JBT modified lower pulley (with a bit of help from JBT, thank) 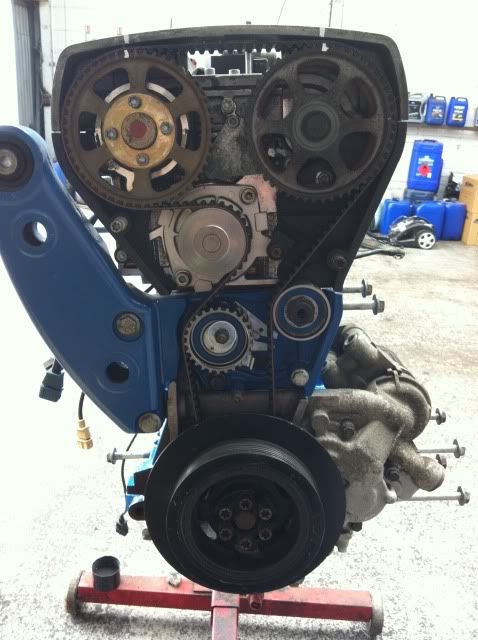 Started fitting oil breather, breather hoses and new silicon water hoses auxillary bracket fitted. Water rail went on 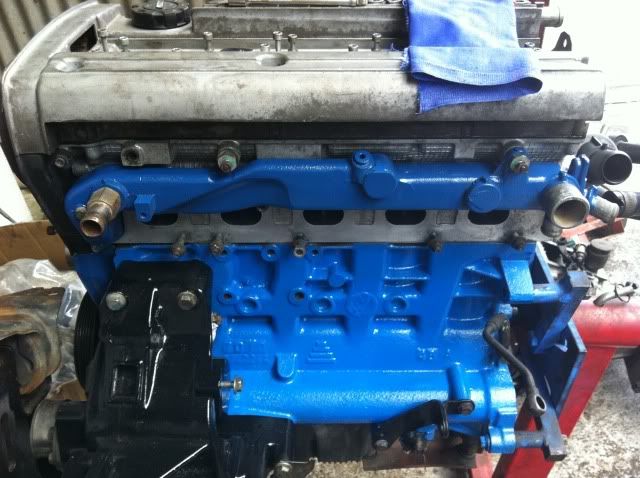 Swapped the cam cover, and fitted new gasket. 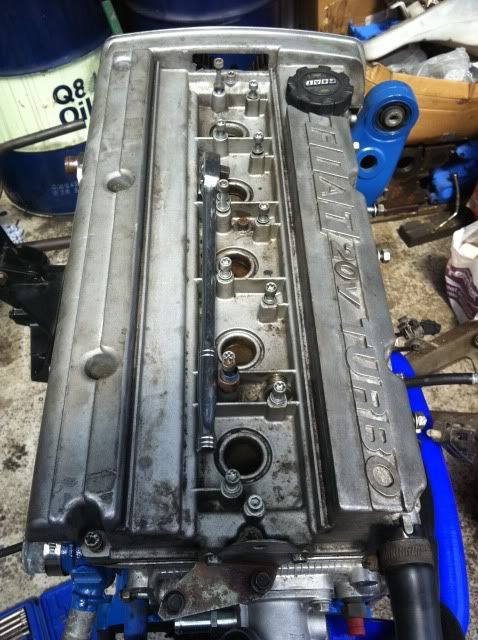 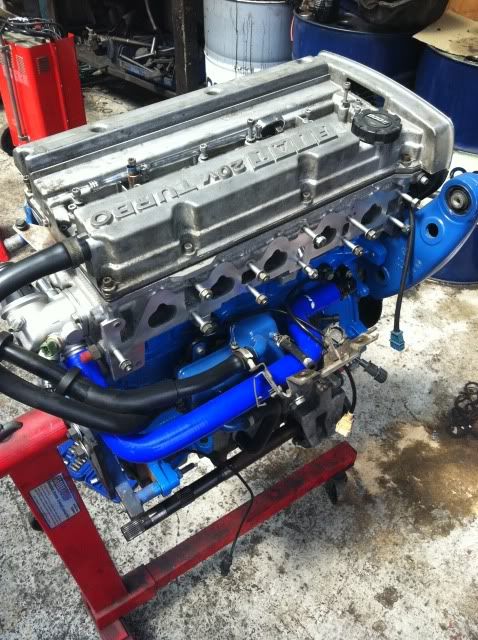 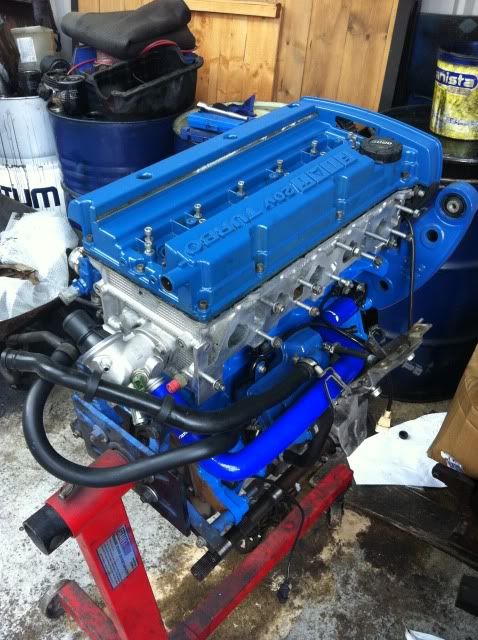 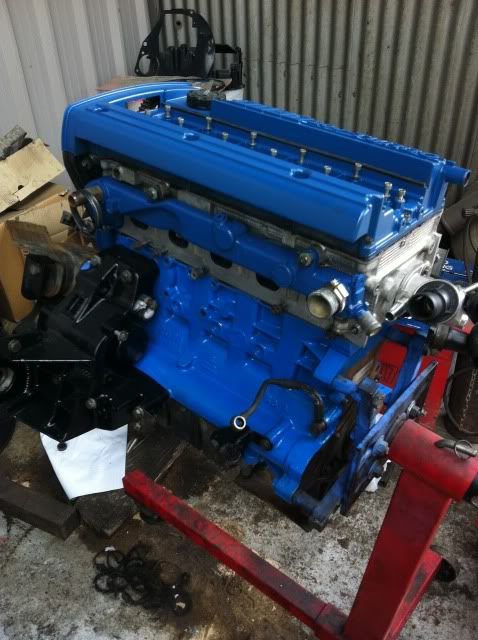  Intake assembly fitted (please see earlier post for parts list) 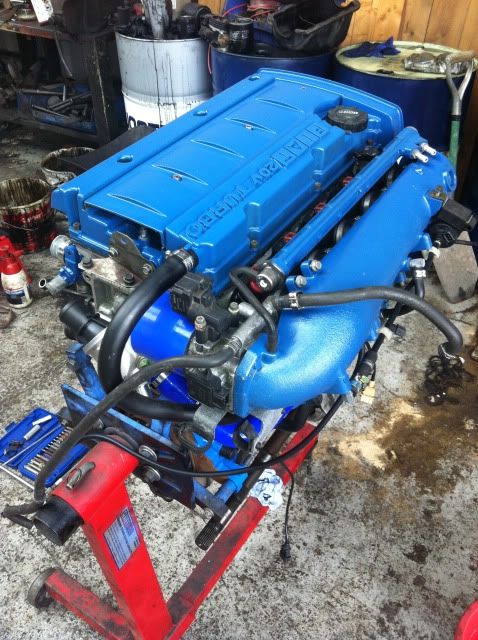 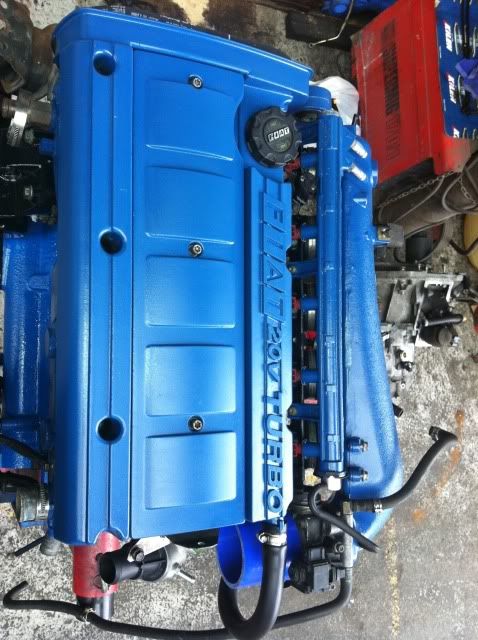 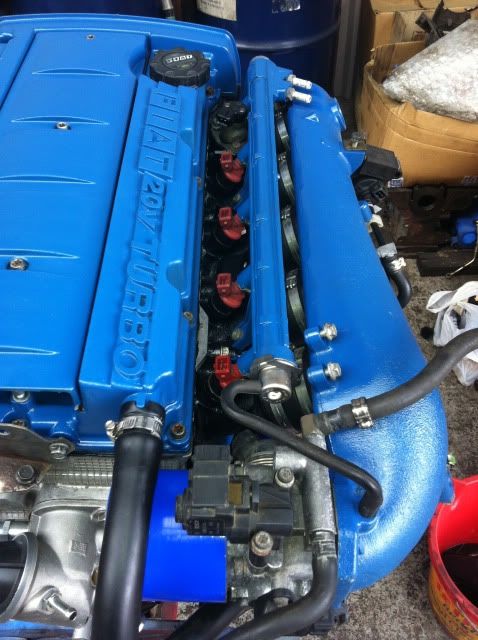 More fitted around the back 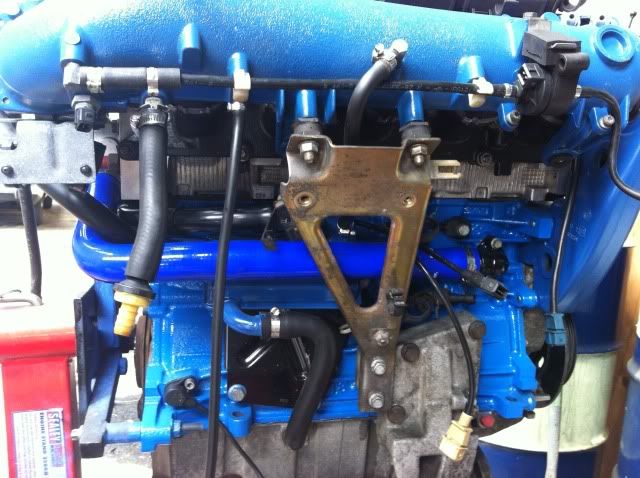 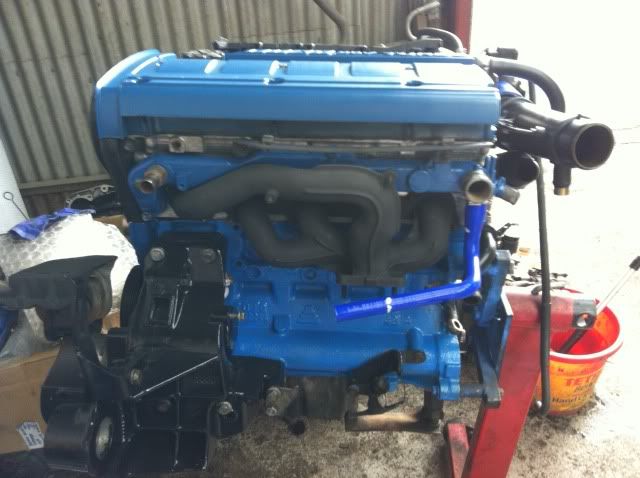 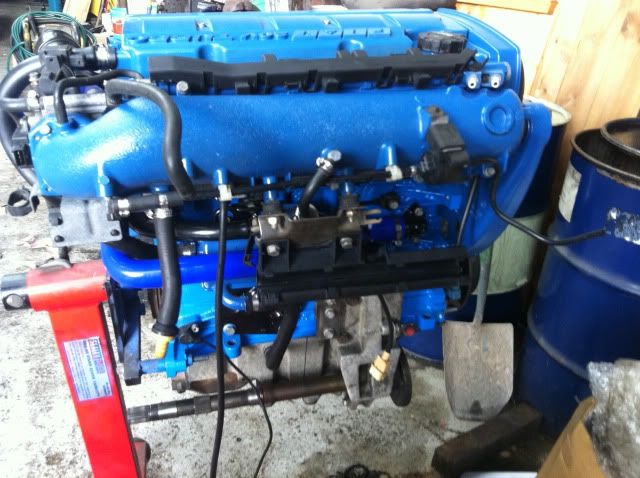 Ported manifold went on (early manifold so i modified it to seperate the 5th brach)   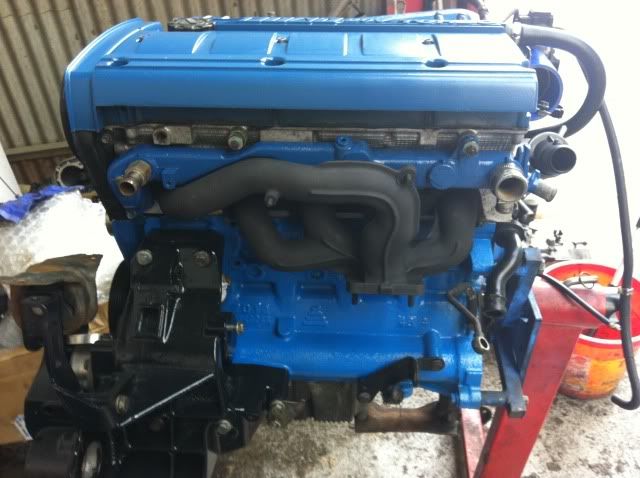 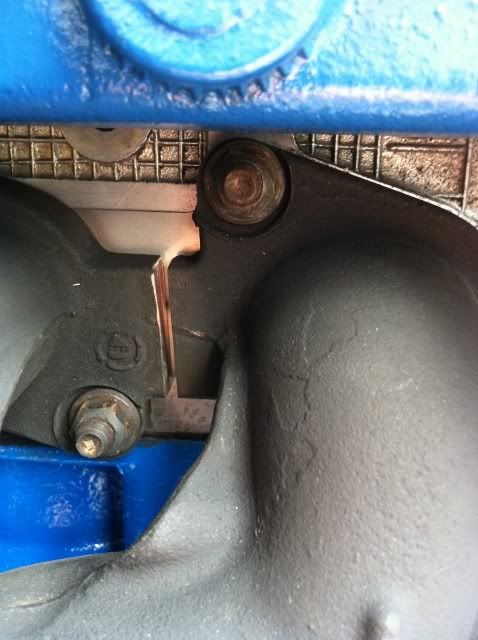 Started collecting spiders already 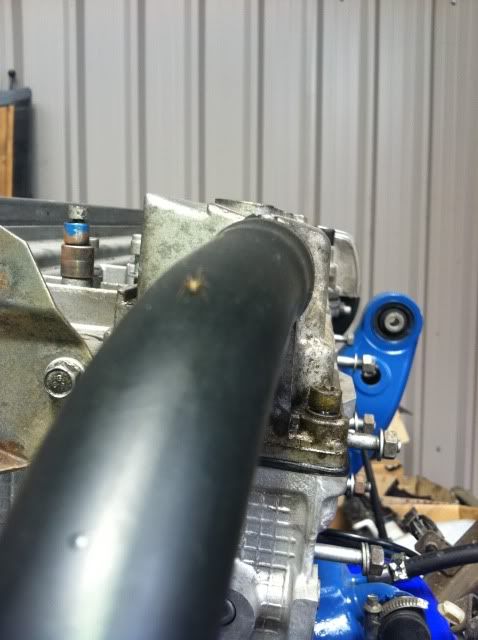 Nice assortment of new hose clips 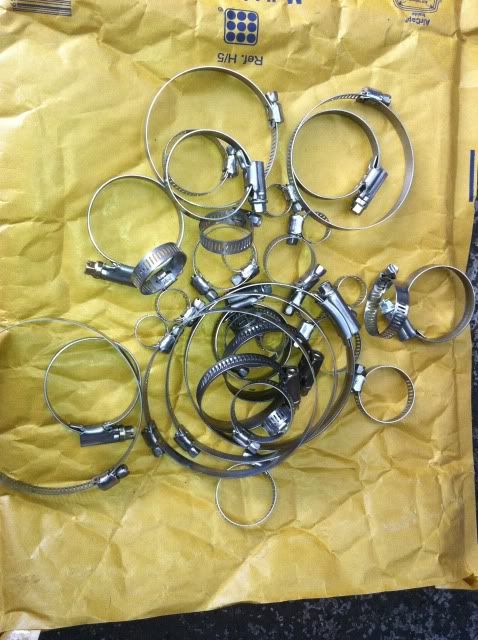 wiring loom was laid out, cleaned, checked, and re-wrapped 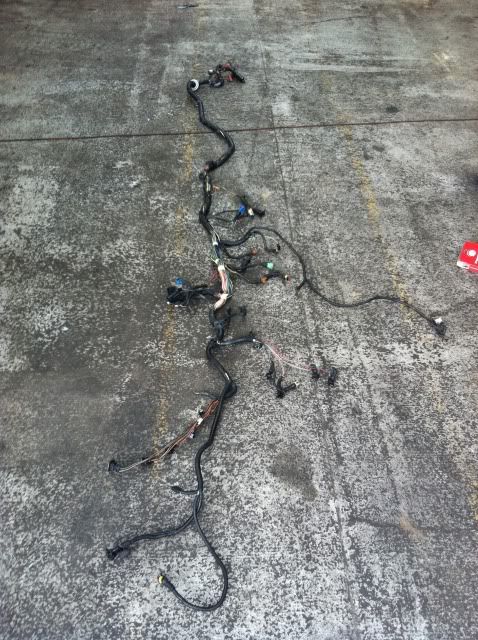 Oil cooler pipes and PS pipes were cleaned up and coated in protective paint  Spark plugs were changed (for NGK 7's) 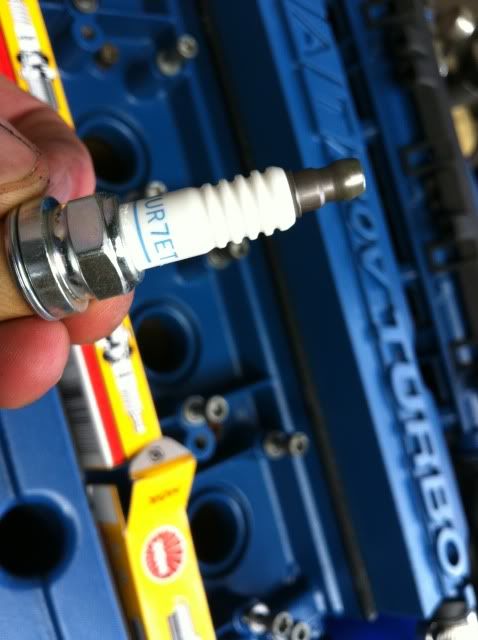 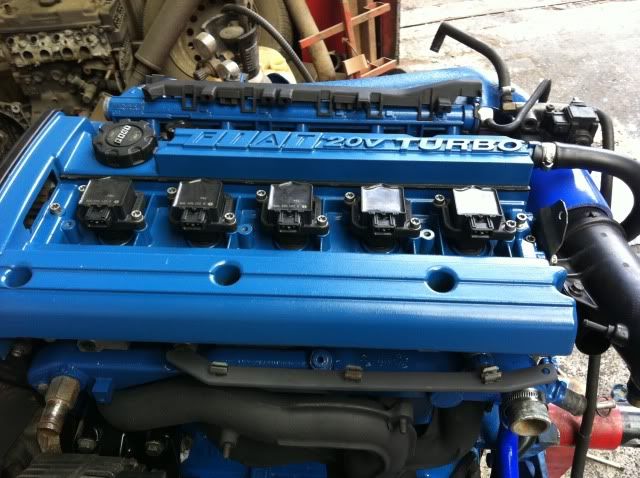 Intake pipe and DV fitted   Alternator and PS pump in, new auxilery belt and pulley and oil cooler bracket on.   Cambelt cover was modified for the larger pulley and fitted.  Mated up a test version of a 5-stud to 3in adaptor developed with MIJ  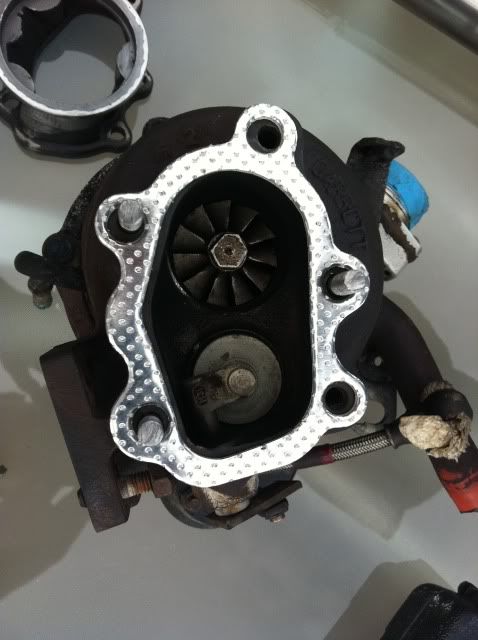 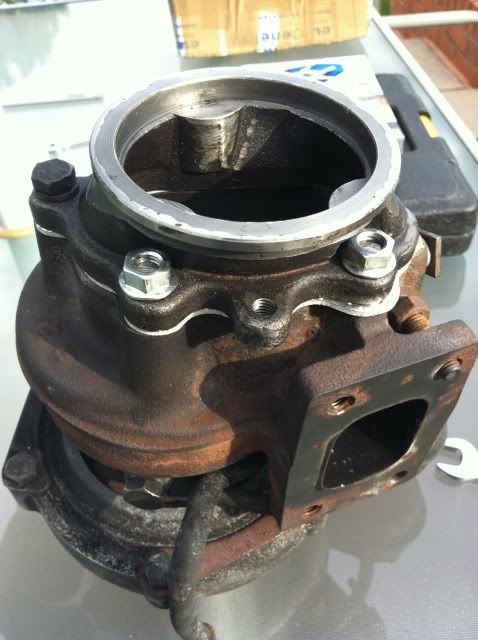 Had to take the turbo apart because the actuator bracket was not in the right place!? 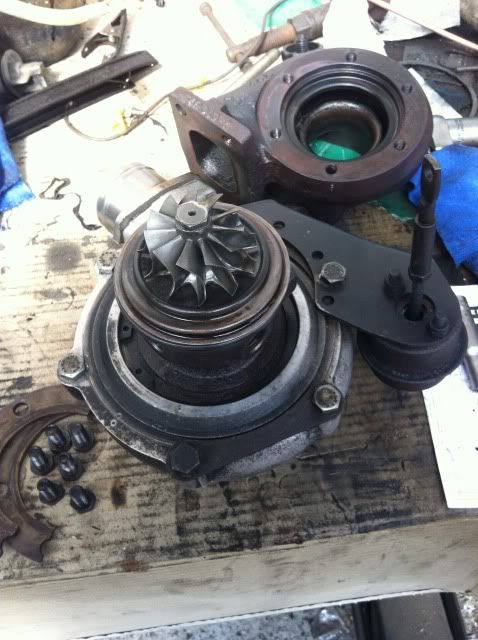 turbo fitted onto manifold (with gaskets) 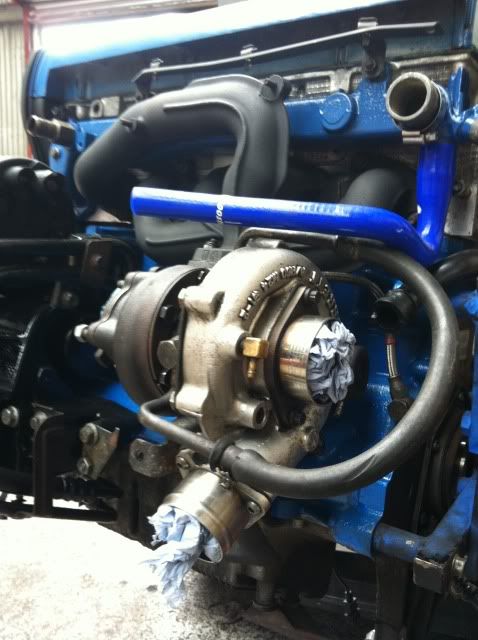 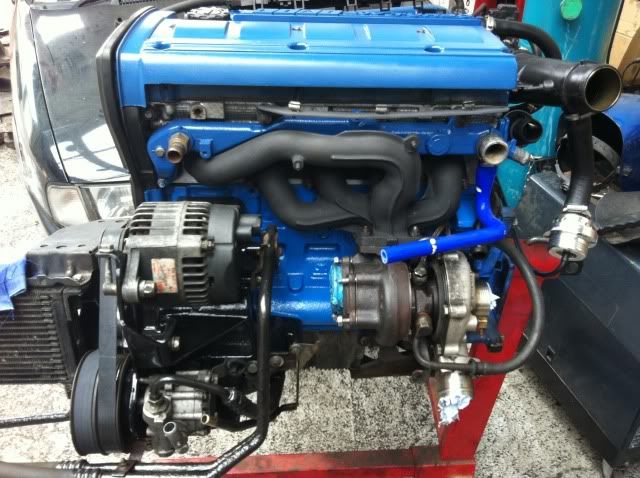 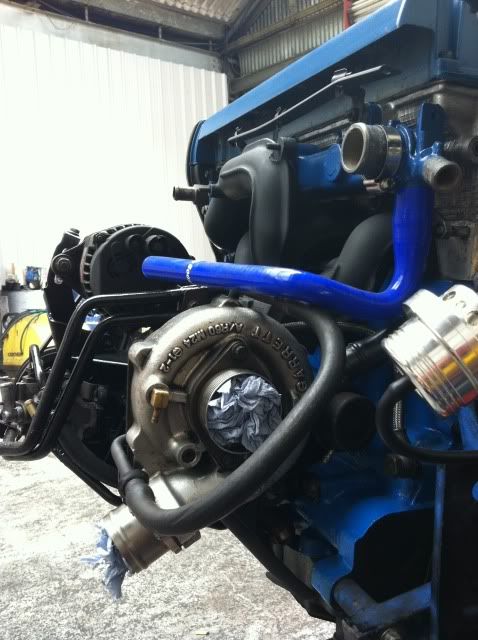 flywheel on 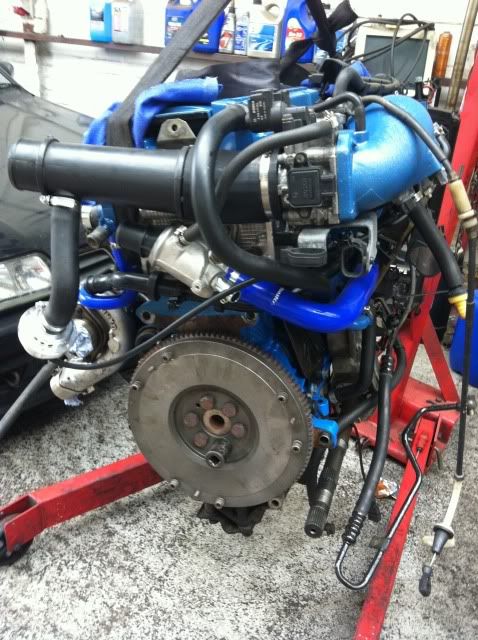 6 Paddle clutch on 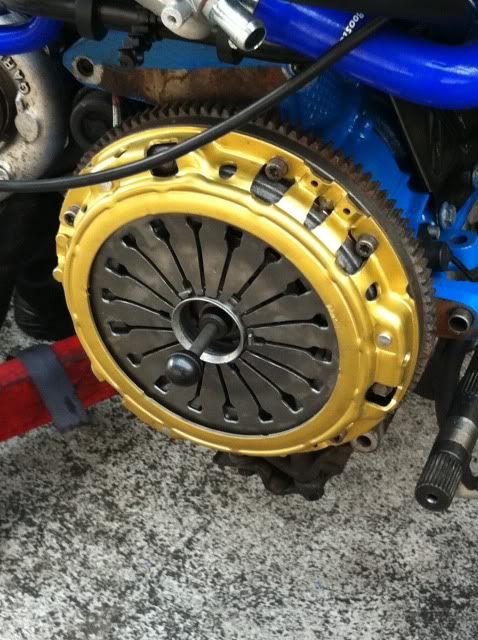  realised i forgot to put the backing plate on at this point so had to take them off again lol re-fitted, then the gearbox went on. At this point we made a short shift too, although i think i went a little too far lol (its short!!)  wiring loom went on, or as much of it as i could at this point   the engine was ready to go in now
|
|
|
Re: Bravo 20vt Project
[Re: ]
#1284818
30/10/2011 02:27
30/10/2011 02:27
|
ninja
Unregistered
|
ninja
Unregistered
|
time to bring the car in, she had not been started for a while, so the jump start was a painful... 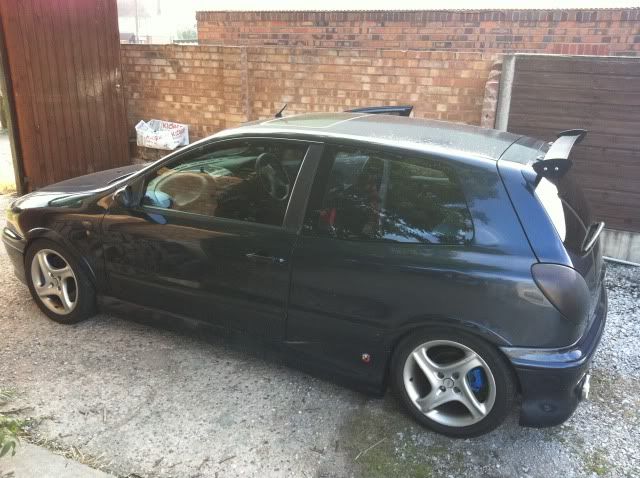 1.8 engine out (not many photos of this but you dont need to see this bit anyway ) 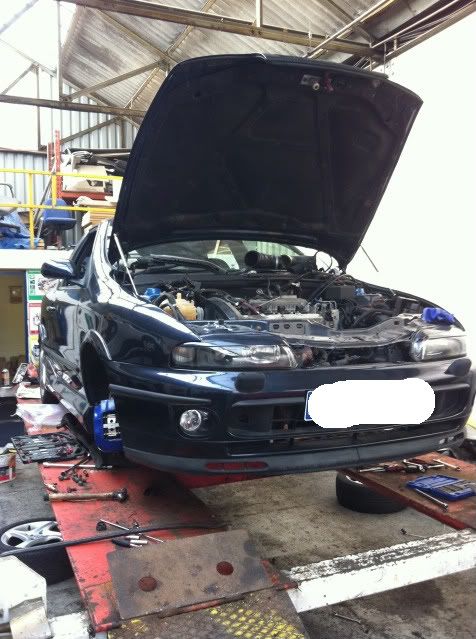 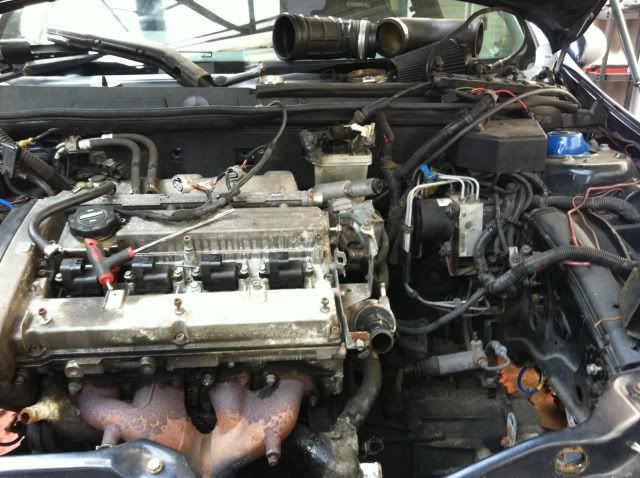  I failed at the ABS swap, unfortunately the plug on the bravo ancillary loom was completely different, and i can live without splicing the loom 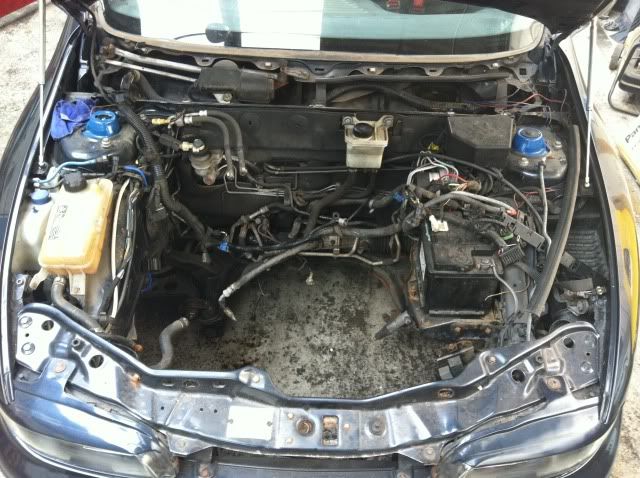 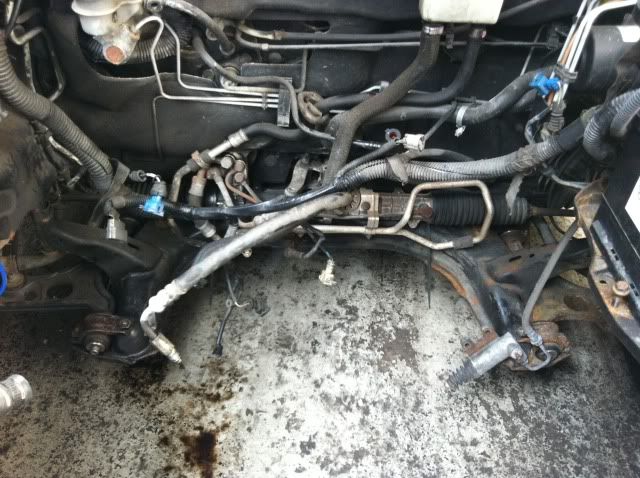 With the engine out, this gave me chance to clean up the bay and make a few modifications that would be very difficult with the engine in place. Bravo 1.8 brake master cyclinder and reservoir are a single unit, i was advised it would foul the coupe intake manifold so needed to be changed. 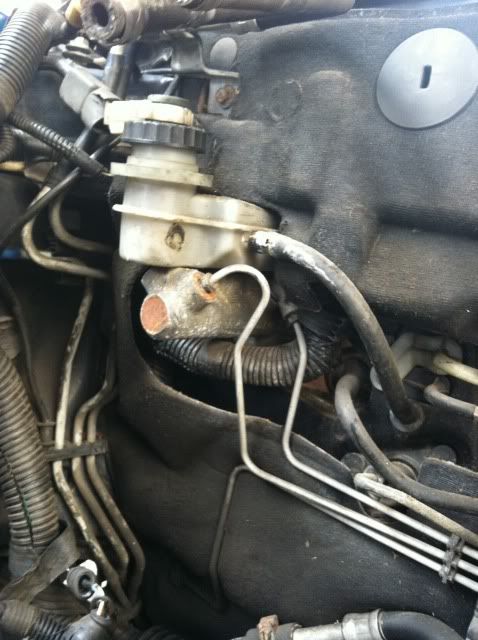 ] the coupe reservoir fit in the same place as it would on a HGT and luckily the mountings were already there on the HLX although the wiring had to be lengthened somewhat. the cylinder however, fit, fitment wise, but the piston was much bigger than the 1.8 bravo unit, this meant the brakes would be permanently on. To get around this we had to modify (shorten) the push rod at the back of the peddle to allow the correct and full peedle movement.    The brake servo vacuum pipe was swapped for the coupe one 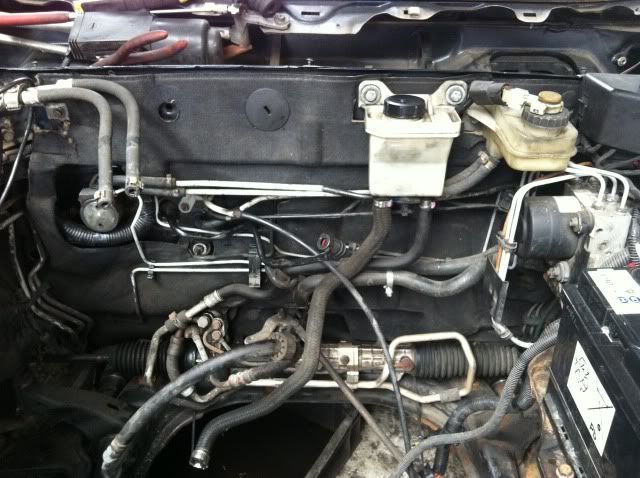 Breather thingy was fitted behind the PS reservoir 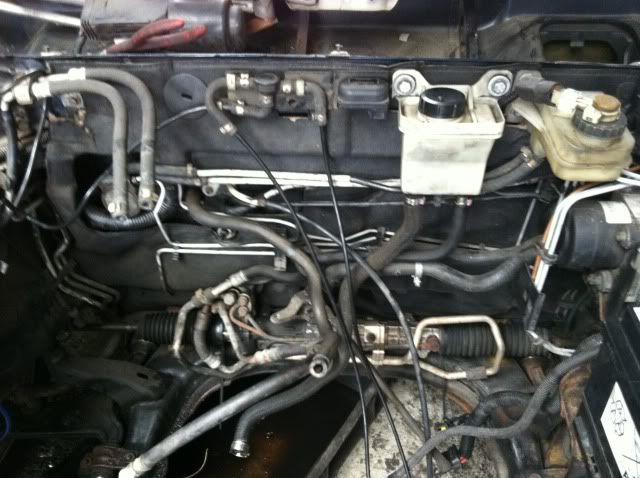 Bravo transmission tunnel had to come down due to the difference in gear selectors (bravo = rod/coupe = flexible) the tunnel fitment was the same, so i opted for the coupe tunnel, as the gearstick fitment differed, but i had to swap the handbrake for the bravo one as they sit in slighly different places in the centre console (handbrake bolt pattern was the same on both tunnels) We had to removed a bracket on the steering rack (used for the selector rods so no longer need) this made the steering rack core exactly the same as the coupe one) Throttle cable was removed Heater matrix hoses were swapped we also bled the brake fluid through the master cylinder before the engine went in. The engine was then put in place!!! 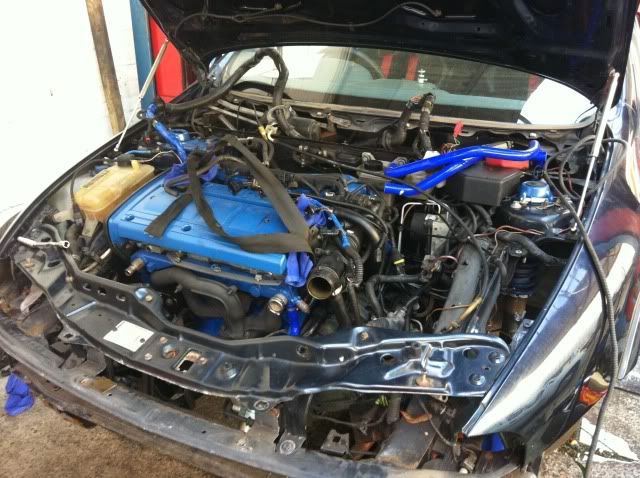 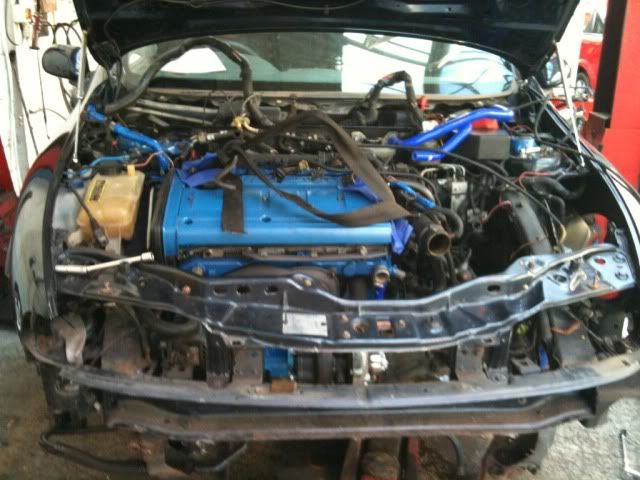 Clearance between the turbo and the radiator support looked ample. 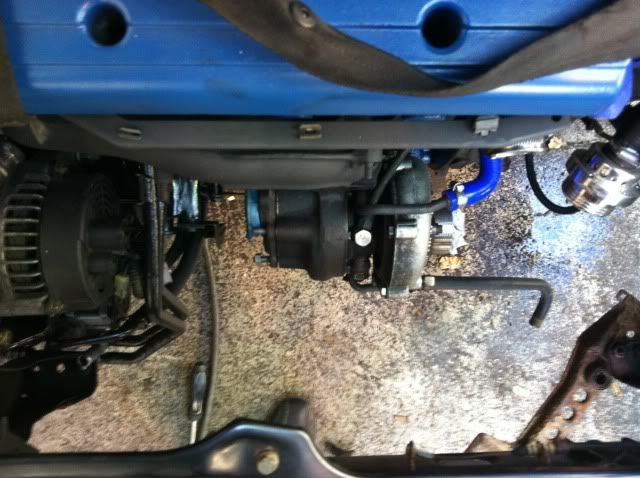 Oil cooler was positioned perfectly 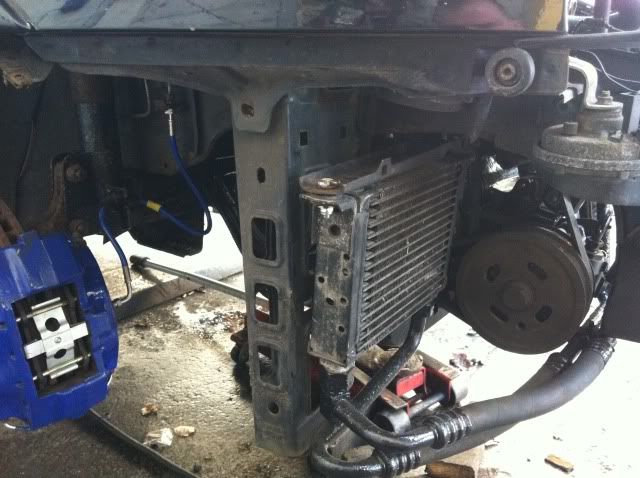 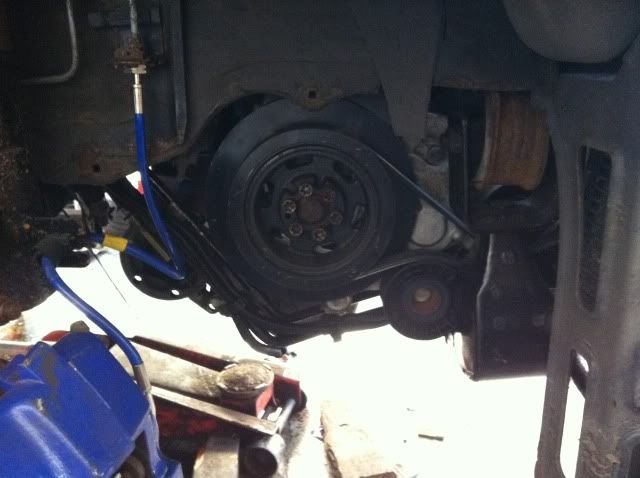 Drive shafts were fitted (fitted perfectly as i already had coupe hubs, wishbones etc) Wiring loom was fed through the bulkhead, and fitted in the footwell. (fitting was perfect, ecu sat in the same place, wiring was the same route, relays and fuses were the same fitment also. Only had to remove glove box for access to fit everything) 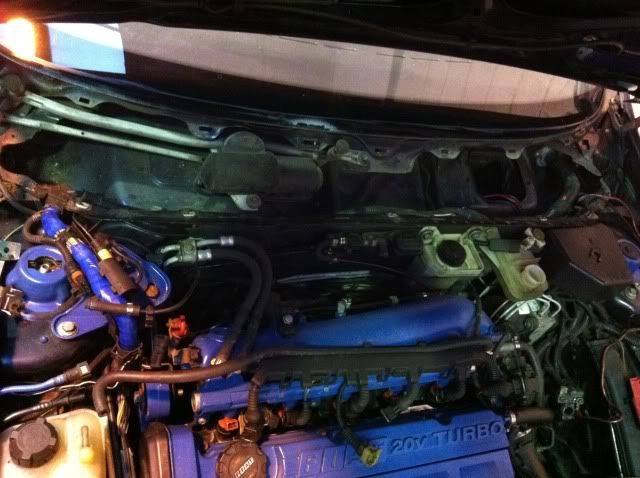 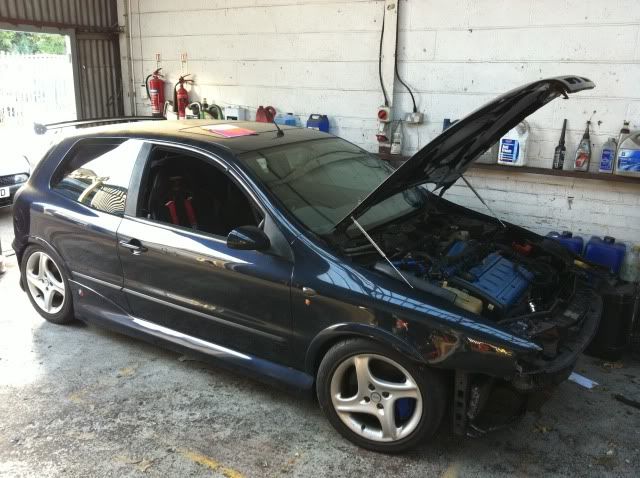 Scuttle panel went back on, and a few clips and cable supports in place, and header tank hoses connected. 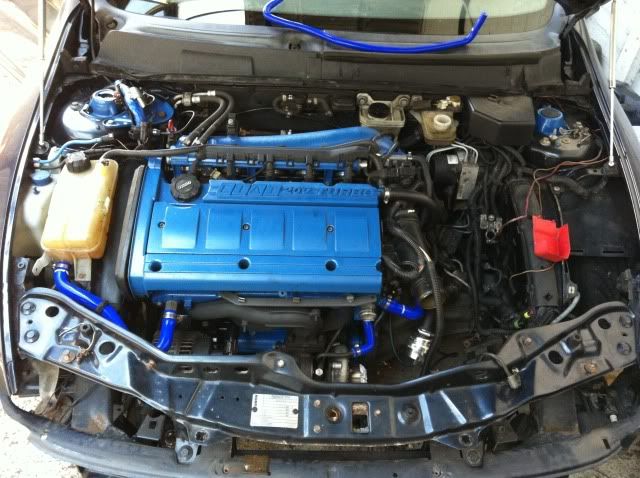  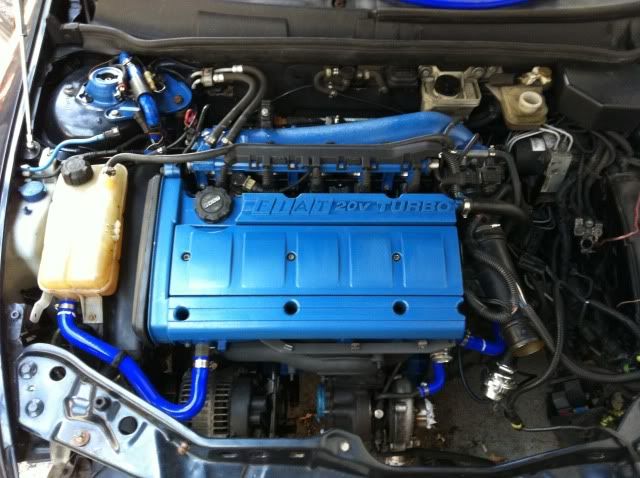 Radiator support bar was removed and checked, (looked like it had seen better days but removal of the surface corrosion showed it was fine, so added some corrosion protective paint and refitted) i did have to modify this for extra clearance of the oil cooler pipes. 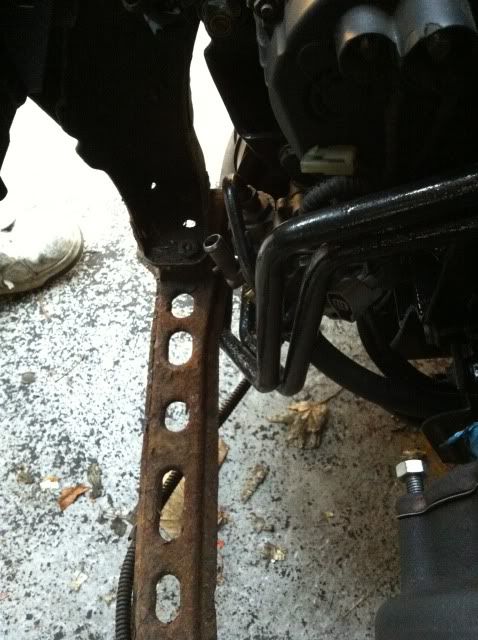 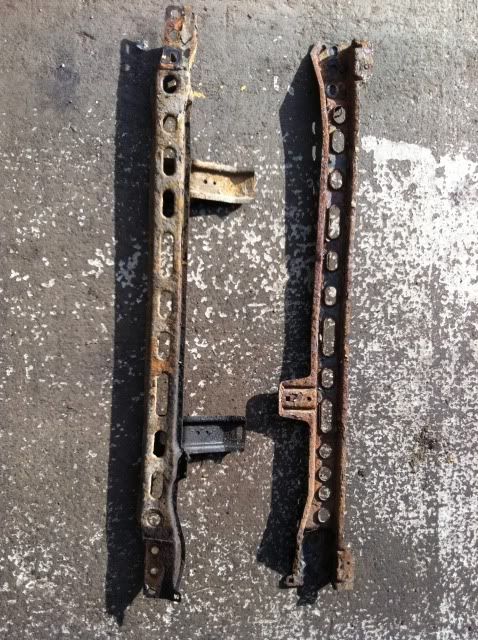    Gear selector cables were connected, and slave cycinder was connected and bled.  A couple loose plugs connected (engine to ancillary loom, earths fitted, battery connections swapped, lamba sensor and just made sure everything was in secure place) Throttle cable fitted through bulkhead, and onto peddle (alot of adjustment required to raise peddle) Battery tray fitted 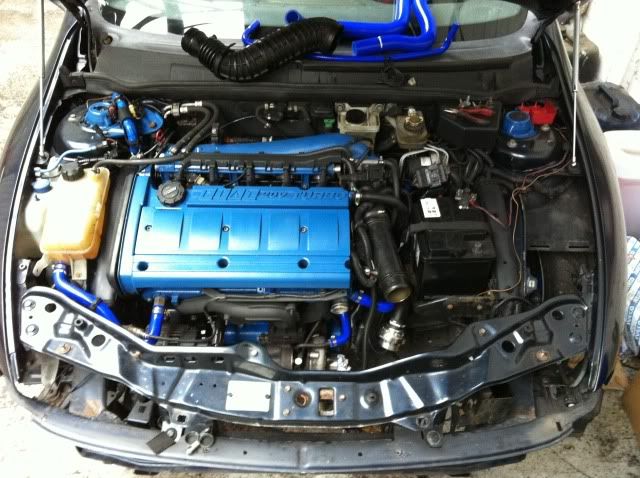 fuse box fitted to the front of the battery tray (bravo item) Coupe EBV fitted to the fuse tray 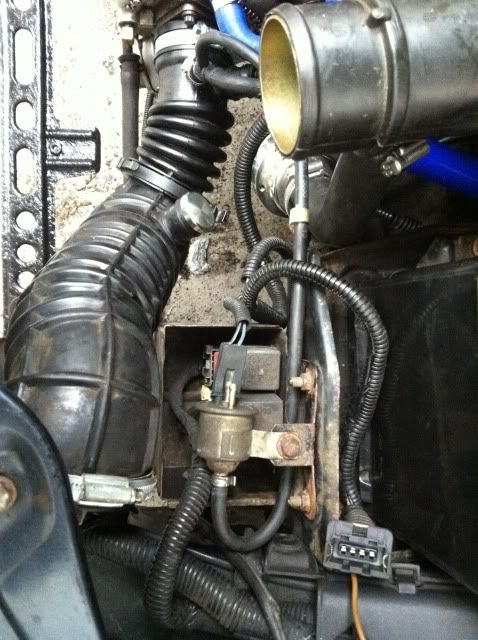 MAF to turbo intake hose fitted had a bit of an issue with the water hose/DV hose/battery tray and DV blank rubbing, so a trim, a and a turn later and clearance is achieved 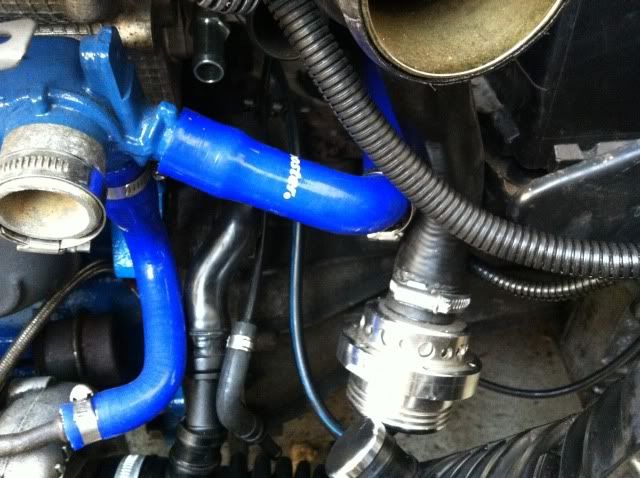 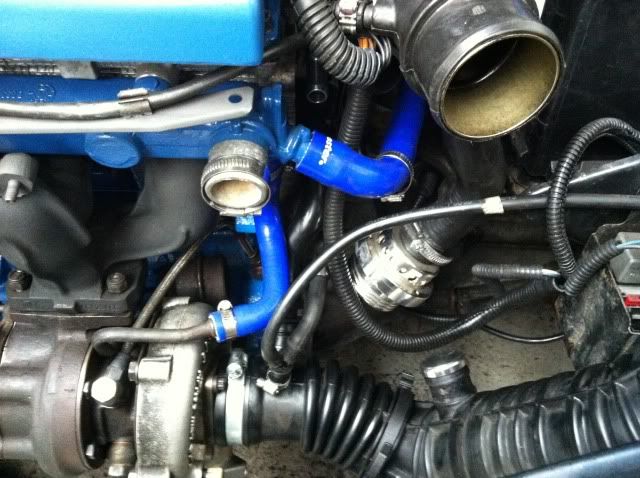 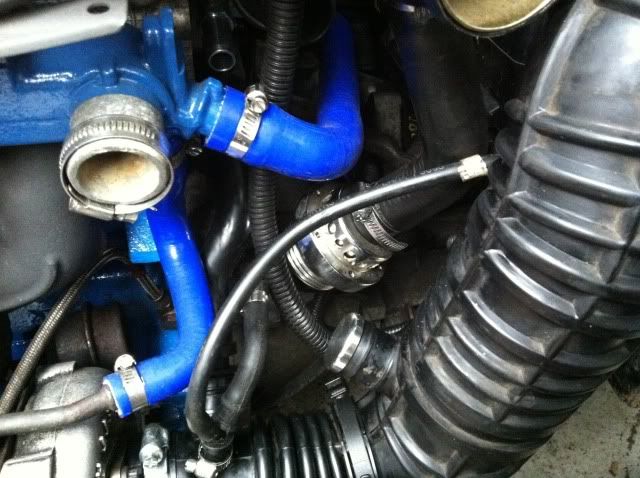 MAF fitted and (temporary) air filter. Although im comtemplating an SIP. 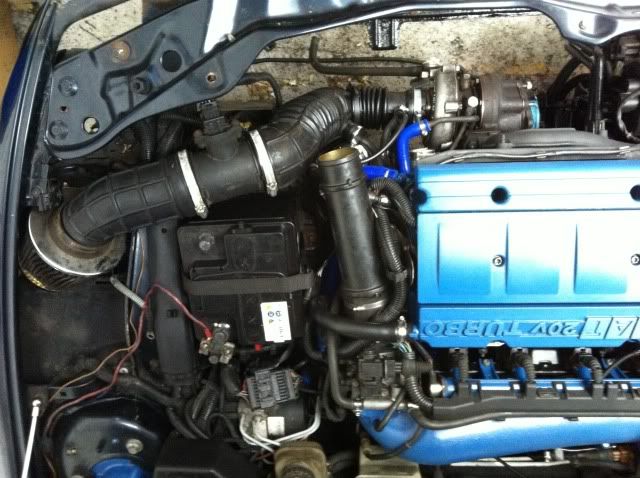 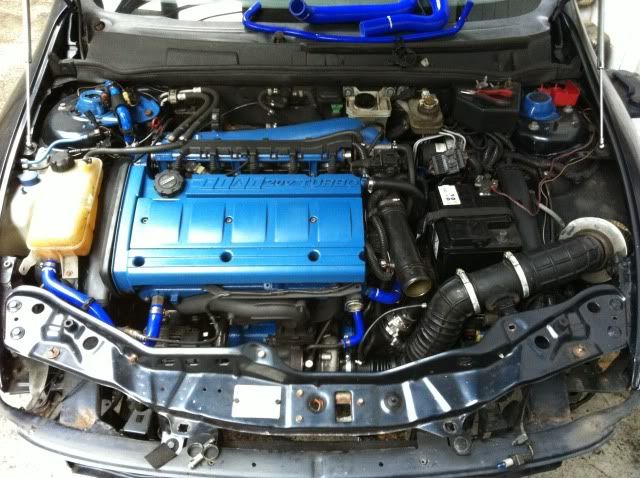 Left it there for today Now i have a few outstanding issues. 1. the connector at the top of the left strut. The coupe plug is 3 pin male, and the bravo plug is 2 pin female!? I have know idea what this plug is at the point but i believe its the light etc on that side 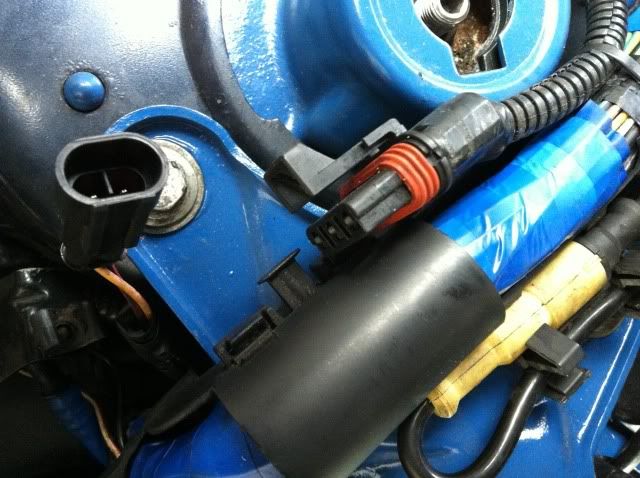 2. The 3rd plug by the battery tray, the coupe plug is 4 pin female, and the bravo plug is 2 pin male!? again i have no idea what this plug is. 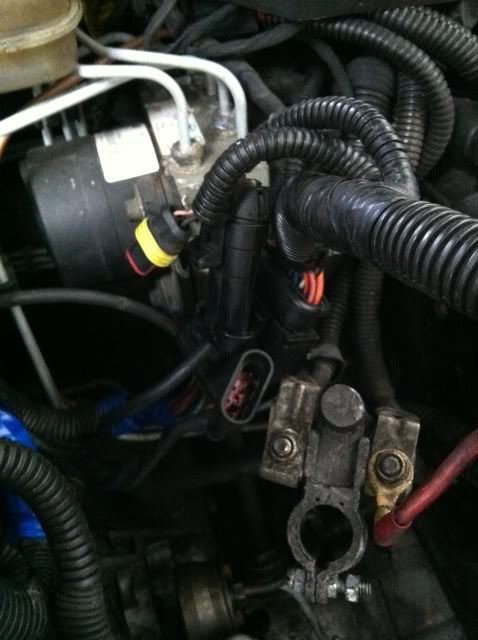 3. Radiator choice!? the coupe rad wont fit due to the top mounting being different, the bravo rad will fit obviously, but the hoses are different. Luckily i have managed to get hold of some HGT hoses that should match the bravo rad to the HGT/coupe water rail (although this makes my rather expensive silcon hoses redundant :grrr: ) I also have no idea whether the 1.8 radiator will hold up the cooling a 2.0 turbo engine (cant find a good second hand HGT rad for love nor money either) Lastly, the coupe power steering reseviour is down behind the headlight, whereas the bravo reseviour is on the bulkhead. now, the coupe PS pipes run 2 pipes from pump at front of engine to rack at back of engine (1 feed to rack, 1 return), the bravo had the PS pump on the back of the engine, so the return goes from the rack straight up to the reservoir, this means the coupes return feed is redundant, but the bravo feed is not long enough, so i am going to modify the coupes return to feed the pump at the front of the engine (make sense ) Still need to fit EBC, feed of for boost gauge, oil temp, oil pressure and fit downpipe/decat/exhaust, but the end is in sight Regards ninja ( ive not spelled checked any of this so no comments please :P)
|
|
|
Re: Bravo 20vt Project (getting pic heavy)
[Re: ]
#1287824
09/11/2011 14:21
09/11/2011 14:21
|
ninja
Unregistered
|
ninja
Unregistered
|
Well after an interesting weekend..... I have decided to go with the SIP, not just for the fact that it positions the air filter in a better place, but it also gives me more room to route the intercooler pipework etc. 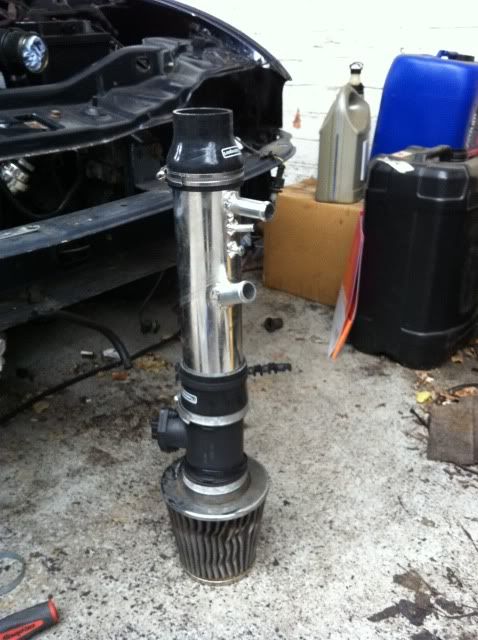 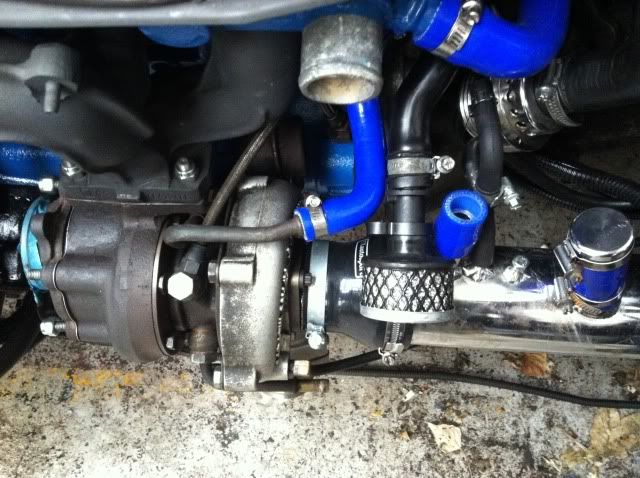 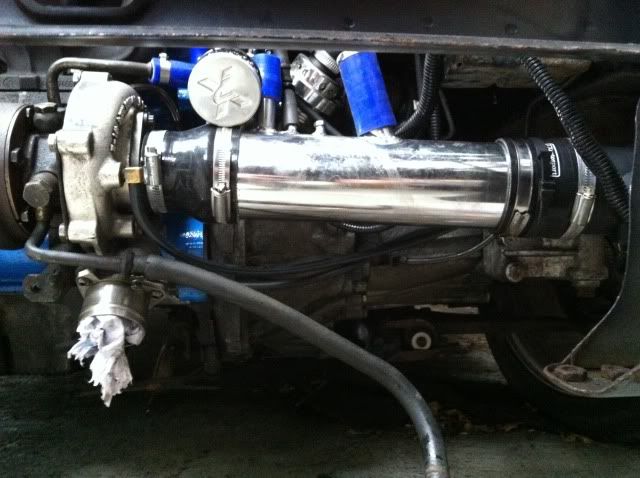 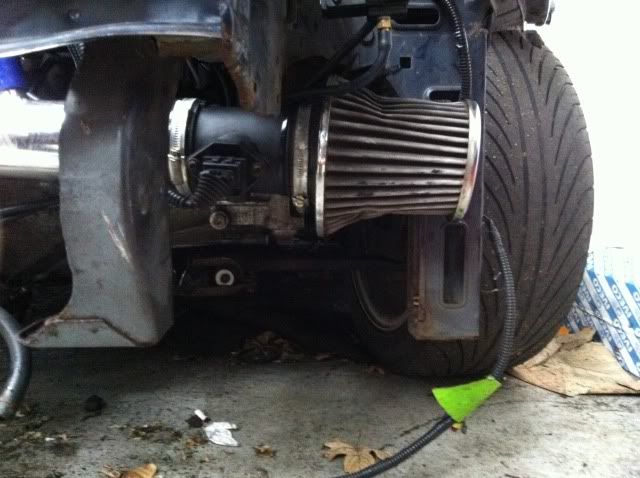 Unfortunately, i have ran into clearance issues with the radiator fan hitting the turbo hopefully nothing a dremel wont solve. Also, the bravo rad does not have a feed for the turbo, so this will need to be created. I believe i have finally got my head around the plug situation now i just need to do something about it before i forget... and as a bonus, 2 of the empty pins are for the oil pressure/temp which means i have easy feeds for the gauges @AP1 - i have not, there was not problem with it when i removed the engine, so did not feel the need. I had a good mouch around while the cam cover was off, and everything looked fine up top. Ninja
|
|
|
Re: Bravo 20vt Project (getting pic heavy)
[Re: ]
#1291005
21/11/2011 21:52
21/11/2011 21:52
|
ninja
Unregistered
|
ninja
Unregistered
|
right, gave up on the bravo rad and fan, so went with the coupe rad and fan, this is tight! 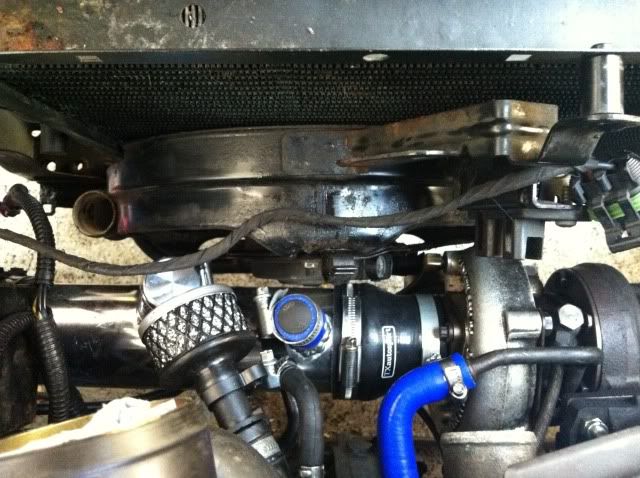 newly developed, MIJ 5-stud to 3in adaptor, and full 3in downpipe, down to std cat/de-cat (oil pipes do need to be pryed forward a bit, and i need to get under the car to fit properly)  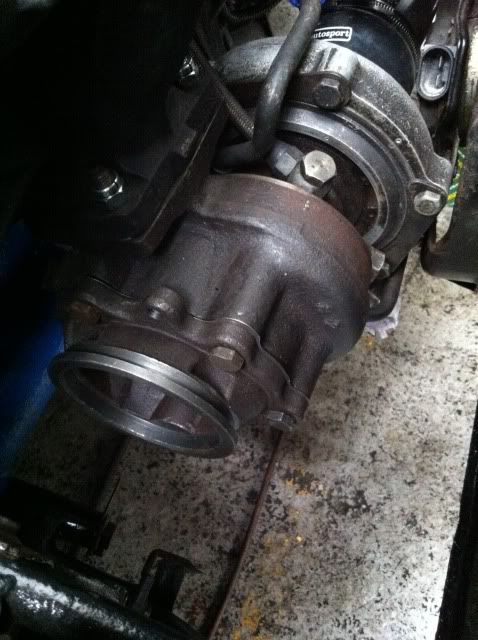 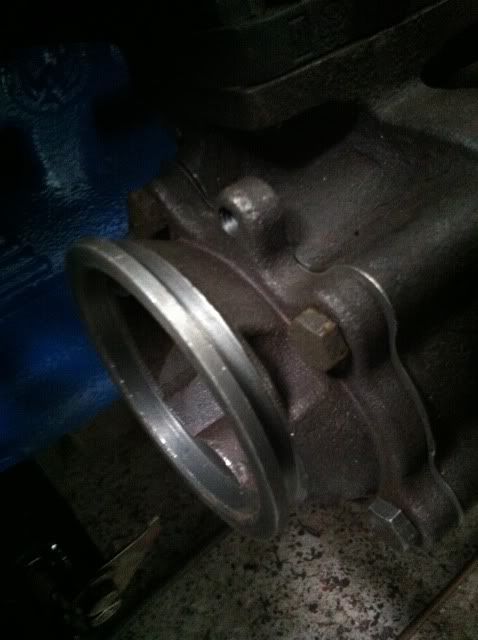 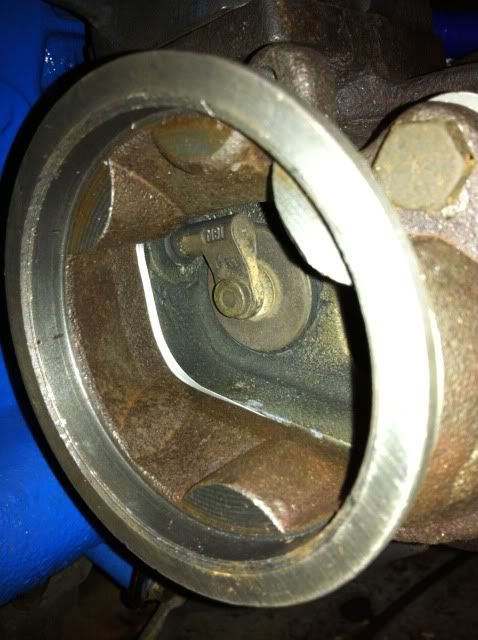 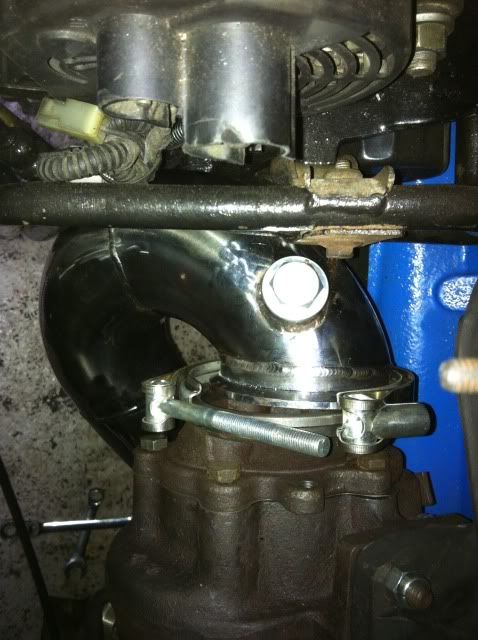 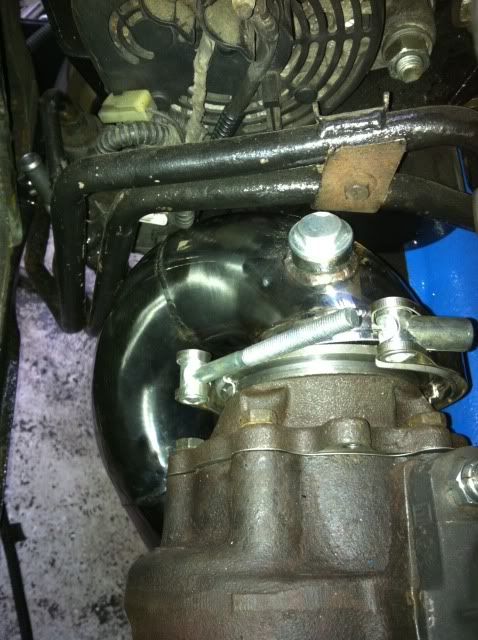 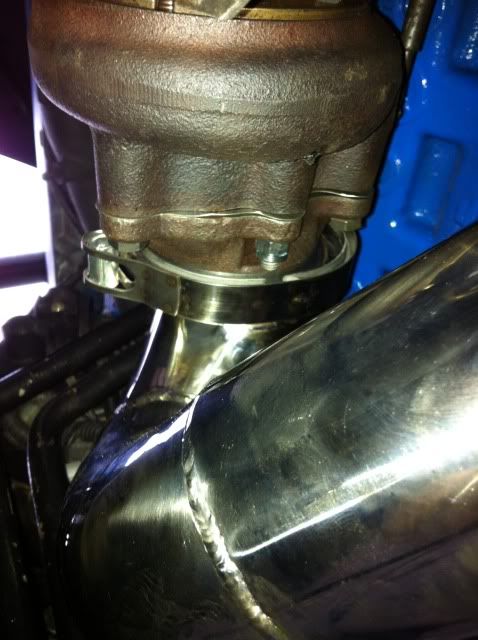  intercooler fitted, and pipework routed 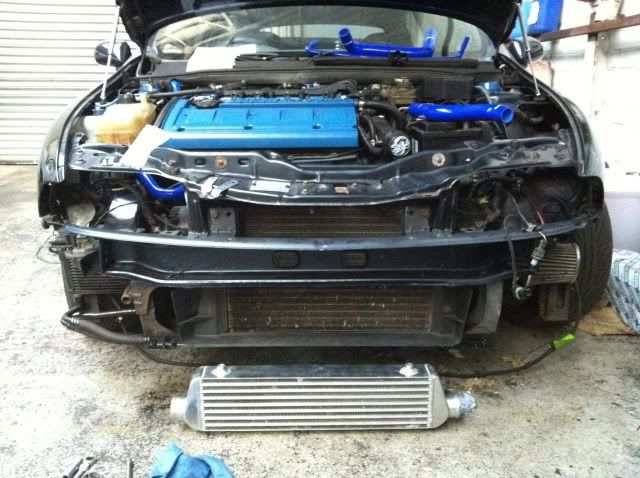 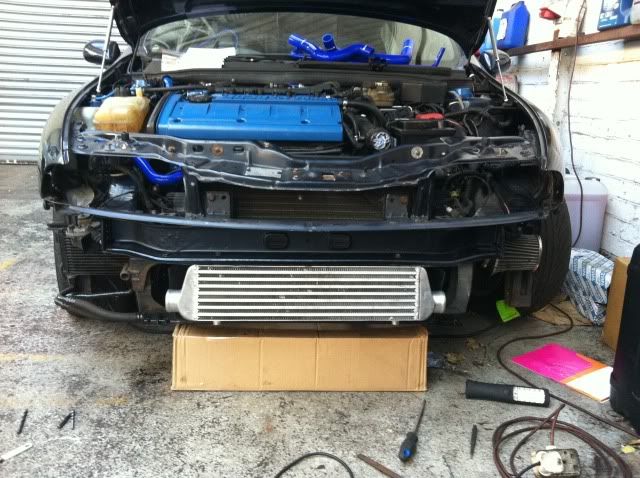 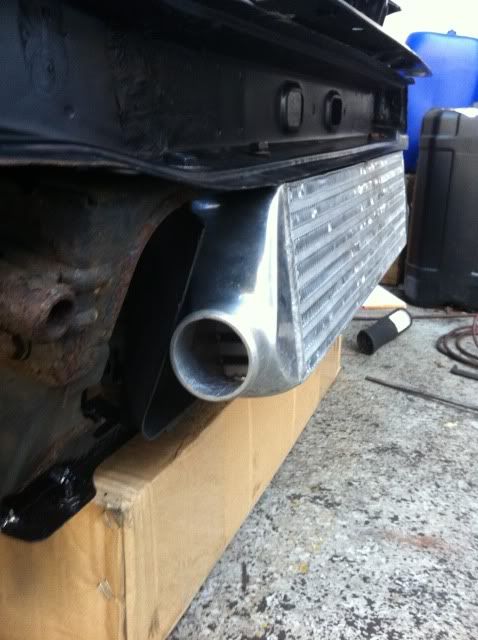 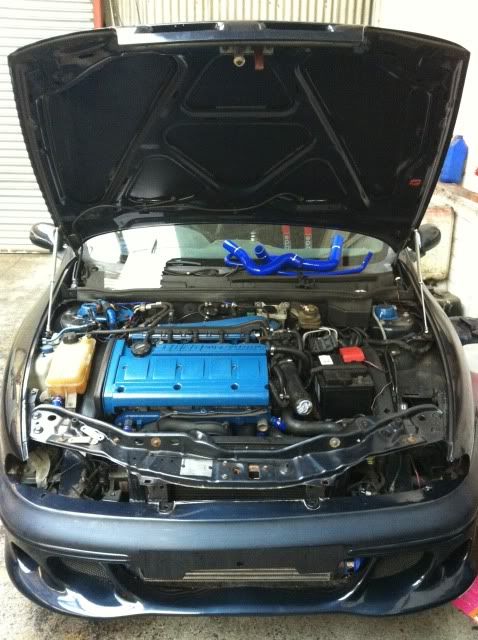 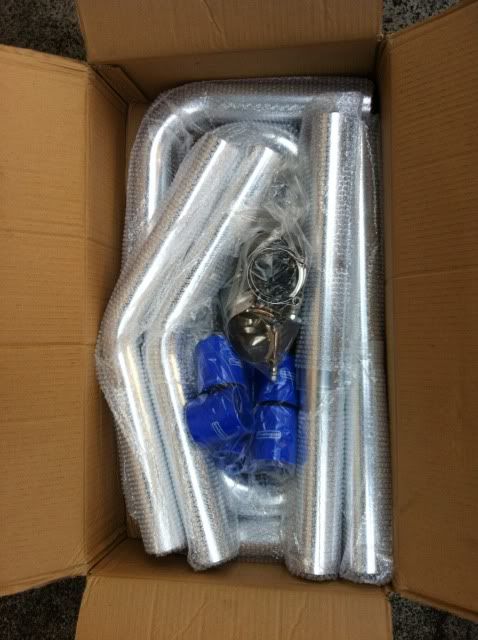 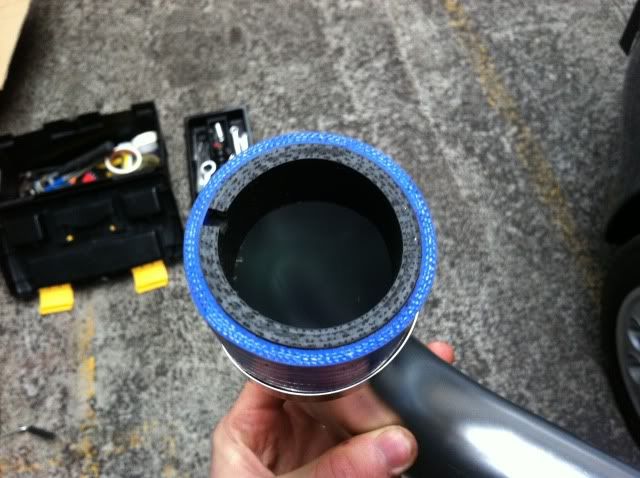 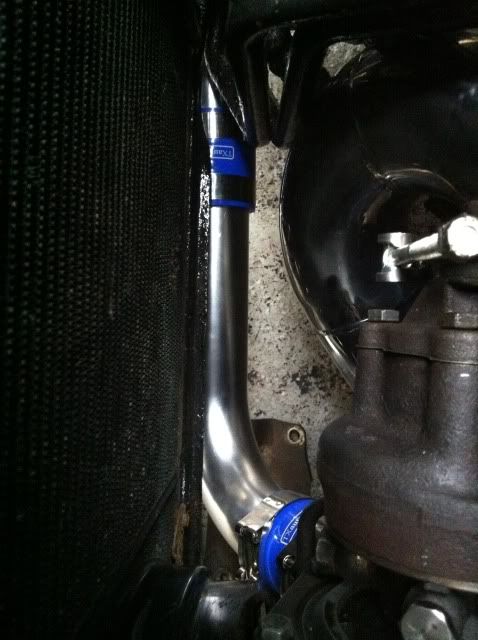 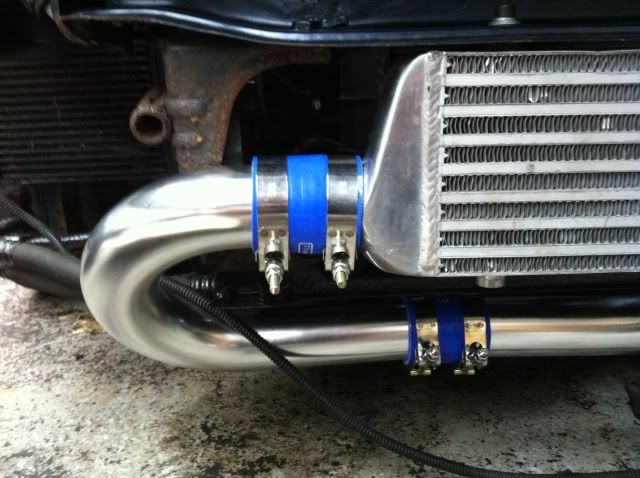 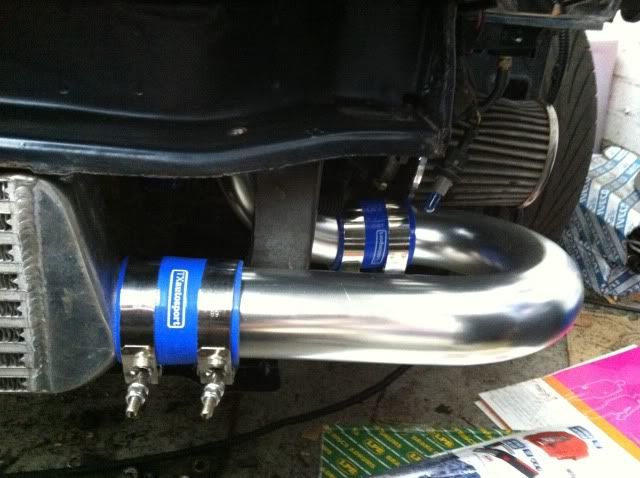 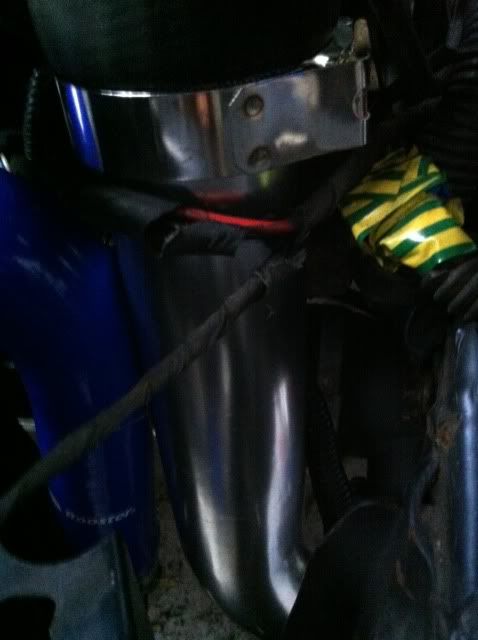 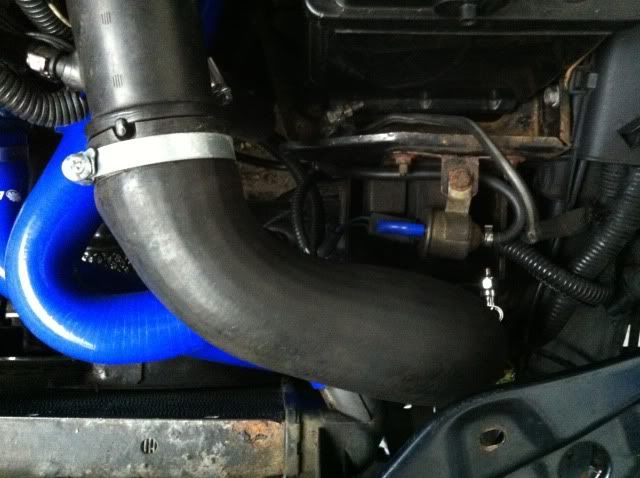 had to double up on the silcone to fit the turbo properly variator relay have has to be extracted from the coupe loom (cause the 1.8 bravo hasnt got one), and i found a spare relay clip down by the battery, so that sorts that plug. The code wires match the coupe plug (albeit a 2 pin male plug into a 4 pin female plug, but hey) getting close now Ninja
|
|
|
Re: Bravo 20vt Project (getting pic heavy)- ITS ALIVE!
[Re: ]
#1294429
04/12/2011 20:02
04/12/2011 20:02
|
ninja
Unregistered
|
ninja
Unregistered
|
AT LAST, ITS ALIVE!! After finishing off the last remainig bits; swapping the coupe charcoal canister fitting the variator relay connected up the DP, decat and rear section putting some oil and water in it was time to connect the battery and turn it over for the first time since the rebuild put the key in, we have ignition, turn the key and........... nothing fuel pump wasnt priming!!?? after a call to leighton, turns out the ECU had no chip in the ECU he sent me lol  chip installed try again, fuel pump priming and try again.....nothing!?? link it up to ECU scan which has the feature to test a few realys (handy feature in this case) they had power, but still nothing!? bridged the starter (there must be an electrical issue somewhere) and it turned over and fired up First Start sounded a bit rough (but thats to be expeted at this stage) found a slight oil leak, and registered a fault with injector 3 fixed the oil leak and dis/re-connected the injector (which seemed to work?), second time lucky!?, Second Start sounds better but upon increasing the revs we had a single loud bang each time!!?? turned out the power steering pump was not seated correctly and was jumping in the housing that sorted, third times a charm!?... Third Start this time sounds much better now the lifters have some oil, very impressed with the sound of the engine, turbo, exhaust Exhaust also seems very level smooth on a std chip considering the changes ive made (injectors, FPR, turbo, DP etc) few last thing to sort in the way of EBC, gauges etc and get her down to leighton for a map Public thank you to leighton and JBT for answering my ramdom calls and all the help from various people on this forum. Massive thanks to NB Autos (my father and brother) for the help, work, garage space and for putting up with during this somewhat drawn out project
Last edited by ninja; 05/12/2011 00:10.
|
|
|
Re: Bravo 20vt Project (getting pic heavy)- ITS ALIVE!
[Re: ]
#1305847
13/01/2012 10:43
13/01/2012 10:43
|
ninja
Unregistered
|
ninja
Unregistered
|
Not too much progress over the christmas period, but a few niggly bit sorted VDO gauges installed EBC/charge temp/AFR installed Strut brace installed Power steering plumbed in and a few presents new helmet jerry cans but most importantly, i collected a trailor and ordered a tow bar this means i can get it to fleas for mapping i think im going to have to make up a new radiator support bar to move the rad forward slightly, only about 20cm or so but it all helps Ninja
|
|
|
Re: Bravo 20vt Project (getting pic heavy)- ITS ALIVE!
[Re: ]
#1313328
03/02/2012 13:19
03/02/2012 13:19
|
ninja
Unregistered
|
ninja
Unregistered
|
Well i modified the rad support, and added extra intercooler support brackets while i was at it. also modified some of the intercooler pipework to get the bumper back on without trimming. I actually had the car booked in for mapping today, but the car has developed a perculiar fault (as per my technical issues thread). After spending all day last sat checking everything i could think of, and even a visit from JBT (in what is now an awesome coupe) on a cold saturday night (now thats what i call service  ) unfortunately we did not come to a conclusion, so it has had to be postponed  Further investigation is required, and hopefully it will be something simple and she will be booked back in soon... Ninja
|
|
|
Re: Bravo 20vt Project (getting pic heavy)- ITS ALIVE!
[Re: ]
#1314888
08/02/2012 16:46
08/02/2012 16:46
|
johnnybravoturbo
Unregistered
|
johnnybravoturbo
Unregistered
|
great stuff.Well done Rich.
|
|
|
Re: Bravo 20vt Project (getting pic heavy)- ITS ALIVE!
[Re: ]
#1315111
09/02/2012 10:07
09/02/2012 10:07
|
ninja
Unregistered
|
ninja
Unregistered
|
cheers john, and thanks again problem solved - bad earth so back on track (or i will be soon ) ninja
|
|
|
|